CDKを利用してAWSで定期的に起動するパイプラインを構築する
Back to Topはじめに
#リポジトリへのプッシュをトリガーとして動作するパイプラインは広く利用されています。
プッシュトリガーで起動するのでは実行頻度として高すぎるアクションをそのまま実行しているパイプランも多く存在します。
定期的に実行されるパイプラインは、より良いCI/CD環境を構築・運用するために、今後必要性が注目さていくと感じております。
本記事では、Amazon EventBridge SchedulerとCodePipelineを利用して、定期的に実行されるパイプラインをAWS CDKで構築する方法を説明させていただきます。
環境構築
#今回は、TypeScriptでCDKを利用していますので、Node.jsがインストールされている環境を前提としています。
CDKのインストール
#CDKをインストールします。
npm install -g aws-cdk
CDKのバージョンを確認します。
cdk --version
執筆時点で利用したバージョンは2.103.1です。バージョン非互換で動作しない場合は、2.103.1をインストールしてください。
CodeCommitリポジトリの作成
#作成するパイプラインに連関付けるリポジトリを作成します。
aws codecommit create-repository --repository-name ScheduledPipelineSourceRepo
デフォルトブランチ(main)に何らかのファイルを登録してください。登録していない場合、パイプラインのソースアクションが失敗します。
CDKプロジェクトの作成
#プロジェクトを格納するディレクトリを作成しcdk initコマンドを実行します。
mkdir scheduled-pipeline && cd scheduled-pipeline
cdk init sample-app --language typescript
スタックの実装
#定期的に起動するパイプラインのサンプル実装ですので、内部処理は不要ですが、CDKでパイプラインを構築するためのサンプルとしても利用可能な事を目指し、アーティファクトの出力と参照処理を実装しております。
./lib/scheduled-pipeline-stack.tsに処理を実装
#scheduled-pipeline-stack.tsを以下のように書き換えてください。
各処理の詳細は後ほど説明させていただきます。
import {Fn, Stack, StackProps} from 'aws-cdk-lib';
import * as codepipeline from 'aws-cdk-lib/aws-codepipeline';
import * as codepipeline_actions from 'aws-cdk-lib/aws-codepipeline-actions';
import * as codecommit from 'aws-cdk-lib/aws-codecommit';
import * as codebuild from 'aws-cdk-lib/aws-codebuild';
import {Construct} from 'constructs';
import {aws_scheduler as scheduler , CfnOutput } from 'aws-cdk-lib';
import {aws_iam} from 'aws-cdk-lib';
import {Pipeline} from 'aws-cdk-lib/aws-codepipeline';

export class ScheduledCodePipelineStack extends Stack {
    constructor(scope: Construct, id: string, props?: StackProps) {
        super(scope, id, props);

        const pipeline = this.createPipeline();
        const pipeLineExecutionRole = this.createPipeLineExecutionRole(pipeline.pipelineArn);
        this.createSchedule(pipeline.pipelineArn, pipeLineExecutionRole.roleArn);
    }

    private createPipeline(): Pipeline {
        // パイプラインを作成
        const pipeline = new codepipeline.Pipeline(this, 'scheduledPipeLine', {
            crossAccountKeys: false
        });

        // パイプラインに連関付けるリポジトリを宣言、ScheduledPipelineSourceRepoは既に作成されているリポジトリ
        const sourceRepo = codecommit.Repository.fromRepositoryName(this, 'ScheduledPipelineSourceRepo', 'ScheduledPipelineSourceRepo') as codecommit.Repository;
        // パイプラインのソースアクションで取得したリポジトリの中身を格納するアーティファクトを定義
        const sourceOutput = new codepipeline.Artifact();

        // パイプラインにソースアクションを定義
        // sourceRepoから取得したソース一式をsourceOutputに格納
        pipeline.addStage({
            stageName: 'Source',
            actions: [
                new codepipeline_actions.CodeCommitSourceAction({
                    actionName: 'CodeCommitSourceSampleAction',
                    repository: sourceRepo,
                    output: sourceOutput,
                    branch: 'main',
                    trigger: codepipeline_actions.CodeCommitTrigger.NONE,
                }),
            ],
        });

        // パイプラインのBuildステージで実行するCodeBuildのプロジェクトを定義
        const buildProject = new codebuild.PipelineProject(this, `BuildSampleProject`, {
            buildSpec: codebuild.BuildSpec.fromObject({
                version: '0.2',
                phases: {
                    build: {
                        commands: [
                            'echo BuildSampleProject started on `date "+%Y/%m/%d %H:%M:%S"`',
                            'mkdir $CODEBUILD_SRC_DIR/output',
                            'touch $CODEBUILD_SRC_DIR/output/result_file_`date "+%Y_%m_%d_%H_%M_%S"`.txt',
                            `ls -l -R $CODEBUILD_SRC_DIR`
                        ],
                    },
                },
                artifacts: {
                    'base-directory': '$CODEBUILD_SRC_DIR/output',
                    'files': '**/*'
                },
            })
        });

        // パイプラインのDeployステージで実行するCodeBuildのプロジェクトを定義
        const deployProject = new codebuild.PipelineProject(this, `DeploySampleProject`, {
            buildSpec: codebuild.BuildSpec.fromObject({
                version: '0.2',
                phases: {
                    build: {
                        commands: [
                            'echo DeploySampleProject started on `date "+%Y/%m/%d %H:%M:%S"`',
                            ,'ls -l'
                        ],
                    },
                },
            })
        });

        // パイプラインのBuildステージの成果物の格納先を定義
        const buildOutput = new codepipeline.Artifact();

        // buildProjectをパイプラインに紐づける
        pipeline.addStage({
            stageName: 'Build',
            actions: [
                new codepipeline_actions.CodeBuildAction({
                    actionName: 'BuildSampleAction',
                    project: buildProject,
                    input: sourceOutput,
                    outputs: [buildOutput]
                }),
            ],
        });

        // deployProjectをパイプラインに紐づける
        pipeline.addStage({
            stageName: 'Deploy',
            actions: [
                new codepipeline_actions.CodeBuildAction({
                    actionName: 'DeploySampleAction',
                    project: deployProject,
                    input: buildOutput
                }),
            ],
        });

        return pipeline;
    }

    private createPipeLineExecutionRole(pipelineArn: string): aws_iam.Role {
        return new aws_iam.Role(this, 'pipeLineExecutionRole', {
            assumedBy: new aws_iam.ServicePrincipal('scheduler.amazonaws.com'),
            managedPolicies: [
                new aws_iam.ManagedPolicy(this, 'pipeLineExecutionRolePolicy', {
                    statements: [
                        new aws_iam.PolicyStatement({
                            effect: aws_iam.Effect.ALLOW,
                            actions: ['codepipeline:StartPipelineExecution'],
                            resources: [pipelineArn],
                        })
                    ],
                }),
            ],
        });
    }


    private createSchedule(pipelineArn: string, pipeLineExecutionRoleArn: string) {
        new scheduler.CfnSchedule(this, 'ExecPipelineSchedule', {
            flexibleTimeWindow: {
                // フレックスタイムウィンドウを利用しないので「OFF」
                mode: 'OFF',
            },
            // 毎日 9時30分に起動するスケジュール
            scheduleExpression: 'cron(30 09 * * ? *)',
            target: {
                // 起動対象は作成したパイプライン
                arn: pipelineArn,
                roleArn: pipeLineExecutionRoleArn,
            },
            name: 'pipelineExecutionSchedule',
            // タイムゾーン未指定だとUTCとなるので'Asia/Tokyo'を指定
            scheduleExpressionTimezone: 'Asia/Tokyo',
        });
    }

}
パイプラインの作成部分の説明
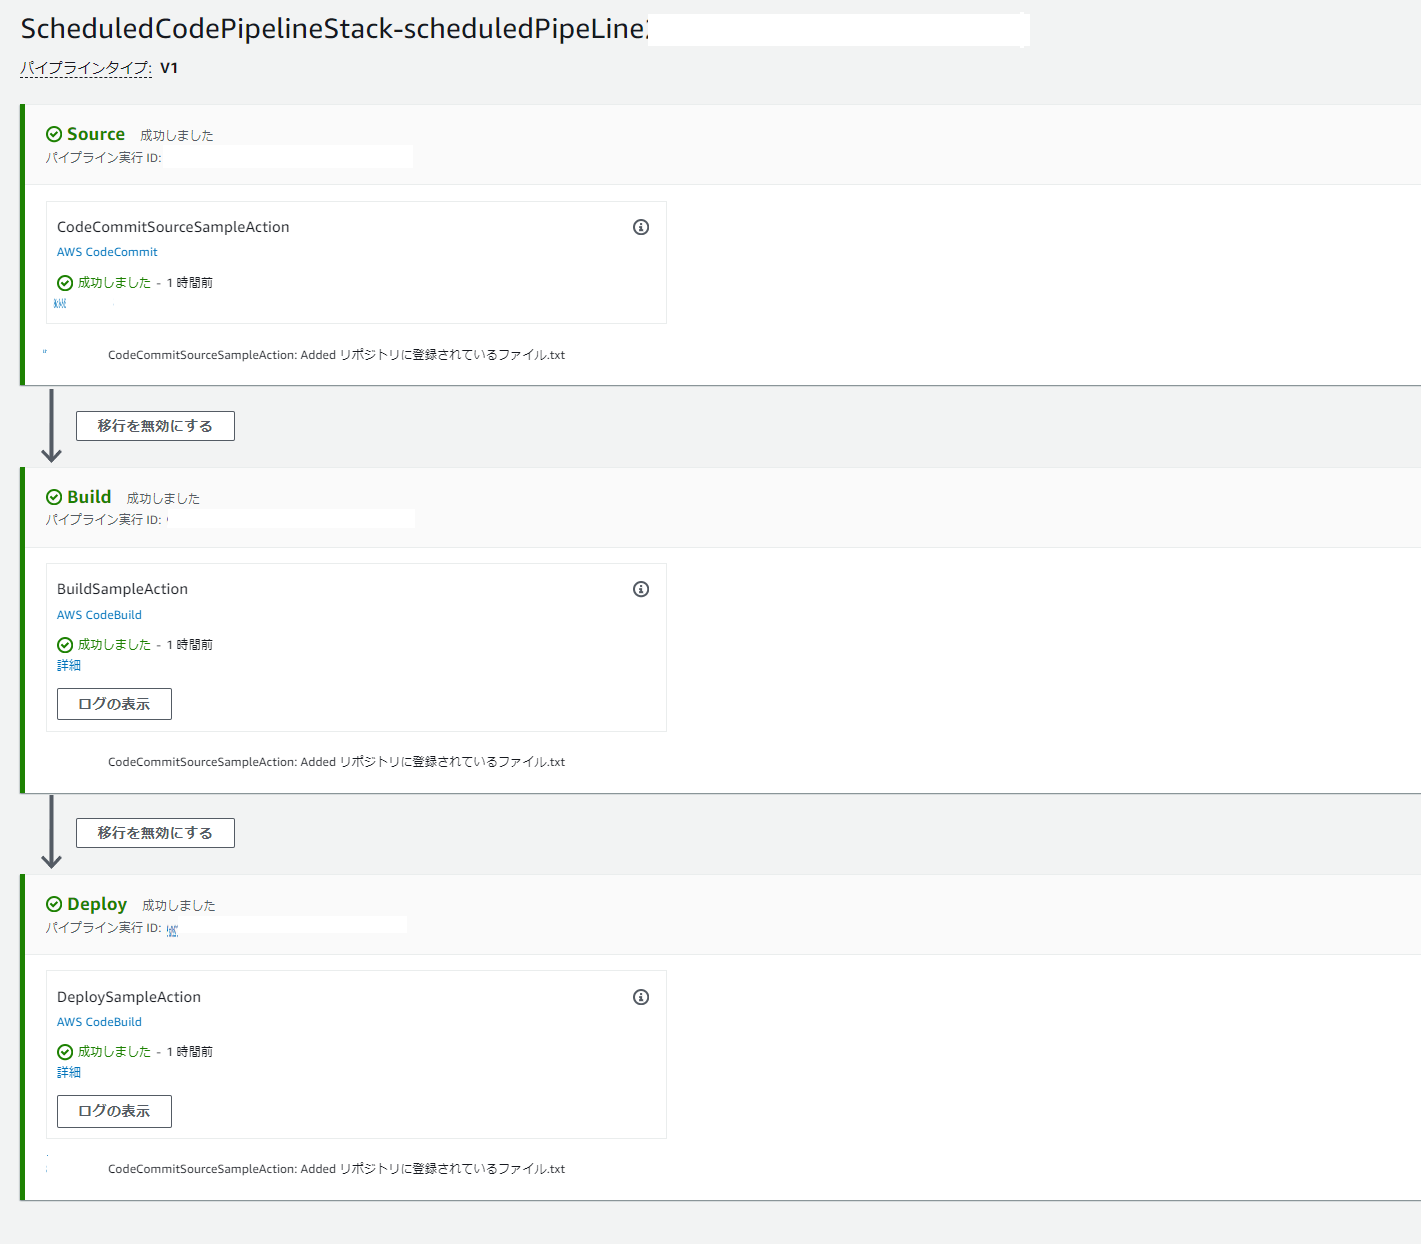
#作成するパイプラインの概要
Source、Build、Deployのステージを持つパイプラインとなります。
パイプラインの作成処理
名前がscheduledPipeLineのパイプラインを定義します。
        const pipeline = new codepipeline.Pipeline(this, 'scheduledPipeLine', {
            crossAccountKeys: false
        });
crossAccountKeys: falseは、パイプラインのアーティファクトを格納するS3のサーバサイド暗号化キーを「AWS マネージドキー」に変更する設定です。
crossAccountKeysを明示的に指定しない場合は、「カスタマーマネージドキー」が自動的に作成され、1カ月はスタックが削除できなくなります。詳細は「カスタマーマネージドキーの削除待機期間について」を参照ください。
「カスタマーマネージドキー」と 「AWS マネージドキー」の詳細については、カスタマーキーと AWS キーを参照ください。
パイプラインのSourceステージの設定
パイプラインですので、インプットとなるソース(リポジトリ)の設定が必要です。
CodeCommitの作成済みのリポジトリScheduledPipelineSourceRepoをソースとして設定します。
        // パイプラインに関連付けるリポジトリを宣言、ScheduledPipelineSourceRepoは既に作成されているリポジトリ
        const sourceRepo = codecommit.Repository.fromRepositoryName(this, 'ScheduledPipelineSourceRepo', 'ScheduledPipelineSourceRepo') as codecommit.Repository;
        // パイプラインのソースアクションで取得したリポジトリの中身を格納するアーティファクトを定義
        const sourceOutput = new codepipeline.Artifact();

        // パイプラインにソースアクションを定義
        // sourceRepoから取得したソース一式をsourceOutputに格納
        pipeline.addStage({
            stageName: 'Source',
            actions: [
                new codepipeline_actions.CodeCommitSourceAction({
                    actionName: 'CodeCommitSourceSampleAction',
                    repository: sourceRepo,
                    output: sourceOutput,
                    branch: 'main',
                    trigger: codepipeline_actions.CodeCommitTrigger.NONE,
                }),
            ],
        });
一般的なパイプラインは、リポジトリへのプッシュをトリガーとして起動するので、CDKでパイプラインを作成すると自動的にトリガーが有効になります。
今回はAmazon EventBridge Schedulerからのみ起動したいので、Sourceステージのactionsでtrigger: codepipeline_actions.CodeCommitTrigger.NONEをセットしています。
パイプラインのBuildステージの設定
echoで実行時刻を標準出力に出力し、仮想的なビルド成果物を$CODEBUILD_SRC_DIR/outputに出力しています。
        // パイプラインのBuildステージで実行するCodeBuildのプロジェクトを定義
        const buildProject = new codebuild.PipelineProject(this, `BuildSampleProject`, {
            buildSpec: codebuild.BuildSpec.fromObject({
                version: '0.2',
                phases: {
                    build: {
                        commands: [
                            'echo BuildSampleProject started on `date "+%Y/%m/%d %H:%M:%S"`',
                            'mkdir $CODEBUILD_SRC_DIR/output',
                            'touch $CODEBUILD_SRC_DIR/output/result_file_`date "+%Y_%m_%d_%H_%M_%S"`.txt',
                            `ls -l -R $CODEBUILD_SRC_DIR`
                        ],
                    },
                },
                artifacts: {
                    'base-directory': '$CODEBUILD_SRC_DIR/output',
                    'files': '**/*'
                },
            })
        });
buildProjectをパイプラインのBuildステージに追加するのが以下のコードとなります。
        // buildProjectをパイプラインに紐づける
        pipeline.addStage({
            stageName: 'Build',
            actions: [
                new codepipeline_actions.CodeBuildAction({
                    actionName: 'BuildSampleAction',
                    project: buildProject,
                    input: sourceOutput,
                    outputs: [buildOutput]
                }),
            ],
        });
パイプラインのDeployステージの設定
Deploy処理は、echoで実行時刻を標準出力に出力し、CodeBuildActionのinputで指定されたディレクトリのファイルリストを出力しています。
        // パイプラインのDeployステージで実行するCodeBuildのプロジェクトを定義
        const deployProject = new codebuild.PipelineProject(this, `DeploySampleProject`, {
            buildSpec: codebuild.BuildSpec.fromObject({
                version: '0.2',
                phases: {
                    build: {
                        commands: [
                            'echo DeploySampleProject started on `date "+%Y/%m/%d %H:%M:%S"`',
                            ,'ls -l'
                        ],
                    },
                },
            })
        });
deployProjectをパイプラインのDeployステージに追加するのが以下のコードとなります。
        // deployProjectをパイプラインに紐づける
        pipeline.addStage({
            stageName: 'Deploy',
            actions: [
                new codepipeline_actions.CodeBuildAction({
                    actionName: 'DeploySampleAction',
                    project: deployProject,
                    input: buildOutput
                }),
            ],
        });
input: buildOutputで指定しているのはbuildOutputで、buildProjectのCodeBuildActionのoutputsで指定したbuildOutputと同じオブジェクトです。
buildProjectの実行ログは以下のようになります。
ScheduledPipelineSourceRepoのデフォルトブランチのルートに「リポジトリに登録されているファイル.txt」が登録されている状態で動作した時のログとなります。
[Container] 2023/10/27 08:18:21.554852 Running command echo BuildSampleProject started on `date "+%Y/%m/%d %H:%M:%S"`
BuildSampleProject started on 2023/10/27 08:18:21

[Container] 2023/10/27 08:18:21.562679 Running command mkdir $CODEBUILD_SRC_DIR/output

[Container] 2023/10/27 08:18:21.568056 Running command touch $CODEBUILD_SRC_DIR/output/result_file_`date "+%Y_%m_%d_%H_%M_%S"`.txt

[Container] 2023/10/27 08:18:21.575371 Running command ls -l -R $CODEBUILD_SRC_DIR
/codebuild/output/src3287704453/src:
total 0
drwxr-xr-x 2 root root 49 Oct 27 08:18 output
-rw-r--r-- 1 root root  0 Oct 27 08:18 リポジトリに登録されているファイル.txt

/codebuild/output/src3287704453/src/output:
total 0
-rw-r--r-- 1 root root 0 Oct 27 08:18 result_file_2023_10_27_08_18_21.txt
deployProjectの実行ログは以下のようになります。
[Container] 2023/10/27 08:19:31.520871 Running command echo DeploySampleProject started on `date "+%Y/%m/%d %H:%M:%S"`
DeploySampleProject started on 2023/10/27 08:19:31

[Container] 2023/10/27 08:19:31.526980 Running command ls -l
total 0
-rw-r--r-- 1 root root 0 Oct 27 08:18 result_file_2023_10_27_08_18_21.txt
buildProjectの出力設定であるartifactsは
artifacts: {
    'base-directory': '$CODEBUILD_SRC_DIR/output',
    'files': '**/*'
}
と指定しているので、deployProject動作時のカレントディレクトリには'touch $CODEBUILD_SRC_DIR/output/result_file_`date "+%Y_%m_%d_%H_%M_%S"`.txt'で作成されたファイルのみが含まれます。
パイプラインを起動するロールの作成
#Amazon EventBridge Schedulerで何らかの処理を起動する場合は、起動用のロールが必要となります。
作成するロールの要件は、Amazon EventBridge Schedulerから、作成したパイプラインを起動できる権限を有する事となります。
AWSのロールの定義の具体的なイメージで表現すると、ServicePrincipal:'scheduler.amazonaws.com'から作成したパイプラインに対してcodepipeline:StartPipelineExecutionアクションを実行可能となります。
これをCDKのコードで表現すると以下のようになります。
pipelineArnは作成したパイプラインのARN(pipeline.pipelineArn)を指定しています。
        const pipeLineExecutionRole  = new aws_iam.Role(this, 'pipeLineExecutionRole', {
            assumedBy: new aws_iam.ServicePrincipal('scheduler.amazonaws.com'),
            managedPolicies: [
                new aws_iam.ManagedPolicy(this, 'pipeLineExecutionRolePolicy', {
                    statements: [
                        new aws_iam.PolicyStatement({
                            effect: aws_iam.Effect.ALLOW,
                            actions: ['codepipeline:StartPipelineExecution'],
                            resources: [pipelineArn],
                        })
                    ],
                }),
            ],
        });
作成したパイプラインを起動するスケジュールの登録
#private createSchedule(pipelineArn: string, pipeLineExecutionRoleArn: string) {
new scheduler.CfnSchedule(this, 'ExecPipelineSchedule', {
flexibleTimeWindow: {
// フレックスタイムウィンドウを利用しないので「OFF」
mode: 'OFF',
},
// 毎日 9時30分に起動するスケジュール
scheduleExpression: 'cron(30 09 * * ? *)',
target: {
// 起動対象は作成したパイプライン
arn: pipelineArn,
roleArn: pipeLineExecutionRoleArn,
},
name: 'pipelineExecutionSchedule',
// タイムゾーン未指定だとUTCとなるので'Asia/Tokyo'を指定
scheduleExpressionTimezone: 'Asia/Tokyo',
});
}
scheduleExpression以外の説明はコード内のコメントで十分と思います。
scheduleExpressionには、「特定の時間に実行」もしくは、「一定の間隔で実行」を意味する文字列が指定可能です。
scheduleExpressionに指定する値の詳細は、スケジュールに従って実行する Amazon EventBridge ルールの作成スケジュール スケジュールパターンを定義するにはを参照ください。
デプロイ
#以下のコマンドを実行し、AWSにデプロイします。
cdk bootstrap
cdk deploy
cdk bootstrapコマンドは、CDKがデプロイ時に使用するS3バケットなどを作成するコマンドです。
対象アカウント、対象リージョン毎に1回だけ実行する必要があります。
cdk deployコマンドの実行にはおよそ3分の時間を要します。
AWS マネジメントコンソールの表示イメージ
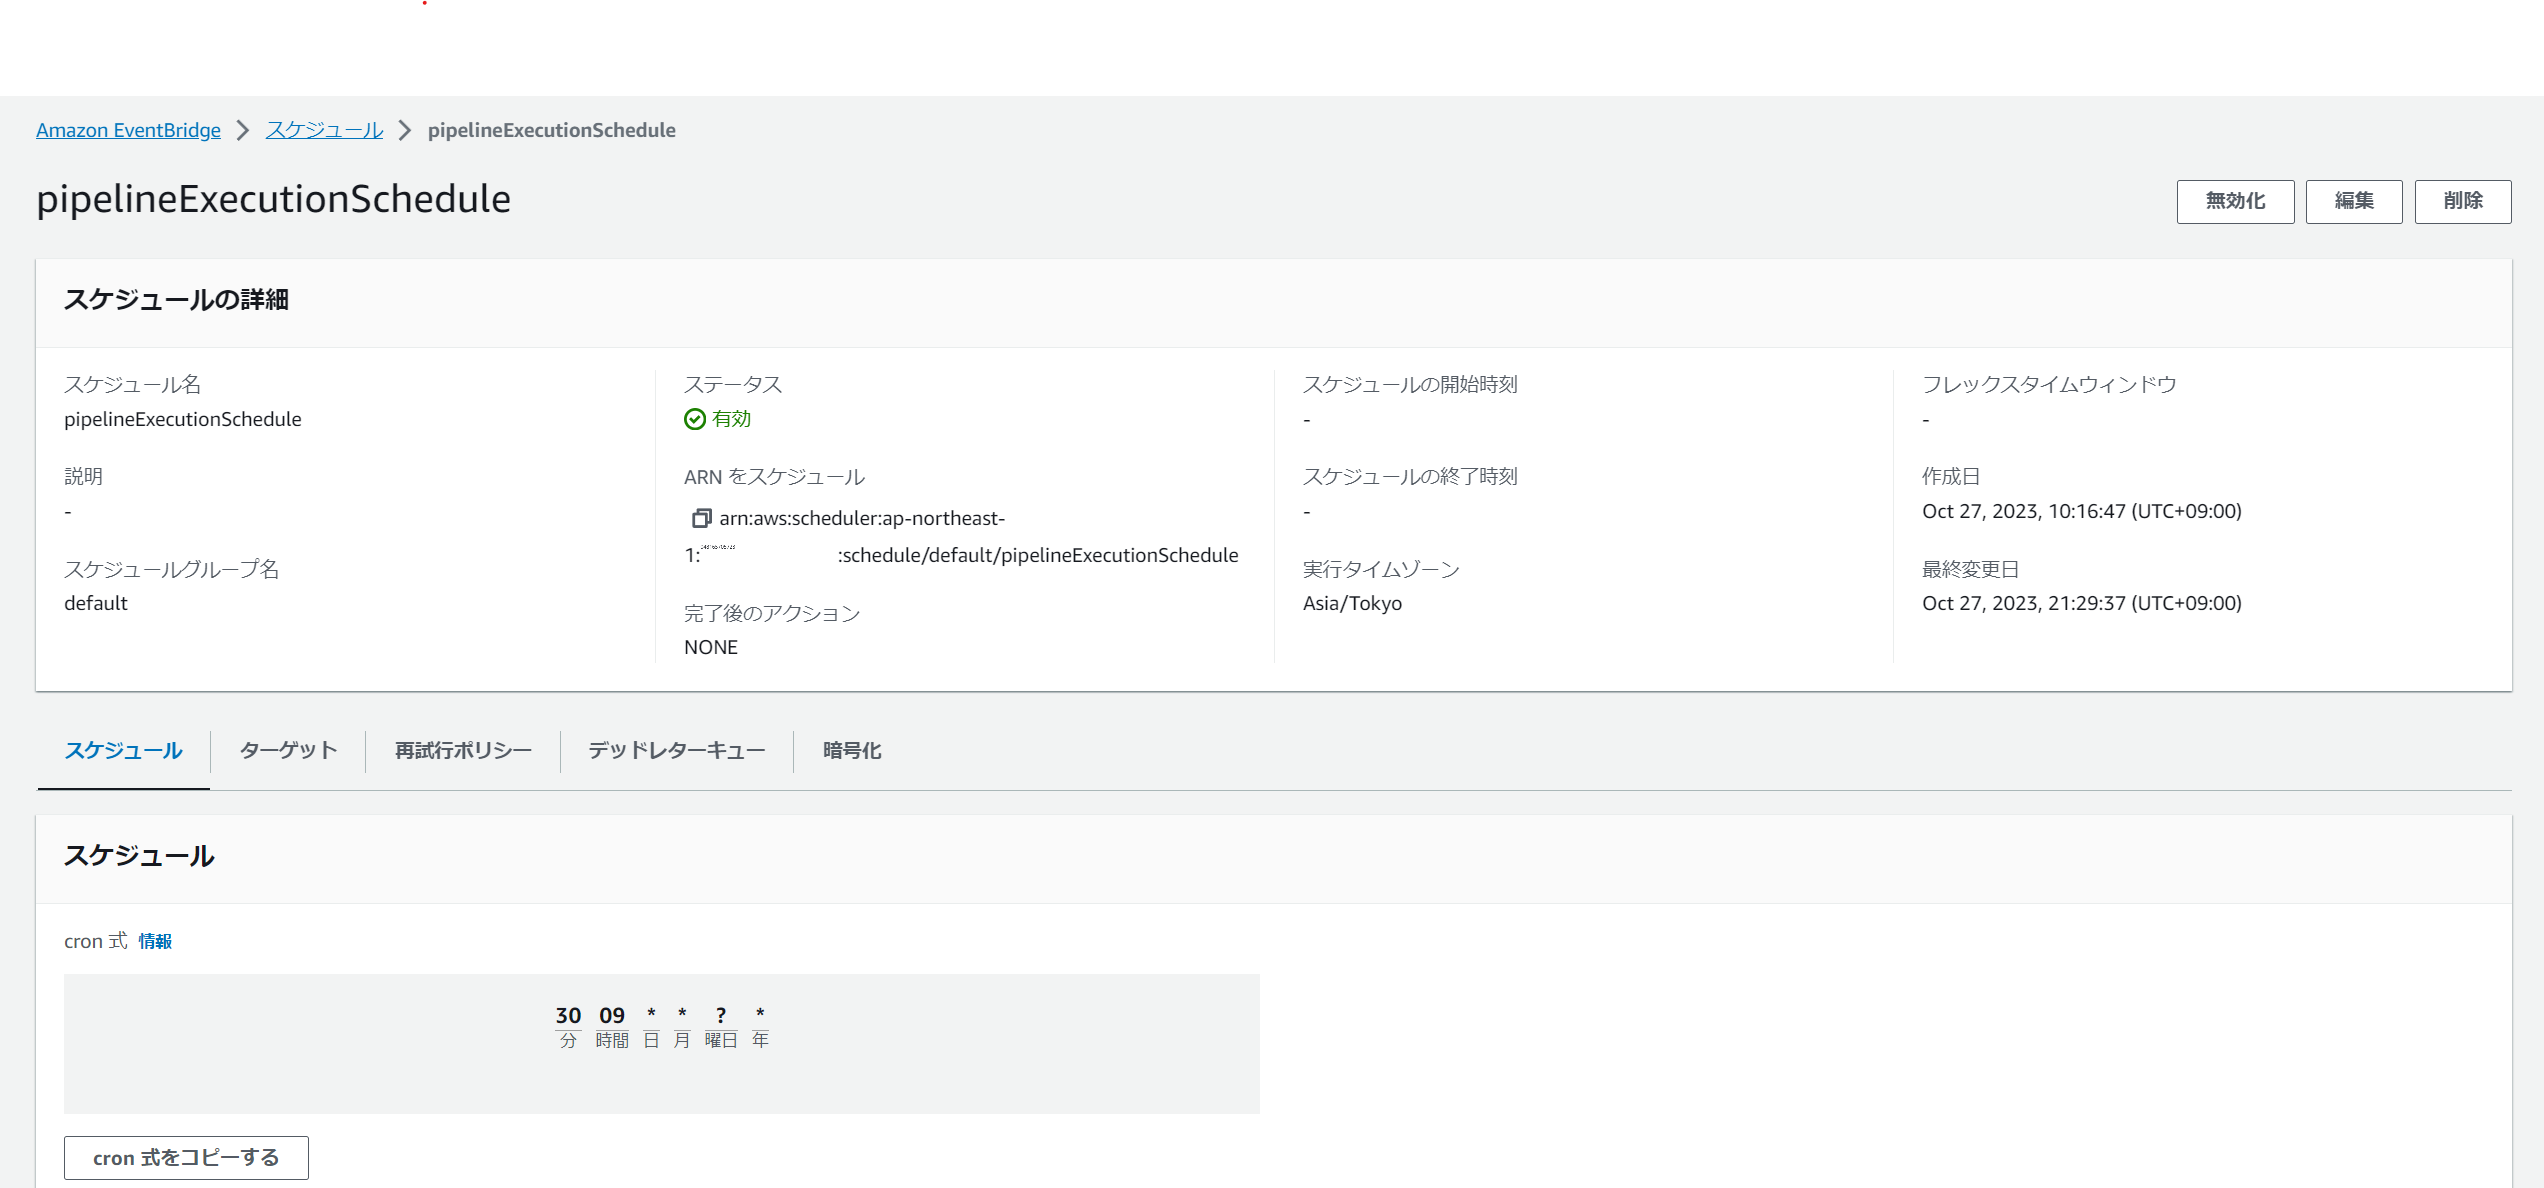
#実際に登録されたスケジュールは以下のようになります。
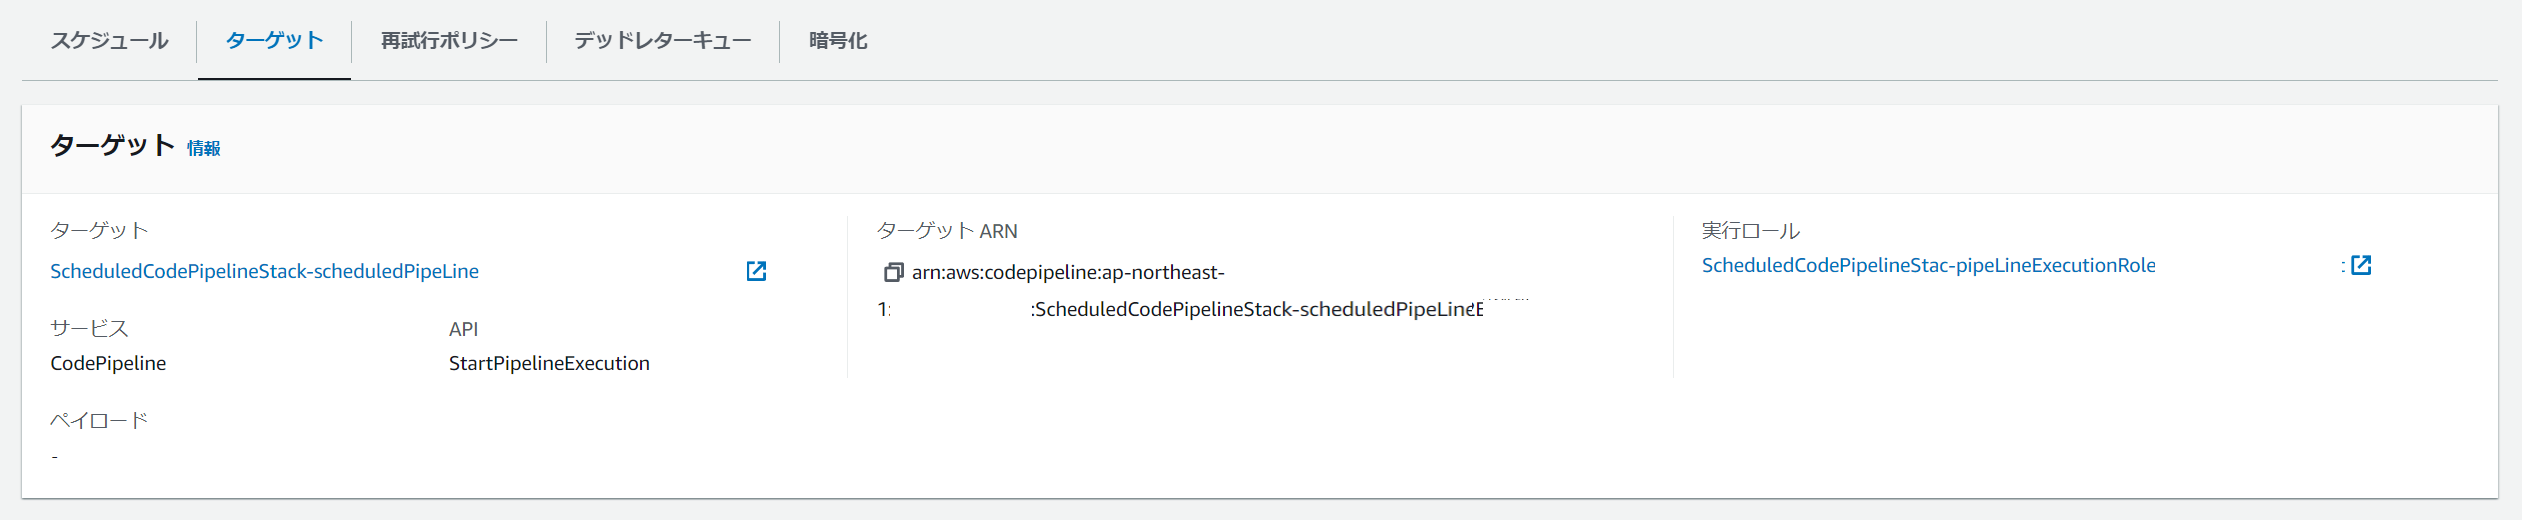
スケジュールのターゲット設定は以下のようになります。
まとめ
#定期的に起動するパイプラインをCDKを用いて構築する方法について説明させていただきました。
パイプラインの中身も、実際に利用する場面を想定して3ステージ構成となっておりますので、パイプラインを構築する際のテンプレートとして利用いただければ幸いです。