Infrastructure Construction for Sales Support System with IaC
Back to TopTo reach a broader audience, this article has been translated from Japanese.
You can find the original version here.
Introduction
#This article introduces the steps to construct the infrastructure for the Sales Support System (SSS) using Terraform with a configuration of API Gateway + CloudMap + ECS (Fargate).
Background
#Due to the following maintainability issues, we decided to migrate the AWS container environment from EKS to ECS. Fargate usage has been continued.
- Among AWS services, EKS incurred the highest cost. By migrating to ECS, we could save enough to cover the SaaS usage fees we were considering at the time.
- Kubernetes, the foundation of EKS, requires updates at least once a year.
- Middleware (HELM) updates on EKS are not notified by AWS, so we had to check them ourselves.
- The high frequency of Kubernetes updates made it difficult to keep up.
- Many APIs, including alpha and beta versions, are present in Kubernetes, and incompatible updates are common.
- The SSS development team lacked Kubernetes expertise, which is often cited as a reason to use EKS.
- The team was already overwhelmed with catching up on AWS itself, as they were unfamiliar with it.
Here is a comparison table of the main elements of EKS and ECS.
| Element | ECS | EKS |
|---|---|---|
| Control Plane | ECS | AWS Managed |
| Data Plane | EC2/Fargate | EC2/Fargate |
| Integration with Other AWS Services | High | Low |
| Features | Fewer | Richer |
| Kubernetes Tools | Not Available | Available |
| Definition Files | Task Definition | Manifest |
| Cost | Free | 0.1USD/hr |
| Release Cycle | None | About 3 months |
| Support Period | None | About 1 year |
| Minimum Execution Unit | Task | Pod |
| Intra-Cluster Communication | Route53+CloudMap | Service |
| External Communication/Inbound | Separate Setup | Ingress |
| Environment Variables | Yes | Yes |
| Secret | Yes | Yes |
| Cron | Out of Task Definition Scope | Defined in Manifest |
| CICD for Definition Files | None | GitOps |
| Scheduled Tasks | Available | Not Available |
| Cluster Creation Speed | About 2 seconds | About 5 to 10 minutes |
CloudMap vs ALB vs NLB
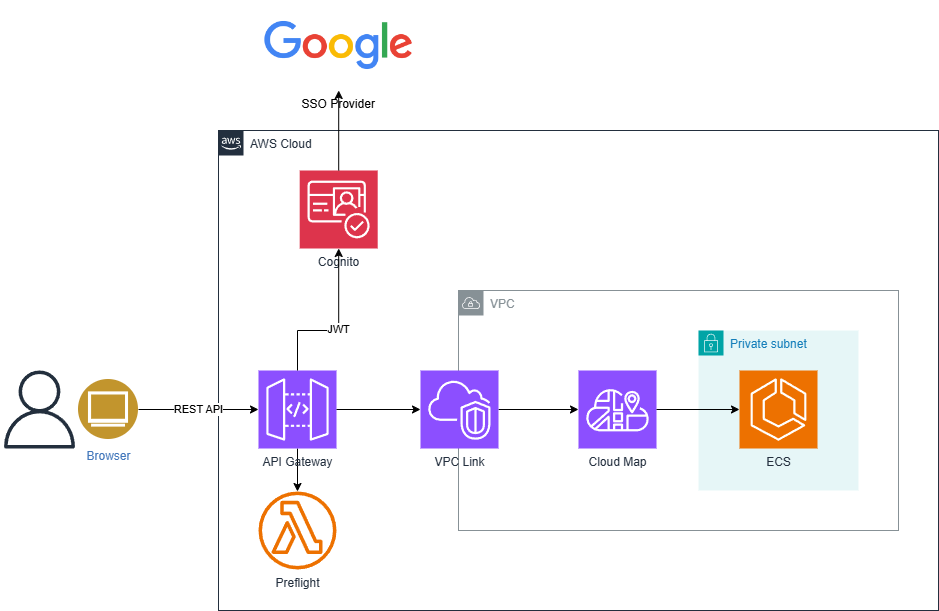
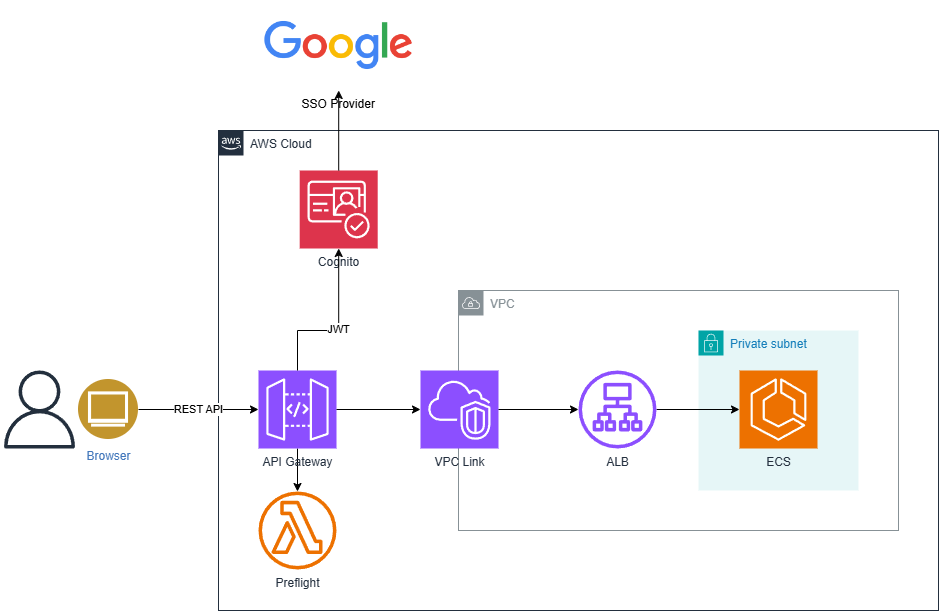
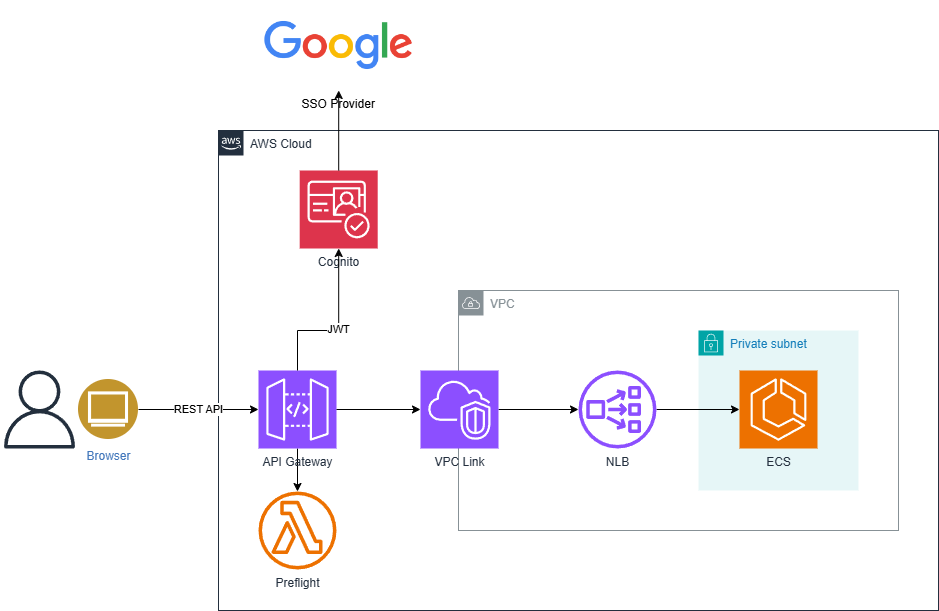
#Since AWS API Gateway was already decided for use, we investigated and implemented the following three AWS services for the configuration behind the API Gateway and compared them.
- Using CloudMap
- Using Application Load Balancer (ALB)
- Using Network Load Balancer (NLB)
Below is the actual comparison[1]. We assigned points (3 for ◯, 2 for △, and 1 for ×) and adopted the one with the highest score.
| Service | Cost | Knowledge | Features | Inter-Service Communication | Integration | Points | Result |
|---|---|---|---|---|---|---|---|
| CloudMap | ◯ | × | ◯ Mapper for Microservices | ◯ Likely Possible | △ HTTP | 12 | Adopted! |
| ALB | × | ◯ | ◯ Layer 7. Richer features than NLB | △ Unknown? | △ HTTP | 11 | |
| NLB | △ | ◯ | × Layer 4. For high-performance needs | △ Unknown? | ◯ REST/HTTP | 11 |
As a result, the following configuration was chosen for SSS:
- AWS API Gateway
- AWS CloudMap
- AWS ECS on Fargate
Prerequisites for Construction
#The existing infrastructure, including VPC, subnets, and Google SSO authentication via Cognito, was reused. Therefore, the construction steps introduced here assume the following:
- The following are already constructed/prepared:
- VPC
- Private Subnet
- Cognito
- User Pool with Google as a Federated ID Provider
In practice, middleware like RDS and DynamoDB, as well as storage like S3, were also reused.
ECS Construction
#This section reproduces the content of the AWS tutorial[2] using Terraform.
Creating an ECS Cluster
#First, create an ECS cluster. The Terraform code for the ECS cluster is as follows. To make it an ECS cluster for the Fargate launch type, "FARGATE" is specified in capacity_providers. The local. prefix indicates values defined as Terraform local variables.
resource "aws_ecs_cluster" "this" {
  name = local.ecs_cluster_name
}

resource "aws_ecs_cluster_capacity_providers" "this" {
  cluster_name       = aws_ecs_cluster.this.name
  capacity_providers = ["FARGATE"]
}
Creating IAM Roles
#To run applications on ECS, the following two types of IAM roles need to be created:
- ECS Task Execution Role
- A role required to execute defined tasks.
- ECS Task Role
- A role required for the execution of defined applications.
ECS Task Execution Role
#The Terraform code for the ECS Task Execution Role is as follows. The permissions required for general use cases are defined in the AWS-managed policy AmazonECSTaskExecutionRolePolicy, which is attached here. This policy includes permissions for pulling images from ECR and outputting logs to CloudWatch. Additionally, SSS defines permissions for outputting metrics data in an inline policy.
Policies can be either managed or inline. AWS recommends using "managed policies."
resource "aws_iam_role" "ecs_task_exec" {
  name               = local.ecs_task_execution_role_name
  assume_role_policy = data.aws_iam_policy_document.ecs_task_assume_role_policy.json
}

resource "aws_iam_role_policy_attachment" "ecs_task_exec" {
  role       = aws_iam_role.ecs_task_exec.name
  policy_arn = "arn:aws:iam::aws:policy/service-role/AmazonECSTaskExecutionRolePolicy"
}

data "aws_iam_policy_document" "ecs_task_assume_role_policy" {
  statement {
    actions = ["sts:AssumeRole"]

    principals {
      type        = "Service"
      identifiers = ["ecs-tasks.amazonaws.com"]
    }
  }
}

data "aws_iam_policy_document" "cloud_watch_policy" {
  statement {
    actions   = ["cloudwatch:PutMetricData"]
    resources = ["*"]
  }
}

resource "aws_iam_role_policy" "ecs_task_exec_cloud_watch_policy" {
    name   = "${local.prefix}-cloud-watch-policy"
    role   = aws_iam_role.ecs_task_exec.id
    policy = data.aws_iam_policy_document.cloud_watch_policy.json

}

resource "aws_iam_role_policies_exclusive" "ecs_task_exec" {
  role_name = aws_iam_role.ecs_task_exec.name

  policy_names = [
    aws_iam_role_policy.ecs_task_exec_cloud_watch_policy.name
  ]
}
ECS Task Role
#Next, the Task Role is defined. This role is for application execution and must be defined according to the application's requirements. For example, if the application uses DynamoDB, permissions for accessing DynamoDB must be granted to this role. In this case, the application is a simple web application that only returns static pages, so no additional permissions are required. As a sample, the same policy as the Task Execution Role is attached.
resource "aws_iam_role" "mz_dev_app" {
  name               = "${local.app_name}-role"
  assume_role_policy = data.aws_iam_policy_document.ecs_task_assume_role_policy.json
}

resource "aws_iam_role_policy" "cloud_watch_log_policy" {
  name   = "${local.app_name}-cloud-watch-log-policy"
  role   = aws_iam_role.mz_dev_app.id
  policy = data.aws_iam_policy_document.cloud_watch_policy.json
}

resource "aws_iam_role_policies_exclusive" "mz_dev_app" {
  role_name = aws_iam_role.mz_dev_app.name
  policy_names = [
    aws_iam_role_policy.cloud_watch_log_policy.name
  ]
}
Creating ECS Task Definitions
#The ECS Task Definition is the main configuration for applications running on ECS. Various settings for the application can be defined in the ECS Task Definition[3].
- Launch Type
- Docker Image to Use
- Memory and CPU Requirements
- OS
- Docker Networking Mode
- ...
The launch type is specified as "FARGATE". When using the Fargate launch type, the following settings are restricted:
- The network mode must be
awsvpc. - In the container definitions (
container_definitions):- The
hostPortin port mappings (portMappings) must be empty or the same ascontainerPort. - The log configuration specification (
logConfiguration):- The
logDrivermust be one of the following:awslogssplunkawsfirelens
awslogs-stream-prefixis mandatory.
- The
- The
Other restrictions exist, but they are generally intended to ensure Fargate's operation. The log configuration specification uses the awslogs log driver to send container logs to CloudWatch Logs. The cpu and memory specified in the ECS Task Definition represent the total for all containers in the task. It is also possible to define these for each container, but the total values for each container must not exceed the settings in the ECS Task Definition.
resource "aws_ecs_task_definition" "mz_dev_app" {
  family                = "${local.prefix}-site"

  container_definitions = <<EOF
[
    {
        "name": "${local.app_name}",
        "image": "public.ecr.aws/docker/library/httpd:latest",
        "portMappings": [
            {
                "containerPort": 80,
                "hostPort": 80,
                "protocol": "tcp"
            }
        ],
        "essential": true,
        "entryPoint": [
            "sh",
            "-c"
        ],
        "command": [
            "/bin/sh -c \"echo '<html> <head> <title>Amazon ECS Sample App</title> <style>body {margin-top: 40px; background-color: #333;} </style> </head><body> <div style=color:white;text-align:center> <h1>Amazon ECS Sample App</h1> <h2>Congratulations!</h2> <p>Your application is now running on a container in Amazon ECS.</p> </div></body></html>' >  /usr/local/apache2/htdocs/index.html && httpd-foreground\""
        ],
        "logConfiguration": {
            "logDriver": "awslogs",
            "options": {
                "awslogs-group": "${aws_cloudwatch_log_group.mz_dev_app.name}",
                "awslogs-region": "ap-northeast-1",
                "awslogs-stream-prefix": "${local.app_name}"
            }
        }
    }
]
EOF

  execution_role_arn       = aws_iam_role.ecs_task_exec.arn
  task_role_arn            = aws_iam_role.mz_dev_app.arn

  network_mode             = "awsvpc"
  requires_compatibilities = ["FARGATE"]
  cpu                      = var.ecs_task.cpu
  memory                   = var.ecs_task.memory
}
Below is the definition of the CloudWatch log group for the application defined in the ECS Task Definition.
resource "aws_cloudwatch_log_group" "mz_dev_app" {
  name              = "/aws/ecs/fargate/${local.app_name}"
  retention_in_days = var.log_retention_in_days
}
Creating ECS Services
#ECS tasks can be launched standalone, but they are usually launched from ECS services. Standalone ECS tasks are typically used for applications that perform some processing and then stop, such as batch processes.
ECS services define settings related to the tasks to be executed.
- Which cluster to run on
- How many tasks to launch
- Network environment (subnets, security groups, etc.)
- Connection settings with service registries
- Error handling during deployment (circuit breaker)
- ...
Essentially, ECS services define the information necessary for deployment and where to run ECS tasks. ECS Task Definitions define "what to run and how," while ECS Services define "where and how to run."
The service_registry specifies information related to registering the service with the service registry, CloudMap.
resource "aws_ecs_service" "mz_dev_app" {
  name                 = local.app_name
  cluster              = aws_ecs_cluster.this.id
  task_definition      = aws_ecs_task_definition.mz_dev_app.arn
  desired_count        = var.ecs_service.desired_count
  force_new_deployment = true
  launch_type          = "FARGATE"

  network_configuration {
    subnets         = var.private_subnet_ids
    security_groups = [aws_security_group.ecs.id]
  }

  service_registries {
    registry_arn   = aws_service_discovery_service.mz_dev_app.arn
    container_name = local.app_name
    container_port = 80
  }

  deployment_circuit_breaker {
    enable   = true
    rollback = true
  }
}
Creating ECS Security Groups
#Define security groups for applications running on ECS. The inbound rule allows access to the web application on port 80 via TCP. The outbound rule allows all traffic. The actual rules should be tailored to the applications using the ECS cluster.
resource "aws_security_group" "ecs" {
  name   = local.ecs_security_group_name
  vpc_id = var.vpc_id

  ingress {
    from_port   = 80
    to_port     = 80
    protocol    = "tcp"
    cidr_blocks = ["10.0.0.0/16"]
  }

  egress {
    from_port   = 0
    to_port     = 0
    protocol    = "-1"
    cidr_blocks = ["0.0.0.0/0"]
  }
  tags = {
    Name  = "${local.prefix}-ecs-security-group"
  }
}
Constructing CloudMap
#CloudMap is constructed to mediate between the API Gateway and the application.
Creating a Private DNS Namespace
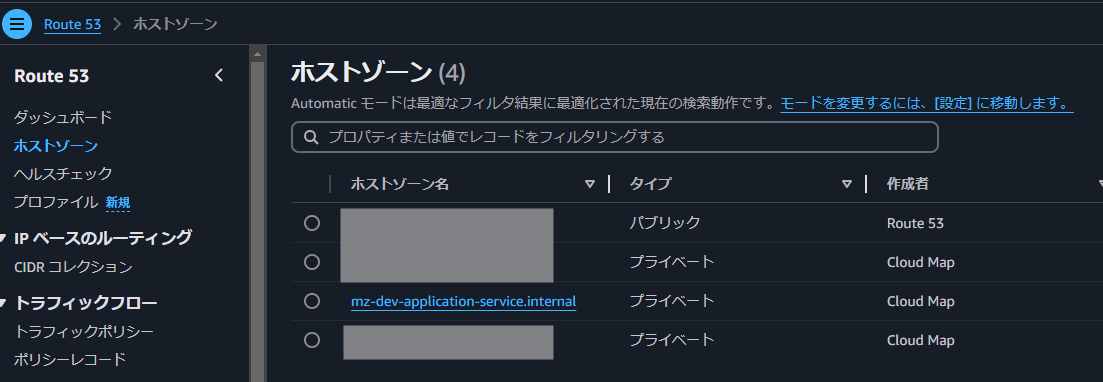
#Define a private DNS namespace for inter-service communication in SSS.
The private DNS namespace name is used for inter-service communication (Service Connect). Therefore, it must comply with the character and length restrictions for DNS names and URLs as specified in RFC. In SSS, _ was used, but due to stricter checks after a library update, a NullPointerException occurred when obtaining the URL. Ultimately, the private DNS namespace name had to be corrected to resolve the error.
resource "aws_service_discovery_private_dns_namespace" "this" {
  name = local.service_discovery_dns_namespace
  vpc  = var.vpc_id
}
You can confirm this in the management console as shown below.
Creating CloudMap Services for Applications
#Define a CloudMap service in the namespace so that the ECS service of the application can be discovered via CloudMap.
For DNS records, the type must be A or SRV for service discovery. In SSS, since the ports differ between Java and Python services, SRV, which allows port specification, is used. Additionally, AWS recommends using HealthCheckCustomConfig for container-level health checks managed by Amazon ECS service discovery[4].
resource "aws_service_discovery_service" "mz_dev_app" {
  name         = local.app_name
  namespace_id = aws_service_discovery_private_dns_namespace.this.id

  dns_config {
    namespace_id = aws_service_discovery_private_dns_namespace.this.id

    dns_records {
      ttl  = 300
      type = "SRV"
    }
  }

  health_check_custom_config {
    failure_threshold = 1
  }
}
Constructing API Gateway
#Finally, construct the API Gateway, which serves as the system's entry point.
Creating an HTTP API
#First, define the type and CORS settings[5] as the basic elements of the API Gateway. For the following reasons, SSS uses the HTTP API type:
- Supports JWT authentication
- Supports integration with CloudMap
- Minimal functionality
- Low cost
When providing RESTful APIs with AWS API Gateway, you can choose between REST API and HTTP API. Generally, HTTP API is more minimal and cost-effective, but for some reason, REST API requires AWS Lambda for JWT validation. Integration with backends also varies, as ALB and CloudMap are not supported in REST API. Choose based on the AWS service configuration you use.
Simply configuring CORS in the API Gateway enables responses to preflight OPTIONS requests[6]. The HTTP status code returned is 204.
resource "aws_apigatewayv2_api" "this" {
  name          = "${local.prefix}-api-gateway"

  protocol_type = "HTTP"

  cors_configuration {
    allow_origins     = var.allow_origins
    allow_headers     = ["authorization", "origin", "content-type", "accept", "x-requested-with"]
    allow_methods     = ["GET", "POST", "DELETE", "PUT"]
    allow_credentials = true
    max_age           = var.cors_max_age
  }
}
Creating a Stage
#In AWS API Gateway, a stage is a logical element for managing the API lifecycle (e.g., versions or environments). In SSS, REST API is used for communication between the UI and backend, but since there are no plans to publish the API, version management is not performed. Additionally, environments differ by AWS account and domain name. For these reasons, only the default stage ($default) is used.
Stages need to be deployed, but since only the default stage is used, auto-deployment is enabled.
Other settings include logging. The format in access_log_settings specifies the items to be output.
resource "aws_apigatewayv2_stage" "this" {
  name        = "$default"

  api_id      = aws_apigatewayv2_api.this.id
  auto_deploy = true

  access_log_settings {
    destination_arn = aws_cloudwatch_log_group.api_gateway.arn
    format          = jsonencode({
      requestId      = "$context.requestId"
      ip             = "$context.identity.sourceIp"
      requestTime    = "$context.requestTime"
      httpMethod     = "$context.httpMethod"
      routeKey       = "$context.routeKey"
      path           = "$context.path"
      status         = "$context.status"
      protocol       = "$context.protocol"
      responseLength = "$context.responseLength"
      errMsg         = "$context.integrationErrorMessage"
    })
  }
}
Below is the definition of the CloudWatch log group for the $default stage of the API Gateway.
resource "aws_cloudwatch_log_group" "api_gateway" {
  name              = "/aws/api-gateway/mz-dev"
  retention_in_days = var.log_retention_in_days
}
Creating a VPC Link
#Create a VPC link to establish a private integration from the HTTP API route to private resources within the VPC.
resource "aws_apigatewayv2_vpc_link" "this" {
  name               = "${local.prefix}-vpc-link"
  security_group_ids = [var.default_security_group_id]
  subnet_ids         = var.private_subnet_ids
}
Creating an Integration
#Create an integration to connect the HTTP API route to the backend service.
For private integration in HTTP API, the integration_type must be HTTP_PROXY. Since this is an integration using CloudMap service discovery, the application's CloudMap service is specified in integration_uri. The integration_method is set to ANY, which is generally used, although GET alone would suffice for the sample application. Since the connection is via a VPC link, the connection_type is set to VPC_LINK, and the ID of the previously defined VPC link is specified in connection_id.
resource "aws_apigatewayv2_integration" "mz_dev_app" {
  api_id             = aws_apigatewayv2_api.this.id

  integration_type   = "HTTP_PROXY"
  integration_uri    = aws_service_discovery_service.mz_dev_app.arn
  integration_method = "ANY"

  connection_type    = "VPC_LINK"
  connection_id      = aws_apigatewayv2_vpc_link.this.id
}
Creating an Authorizer
#Create a JWT authorizer using an existing mechanism that integrates with Cognito for JWT authentication[7]. Since JWT is used, the authorizer_type is naturally set to JWT. In jwt_configuration, specify the Cognito user pool client ID and user pool endpoint.
resource "aws_apigatewayv2_authorizer" "jwt_authorizer" {
  name             = "${local.prefix}-jwt-authorizer"

  api_id           = aws_apigatewayv2_api.this.id
  authorizer_type  = "JWT"
  identity_sources = ["$request.header.Authorization"]

  jwt_configuration {
    audience = var.user_pool_client_ids
    issuer   = "https://${var.cognito_user_pool_endpoint}"
  }
}
Creating Routes for the Application
#Finally, define the URL path and HTTP method pairs for the application API, specifying which authorizer and integration to route to.
For the sample application, the URL path is /, and the HTTP method is GET only. The following Terraform code uses for_each to handle multiple HTTP methods if defined. In route_key, each.key specifies individual HTTP methods defined in var.ecs_service.http_methods. The integration is specified in target, and the authorizer is specified in authorizer_id.
resource "aws_apigatewayv2_route" "mz_dev_app" {
  for_each = var.ecs_service.http_methods
  api_id             = aws_apigatewayv2_api.this.id
  route_key          = "${each.key} /{proxy+}"
  target             = "integrations/${aws_apigatewayv2_integration.mz_dev_app.id}"
  authorizer_id      = aws_apigatewayv2_authorizer.jwt_authorizer.id
  authorization_type = "JWT"
}
External Inputs
#Existing AWS resource IDs and other inputs are defined as Terraform variable[8]. Below is a table of variables, types, default values, and descriptions. For variables with the type object, details are provided in separate tables.
| Variable Name | Type | Default Value | Description |
|---|---|---|---|
vpc_id |
string |
VPC ID | |
default_security_group_id |
string |
Default Security Group ID | |
allow_origins |
list(string) |
Allowed Origins | |
cors_max_age |
number |
80000 |
CORS Max Age (seconds) |
log_retention_in_days |
number |
7 |
Log Retention Period (days) |
cognito_user_pool_endpoint |
string |
Cognito User Pool Endpoint | |
user_pool_client_ids |
list(string) |
Cognito User Pool Client IDs | |
ecs_task |
object |
ECS Task Definition Settings (details below) | |
ecs_service |
object |
ECS Service Settings (details below) | |
private_subnet_ids |
list(string) |
Private Subnet IDs |
ecs_task
| Variable Name | Type | Default Value | Description |
|---|---|---|---|
memory |
number |
512 |
Task Memory Amount |
cpu |
number |
256 |
Task Virtual CPU Value |
ecs_service
| Variable Name | Type | Default Value | Description |
|---|---|---|---|
desired_count |
number |
1 |
|
http_methods |
set(string) |
["GET"] |
Conclusion
#This article introduced the infrastructure and its IaC implementation based on the actual infrastructure constructed for SSS. Implementing with IaC allows for repeated creation and destruction of the infrastructure. While writing this article, the sample application system was created only for testing and verification and destroyed when not in use.
The complete code, including local variables and provider settings not covered here, is available in the repository Infrastructure Construction for Sales Support System with IaC. You can try it as is, experiment with combinations not covered here, or expand it by adding more task definitions for multiple services. Why not explore and apply it in various ways?
Since there were no critical non-functional requirements for SSS, the differences were minimal, and the evaluation might seem somewhat subjective... (sweat) ↩︎
Creating an Amazon ECS Linux Task for the Fargate Launch Type Using the AWS CLI ↩︎
For details on ECS Task Definition settings, refer to Amazon ECS Task Definition Parameters. ↩︎
Refer to Considerations for Service Discovery. ↩︎
For details on CORS, refer to Cross-Origin Resource Sharing (CORS). ↩︎
HTTP API has fewer features, and unfortunately, the Mock Integration recommended for REST API is not supported. ↩︎
For more on JWT, refer to Mamezou Developer Site's "Understanding JWT and JWT Authentication Mechanisms from the Basics". ↩︎
For more on
variable, refer to Input Variables. ↩︎


