Begin Software PLC Development with TwinCAT (Part 1: Development Environment Setup)
Back to TopTo reach a broader audience, this article has been translated from Japanese.
You can find the original version here.
0. Introduction
#TwinCAT is a platform provided by Beckhoff Automation GmbH[1]—a German company famous for developing EtherCAT (hereafter referred to as Beckhoff). It is a so-called software PLC and adopts CODESYS—a well-known software PLC application—as OEM.
In this article and related posts, I would like to share the procedure for developing a software PLC using TwinCAT.
Note that the TwinCAT version used in this article is "TwinCAT 3.1 Build 4026"[2].
1. What is TwinCAT?
#Overview of TwinCAT
#In a nutshell, TwinCAT is an "application that turns a PC into a PLC."
Typical Windows operating systems lack real-time capabilities, so they may not be suitable for industrial applications that demand time-critical processing. By introducing TwinCAT, you can add real-time control functionality to a PC-based Windows system.
At present, the main supported OS is Windows, but there also exists TwinCAT/BSD[3] for FreeBSD. Furthermore, a Linux version is planned for future release[4] (scheduled for Q3 2025?).
In PLC programming, in addition to the five languages defined by IEC61131-3, C++ can also be used.
- LD (Ladder Diagram) language
- FBD (Function Block Diagram) language
- ST (Structured Text) language
- IL (Instruction List) language
- SFC (Sequential Function Chart) language
- C++ language
- However, with some limitations
The Relationship Between TwinCAT and the OS
#Unlike typical applications, TwinCAT (more precisely, the TwinCAT runtime environment) runs at a deeper level. TwinCAT’s proprietary real-time kernel operates independently of the OS, and the programs you create run in kernel mode.
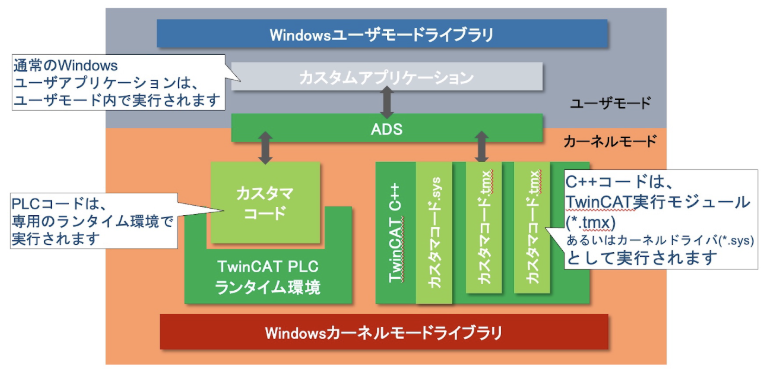
(The above image is excerpted from this source)
You can check TwinCAT's design philosophy from the link below.
TwinCAT3 Product Overview - Philosophy
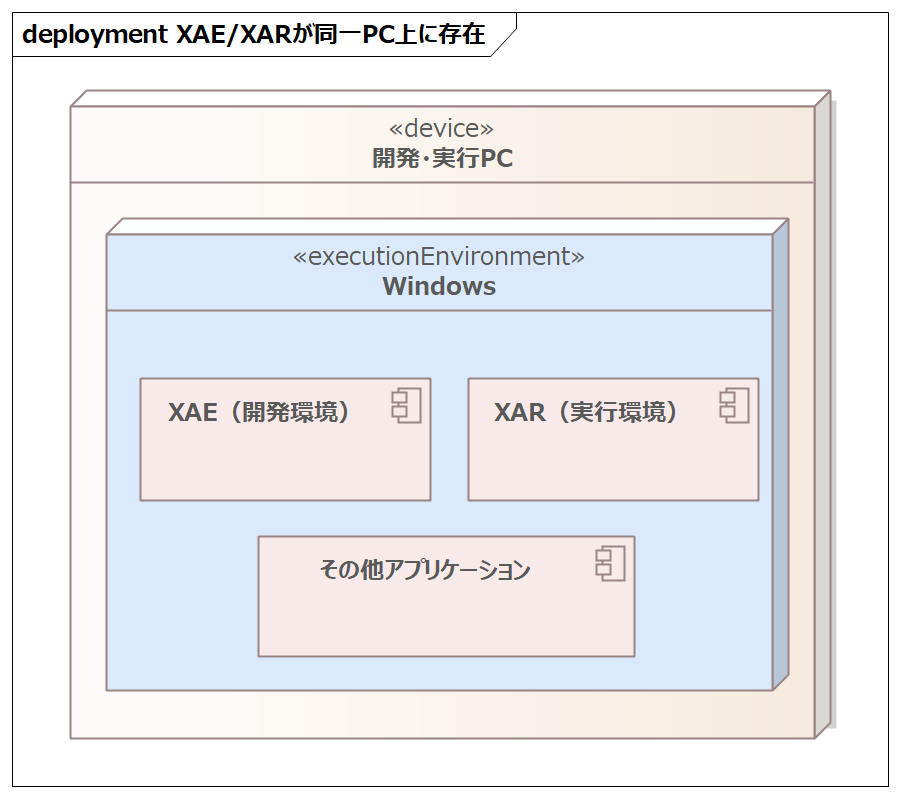
Development Environment (XAE) and Runtime Environment (XAR)
#TwinCAT can be broadly divided into two software packages.
- XAE (eXtended Automation Engineering)
- TwinCAT's development environment.
- Used for development and debugging.
- XAR (eXtended Automation Runtime)
- TwinCAT's runtime environment.
- Used for the real-time execution of PLC programs.
These two software packages do not have to be installed on the same PC; they can be installed on separate PCs. In other words, you have the following two system configuration options:
- Pattern A: XAE and XAR exist on the same PC
- The most minimal configuration.
- Example: When you want to implement everything on a single PC.
- Pattern B: XAE is on the development PC, and XAR is on a separate runtime PC
- The system scale increases, which is useful for multi-person development or if you do not wish to install the runtime environment on the development PC.
- Communication between XAE and XAR is carried out by a proprietary protocol called ADS (Automation Device Specification).
- Example: The runtime PC is on-site while you develop on an office PC.
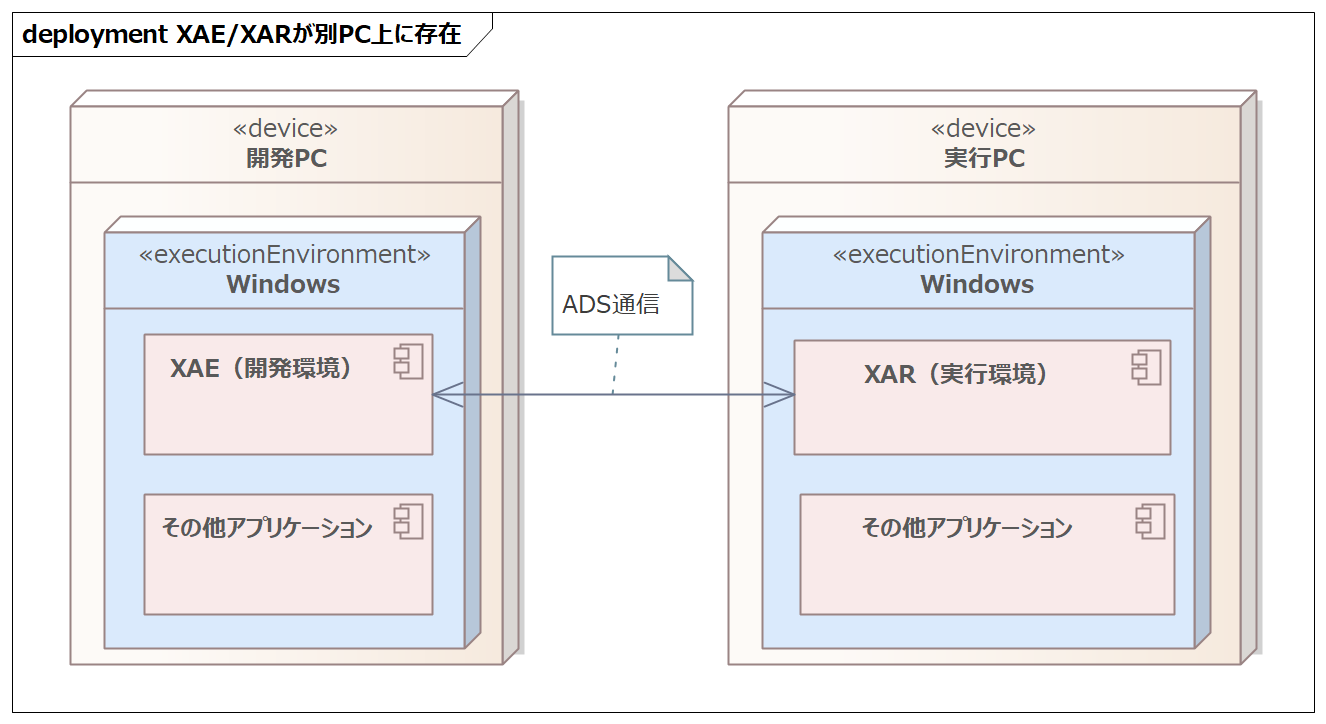
In this article, we will proceed assuming Pattern B (XAE and XAR on separate PCs).
Only XAR operates in kernel mode as mentioned in the previous section. XAE is a normal application. In this article, to mitigate any potential risks, it is strongly recommended to install XAE and XAR on separate PCs.
As another possibility, you can install only XAE on the development PC and install both XAE and XAR on the runtime PC. However, due to the redundant environment, this method will not be detailed in this article.
2. Setting Up the Development Environment
#This time, prepare two PCs—install the development environment (XAE) on one PC and the runtime environment (XAR) on the other. The overall procedure is outlined below.
- Create a Beckhoff account.
- Install the TwinCAT Package Manager on the development PC.
- Install XAE (development environment) on the development PC.
- Download the XAR (runtime environment) package on the development PC.
- Transfer the package from the development PC to the runtime PC.
- Install the TwinCAT Package Manager on the runtime PC.
- Install XAR on the runtime PC.
It is a bit long, but thank you for bearing with me.
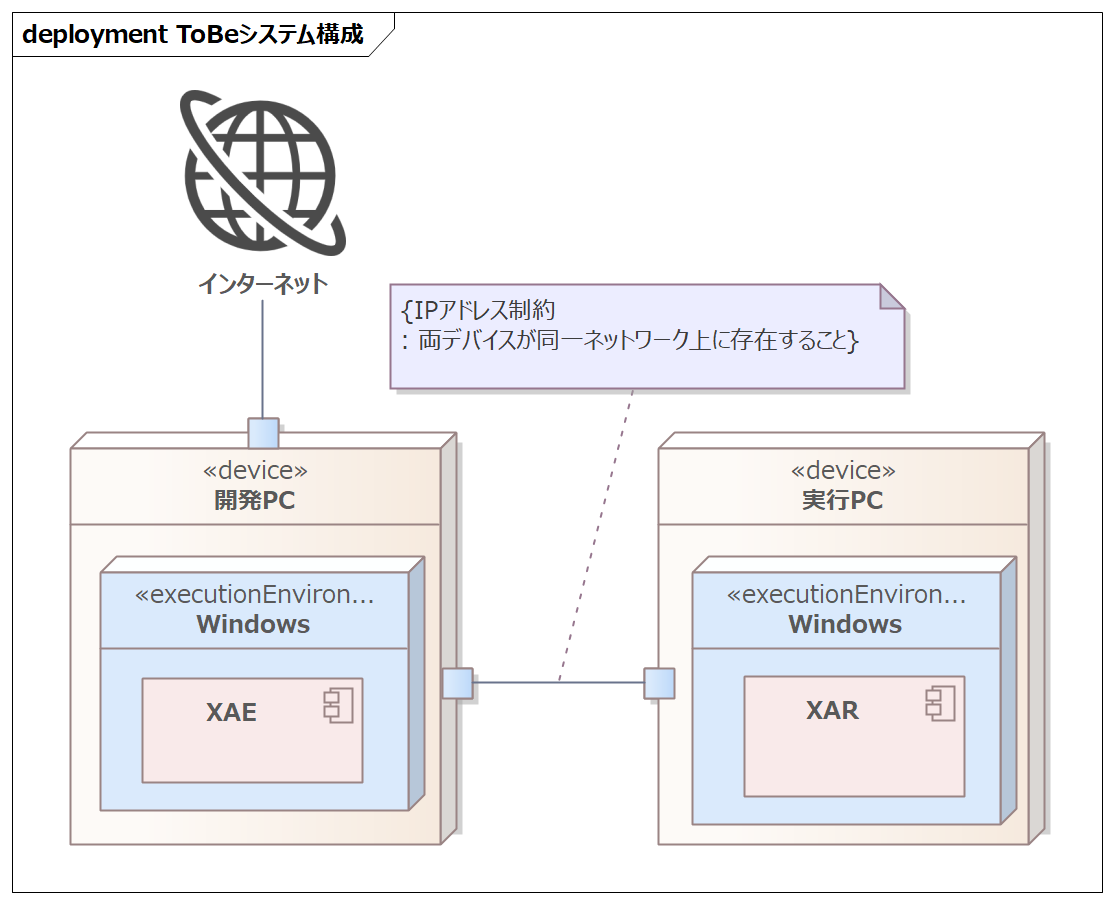
System Configuration
#The system configuration to be built in this article is shown in the diagram below.
- Development PC = A PC on which only the development environment runs. Assume it is connected to the internet.
- Runtime PC = A PC on which only the runtime environment runs. Assume it is not connected to the internet.
In this article and related posts, we use a standard laptop rather than an industrial PC from Beckhoff. If real-time processing performance is a priority, consider using an industrial PC.
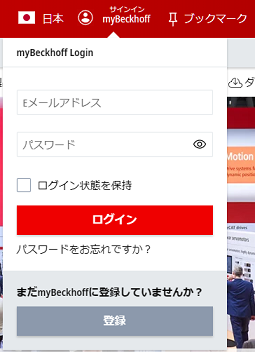
Creating a Beckhoff Account
#Go to the Beckhoff official website and click "Sign In" at the top of the page. Then, click the "Register" button in the area that appears and register for an account from the ensuing screen.
Installing the TwinCAT Package Manager
#Software related to TwinCAT is installed using the TwinCAT Package Manager (abbreviated as tcpkg in commands).
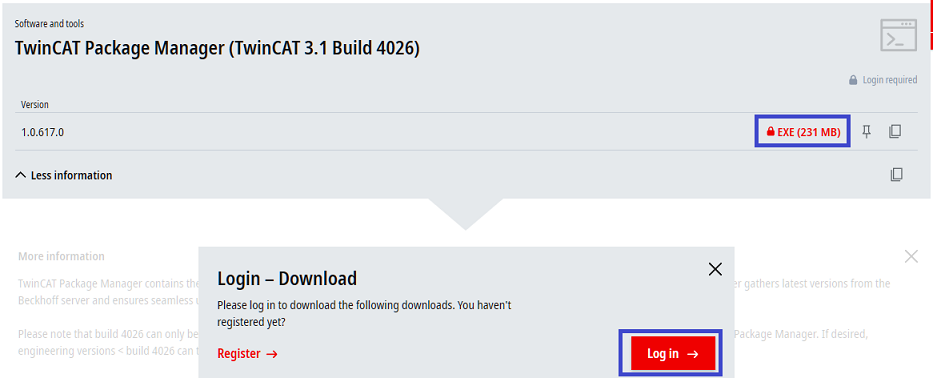
Go to the TwinCAT Package Manager download page and click "Download TwinCAT Package Manager".

The download screen will open, but you will need to log in first.
Click the "Log in" button at the bottom and log in.
After logging in, clicking the "EXE" button will download the installer.
Run the downloaded exe file and install the TwinCAT Package Manager.

Once the installation is complete, you will be prompted to restart, so please restart the PC.
Setting Up the TwinCAT Package Manager
#Launch the TwinCAT Package Manager using the desktop shortcut.
![]()
On the initially displayed "Feed Configuration" screen, specify the package source. Since obtaining packages from the internet requires an account, enter your account information.
Enter your account’s email address in the Username field and your password in the Password field. Once entered, click the Save button.
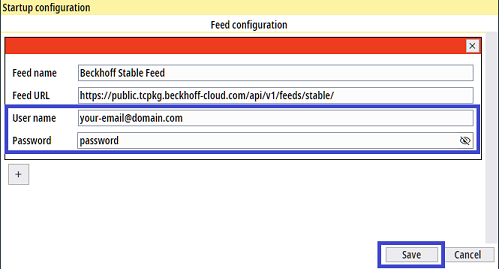
After clicking the Save button, you will be prompted by PowerShell for execution rights, so select "OK."
The actions you perform in the TwinCAT Package Manager are executed by a PowerShell process running in the background. Therefore, permission requests may appear several times as you proceed. Please select "OK" as needed.
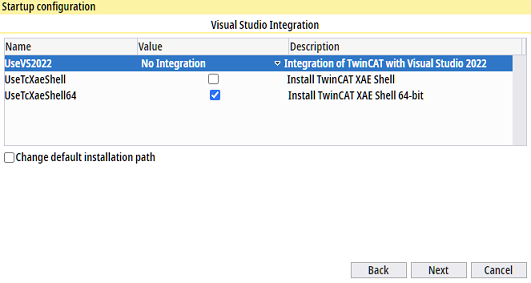
Next, on the "Startup Configuration" screen, configure the initial settings for the TwinCAT Package Manager as shown below.
The details of each setting are described below.
- UseVS2022
- Choose whether to integrate the TwinCAT development environment into an existing Visual Studio installation.
- UseTcXaeShell
- Choose whether to install the TwinCAT IDE (TwinCAT Integrated Development Environment) (32-bit version).
- UseTcXaeShell64
- Choose whether to install the TwinCAT IDE (TwinCAT Integrated Development Environment) (64-bit version).
This option appears only if Visual Studio is installed on the PC. It specifies whether to integrate TwinCAT’s development environment into your existing Visual Studio. Integration is mandatory if you want to build C++ programs within TwinCAT, but since it alters some aspects of Visual Studio’s layout, choose "No Integration" if unnecessary.
If the settings are correct, click "Next" at the bottom of the screen. Then, verify that a list of installable packages appears as shown below.

The setup of the TwinCAT Package Manager is now complete.
Installing XAE on the Development PC
#Next, install the development environment.
From the TwinCAT Package Manager screen, check the checkbox for "TwinCAT Standard."
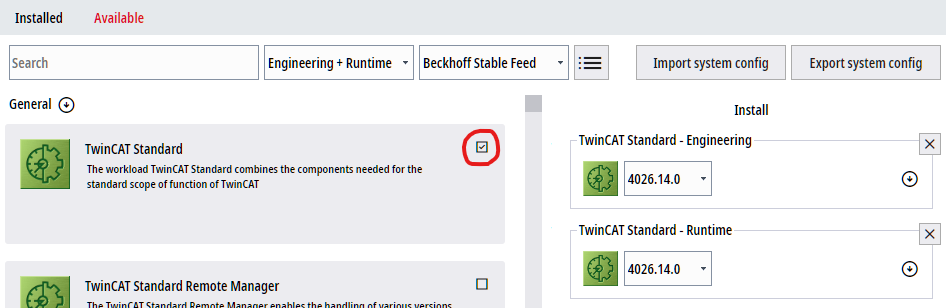
On the right side of the screen, you'll see "TwinCAT Standard-Engineering" and "TwinCAT Standard-Runtime." Since the runtime environment (Runtime) should not be installed on the development PC, click the × button to remove it.
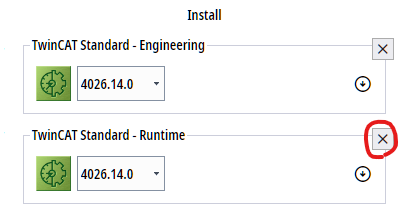
With only Engineering selected, click the Install button to proceed with installation.
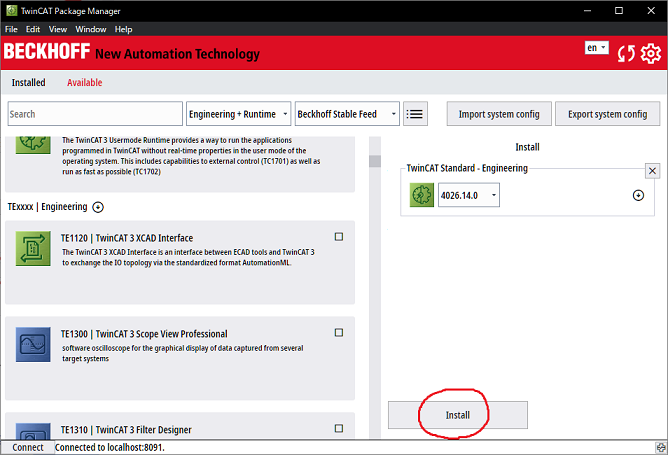
The installation of XAE is now complete.
For safety, please restart the development PC.
Downloading the Files Needed for XAR Installation on the Runtime PC Using the Development PC
#Since the runtime PC is not connected to the internet, it cannot be installed using the same method as the development PC. Therefore, download the necessary files on the development PC and transfer them to the runtime PC using a USB drive or similar.
If the runtime PC can connect to the internet, you can install XAR in the same manner as the development PC, and the following steps are unnecessary.
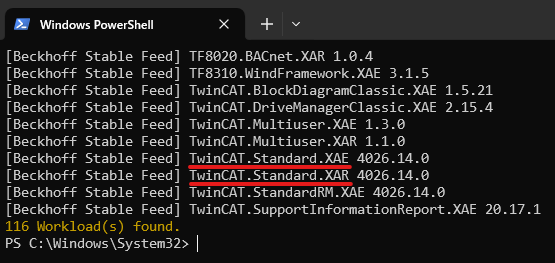
First, open Command Prompt or PowerShell and enter the following command:
tcpkg list -t workload
Executing this will display a list of installable packages. Confirm that "TwinCAT.Standard.XAE" and "TwinCAT.Standard.XAR" are listed at the bottom.
Once confirmed, enter the following command line by line to download the necessary package files (which are actually NuPkg files). (Adjust the output destination as needed.)
tcpkg download TwinCAT.Standard.XAR -o "C:\TwincatOfflineInstaller\XAR"
Note the following:
- You must create the output directory in advance.
- During the installation, you will be prompted for confirmation several times.
Transferring the Necessary Files from the Development PC to the Runtime PC
#Using a USB drive or similar, transfer the following two items to the runtime PC:
- The installation file for the TwinCAT Package Manager.
- The XAR folder.
In this example, they have been placed in the C:\TwincatOfflineInstaller\ directory.

Installing on the Runtime PC
#Once the necessary files have been transferred to the runtime PC, first install the TwinCAT Package Manager as before. Once installed, launch the TwinCAT Package Manager.
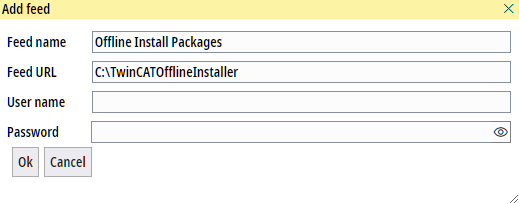
Upon launching, on the Feed Configuration screen, specify the package source. While the development PC obtained packages from the internet, the runtime PC is not connected; therefore, use the package files you transferred earlier. Specify the directory where the XAR installation package is located in the Feed URL field.
Leave the username and password fields blank and click "OK."
Then, verify that "TwinCAT Standard" is displayed on the main screen. From this screen, select "TwinCAT Standard" and install both instances of XAR on the runtime PC.
This completes the installation on the runtime PC.
3. Firewall Settings
#In this section, we will configure the communication settings between the development PC and the runtime PC. The two devices use a protocol called ADS (Automation Device Specification) for communication. By default, the firewall blocks ADS communication, so you need to allow communication on the ports listed in the table below. Enable these ports on both the development PC and the runtime PC.
| Protocol | Port Number | Direction | Purpose |
|---|---|---|---|
| TCP | 48898 | Inbound & Outbound | ADS Communication |
| UDP | 48899 | Inbound & Outbound | ADS Broadcast Search |
| TCP | 8016 | Inbound & Outbound | Secure ADS |
If the development PC and runtime PC are the same device, you do not need to perform these settings.
Opening the Firewall Settings Screen
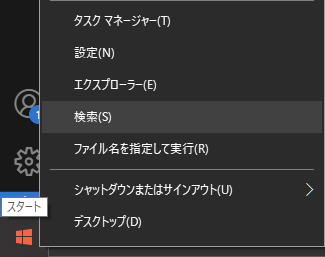
#Right-click the Windows icon in the bottom left of the screen and select "Search."
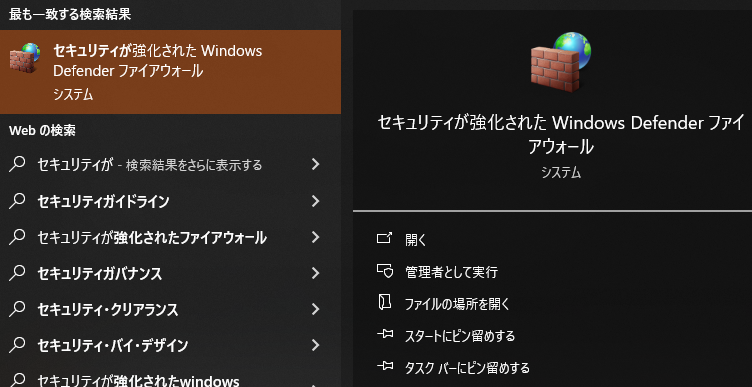
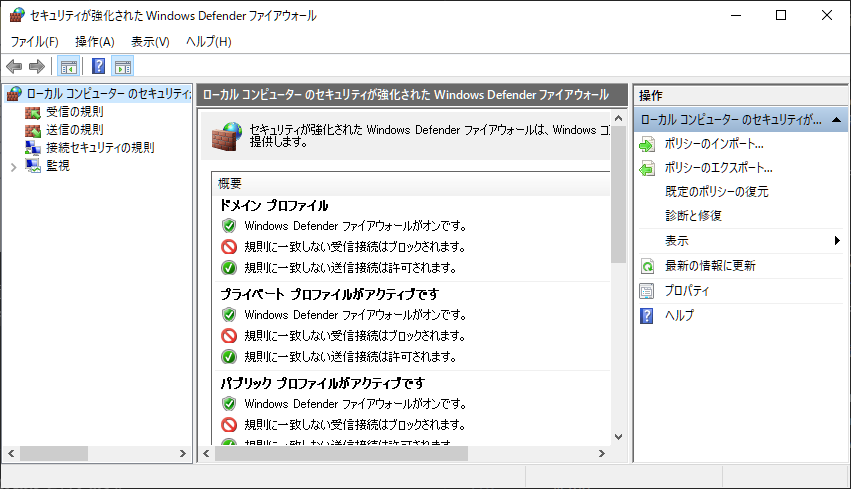
Use the search bar to find and click "Windows Defender Firewall with Advanced Security."
From this dialog, add the settings required for ADS communication.
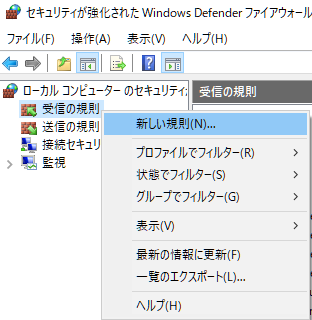
Adding an Inbound Rule
#Right-click "Inbound Rules" on the left side of the screen and click "New Rule."
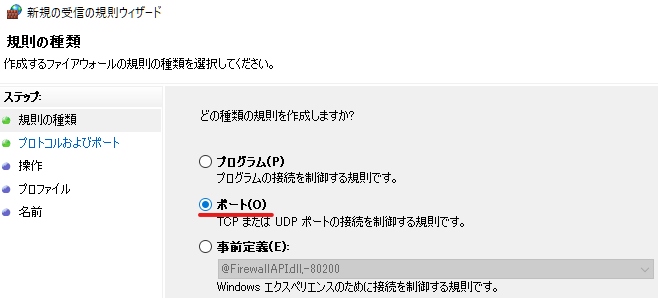
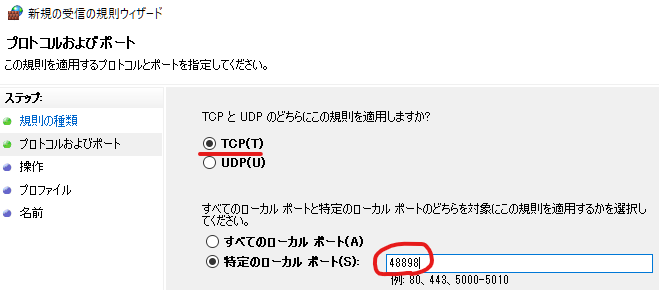
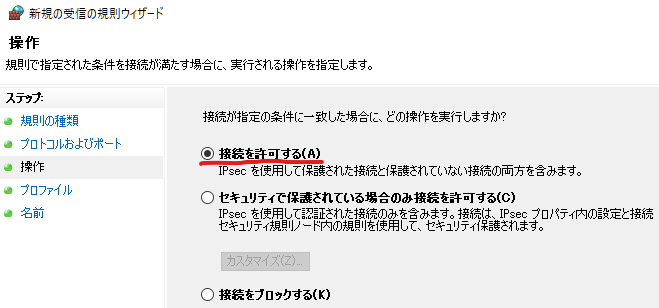
Add a rule for each of the three ports listed in the table above. For example, for "TCP port 48898," proceed as follows:
- Rule Type
- Select "Port."
- Protocol and Ports
- Specify TCP and port 48898.
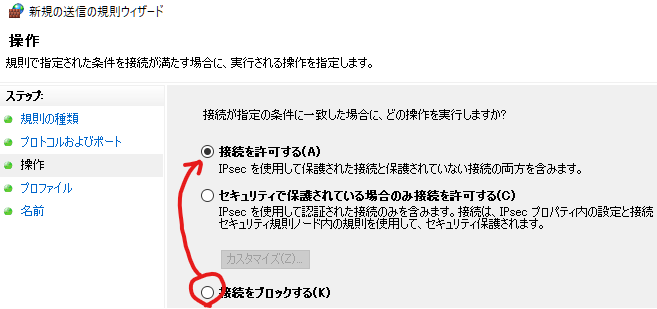
- Action
- Select "Allow the connection."
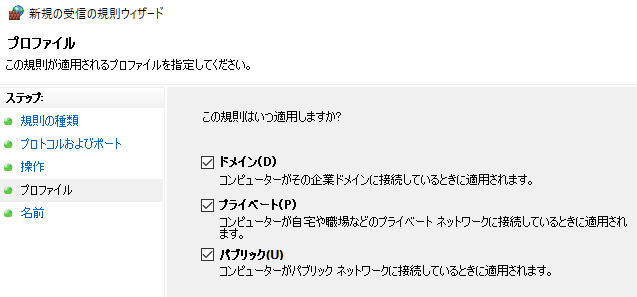
- Profile
- Specify the necessary profiles.
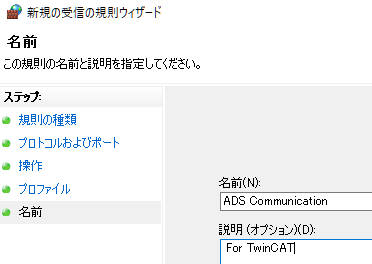
- Name
- Enter a name and description for the rule.
Apply this configuration for all of the following:
- TCP, port 48898
- UDP, port 48899
- TCP, port 8016
Once complete, the list of inbound rules should appear as shown in the image below (adjust the names as needed).
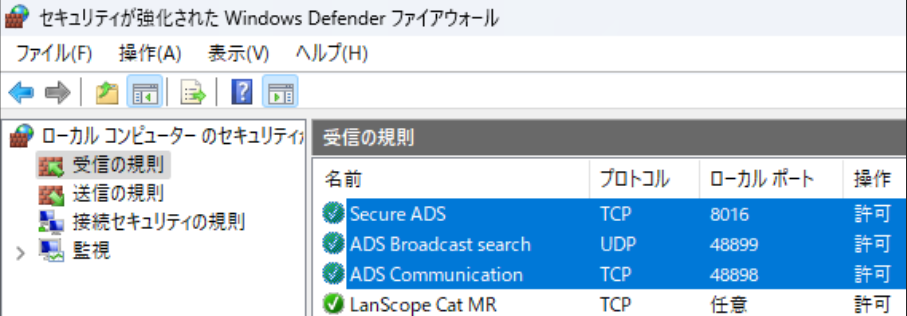
This concludes the inbound rule configuration.
Adding an Outbound Rule
#Next, add an outbound rule. (The process is nearly identical to adding an inbound rule.) From "Outbound Rules" on the left side of the screen, click "New Rule" and add the three configurations as before. (Details are omitted.)
Note that the default selection is "Block the connection."
Once complete, the outbound rules list should appear as shown below (adjust the names as needed).

This concludes the outbound rule configuration.
4. ADS Communication Route Settings
#Now, after a lengthy setup of the development environment, we are almost finished. Finally, set up the route configuration[5] to establish ADS communication between the development PC and the runtime PC.
Before executing the steps in this section, connect the development PC and the runtime PC with an Ethernet cable, and configure them so they are on the same network.
On the development PC, open the system tray in the bottom right, right-click the purple gear icon, and select "Router" → "Edit Routes."
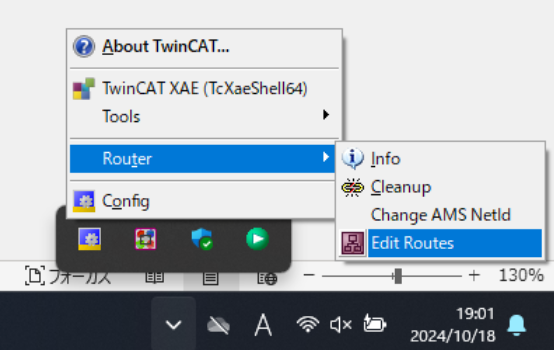
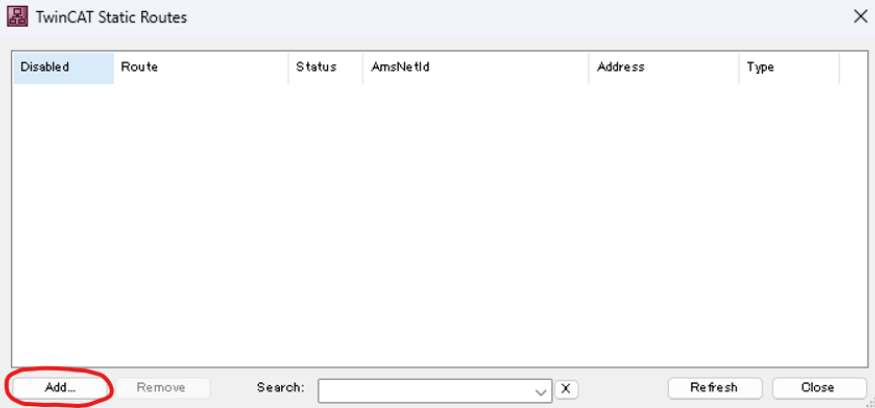
The "TwinCAT Static Routes" screen appears. Click the "Add" button at the bottom left.
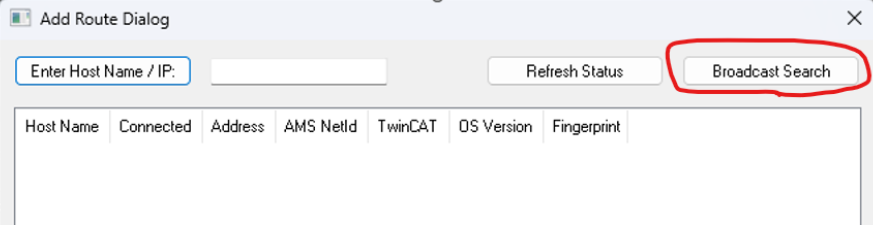
The "Add Route Dialog" screen appears. Check the "Advanced Settings" box at the bottom left.
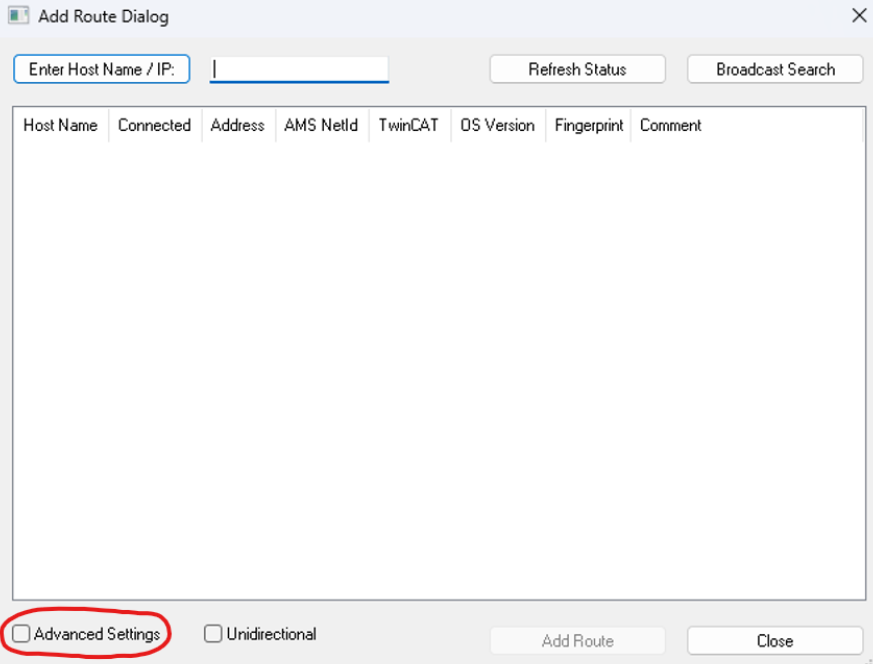
Once checked, detailed settings appear at the bottom of the screen. In the "Address Info" dropdown, select "IP Address."
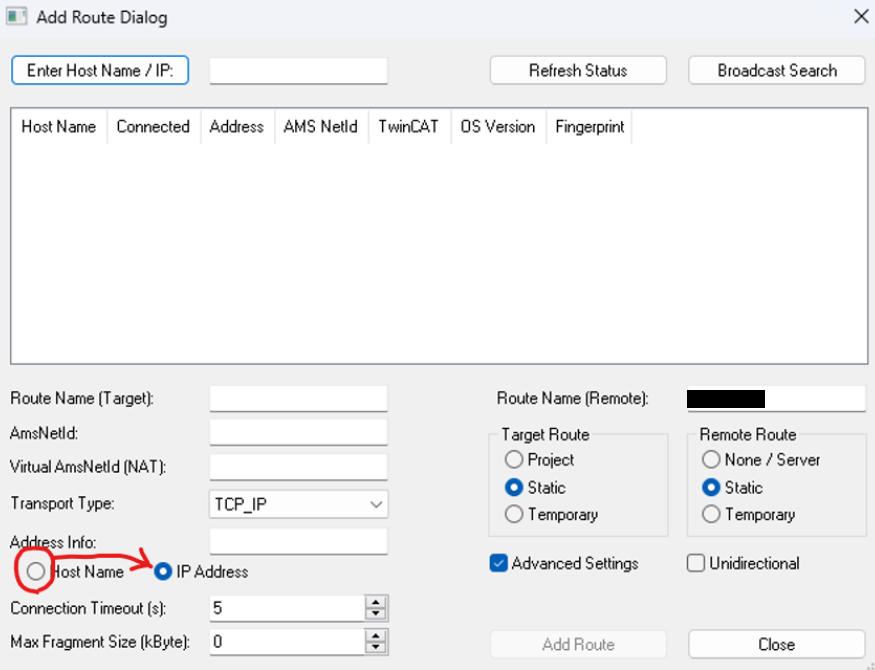
Click the "Broadcast Search" button at the top right of the screen to search for the PC within the same network that has XAR installed.
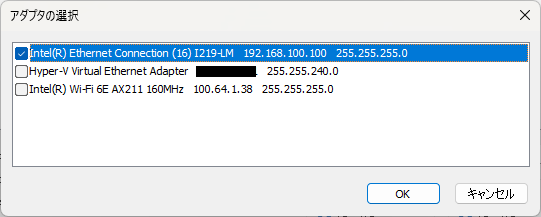
If the development PC has multiple Ethernet adapters (including USB adapters), the "Select Adapters" screen will appear asking which adapter to search. To avoid connecting with unintended devices, check only the adapter that is connected to the PC with XAR installed.
The PC with XAR installed will be detected. Verify the IP address and other details, and if everything is in order, click "Add Route."
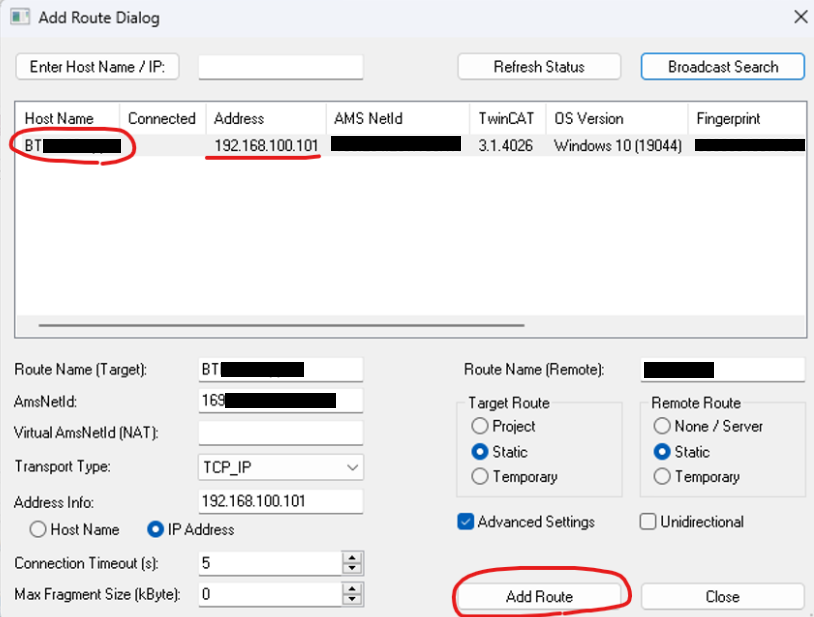
The "SecureADS" screen will then appear, prompting you to configure the settings for remote connection. Enter the username and password of the runtime PC (the target) in the "Remote User Credentials" field.

For Beckhoff PCs, the credentials are as follows:
User = Administrator
Password = 1
Windows Operating Systems - General Information
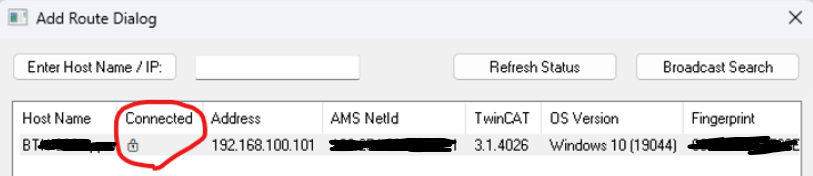
If the connection is successful, a lock icon will appear in the "Connected" section. Once confirmed, click the "Close" button at the bottom right to exit the "Add Route Dialog."
On the "TwinCAT Static Route" screen, verify that the route you just added is displayed and highlighted in green. If it is not green, please recheck the connection between the development PC and the runtime PC.

This completes the ADS communication configuration.
5. In Conclusion
#It has been a long process, but that concludes the setup of the TwinCAT development environment. Thank you for your effort. In the next article, I will create a PLC program and run it on TwinCAT.
[Postscript]
While creating this article, an official Beckhoff video explaining the development environment setup process was released. Please be sure to check it out as well.
TwinCAT Howto - Installation Method for Versions V.3.1.4026 and Later