Introduction to Lume (Part 3) - Managing Pages with Tags to Enhance Searchability
Back to TopTo reach a broader audience, this article has been translated from Japanese.
You can find the original version here.
In the previous article, we looked at how to use the JSX/MDX plugin as a template engine for Lume.
As your site grows and more pages are added, finding the desired page can become challenging. In such cases, a common technique to enhance searchability is to tag pages (markers).
This time, we will introduce how to generate a list page of tagged articles using Lume. We will also look at the pagination feature, which is effective when there are many articles to list on the page.
These can be easily implemented using Lume's Search plugin and Paginate plugin.
Both plugins are pre-installed with Lume, so you can start using them immediately.
Lume underwent a major update to v2 on December 8, 2023. Accordingly, this article has been updated to work with v2.
Tagging Pages
#First, let's tag the pages (articles). In the case of Markdown (including Nunjucks/MDX), add the tags variable to the front matter and specify multiple tags in array format.
---
title: Starting a Blog Site with Lume - Part 1
layout: layouts/blog.njk
date: 2023-01-01
tags: ["Lume", "SSG", "Deno"]
---
The above tags the page with Lume, SSG, and Deno.
Additionally, the date is specified for use as a sorting condition on the list page. This date variable is a special variable in Lume and is treated as the page creation date.
For more details, refer to the official documentation below.
Here, we will create 10 Markdown files under the blogs directory.
blogs
├── lume-1.md
├── lume-2.md
├── lume-3.md
├── lume-4.md
├── lume-5.md
├── lume-6.md
├── lume-7.md
├── lume-8.md
├── lume-9.md
└── lume-10.md
The date variable (creation date) for each file is set to a staggered date (2023-01-01 ~ 2023-01-10).
These will be generated as pages accessible at /blogs/lume-{num}/[1].
If you want to tag pages created with JSX, export the tags variable as follows.
export const title = "Starting a Blog Site with Lume - Part 1";
export const layout = "layouts/blog.njk";
export const date = "2023-01-01";
export const tags = ["Lume", "SSG", "Deno"];

export default () => (<div>Tagging with JSX</div>);
Creating a List Page
#With the preparations done, let's create a list page of tagged articles.
Here, we will target pages tagged with Lume.
Creating a list page is basically the same as creating a regular page, but we will use the Search plugin built into Lume.
Let's look at the Nunjucks version and JSX version.
- Nunjucks Template
---
layout: layouts/blog.njk
url: /tags/lume/
title: List of Lume Pages
---

{%- for page in search.pages('Lume', 'date=desc') %}
<div>
  <a href="{{ page.url }}">{{ page.title }}</a>
</div>
{%- endfor %}
- JSX(TSX) Template
export const layout = "layouts/blog.njk";
export const url = "/tags/lume/";
export const title = "List of Lume Pages";

export default ({ search }: Lume.Data) => {
  return (
    <>
      {search.pages("Lume", "date=asc").map((page, index) => (
        <div key={index}>
          <a href={page.url}>{page.title}</a>
        </div>
      ))}
    </>
  );
};
In the case of Nunjucks, the search object is received as a global variable, and in JSX, it is received as a prop. The target pages are obtained from the pages method.
The pages method takes the search condition as the first argument[2], the sort order as the second argument, and the limit count as the third argument. In other words, here it is the condition of descending order of creation date for the Lume tag (no limit specified).
The search condition of the first argument can specify any front matter variable, not just tags (for non-tag cases, the variable must also be specified separately). Of course, it also supports multiple conditions, negations, and prefix matches.
For more details, refer to the official documentation and source code below.
In either template, the generated page will look like this.

You can see that the pages tagged with Lume are listed in descending order of creation date.
Generating List Pages for All Tags
#Earlier, we created a list page for a specific tag, but this is not efficient as you would need to implement a list page each time a tag increases.
Ideally, you should collect all tags in advance and create a mechanism to generate list pages for each.
To handle such cases, Lume allows you to generate multiple pages with a single template using generator functions.
Generator functions are JavaScript functions. JavaScript (also built-in) is used as the template engine.
The template that outputs the equivalent HTML as before is as follows (here we use TypeScript).
export const layout = "layouts/blog.njk"; // Common front matter for all pages

export default function* ({ search }: Lume.Data) {
  const tags = search.values("tags"); // Collect all tags
  for (const tag of tags) {
    const links = search.pages(tag as string, "date=desc").map((page) =>
      `<div><a href="${page.url}">${page.title}</a></div>`
    );
    yield {
      // Front matter for each page
      title: `List of ${tag} Pages`,
      url: `/tags/${tag}/`,
      // Page content
      content: links.join("")
    };
  }
}
Although slightly more complex, the content is straightforward.
- Collect tags with the tags method of the search object
- Search for target pages with the pages method for each tag
- Generate page content (HTML)
- Return the front matter and page content with yield
When using JavaScript as a template, to indicate that it is a template for page generation to Lume, the file name must have the suffix <file-name>.page.(js|ts) (default).
Since we have specified 3 tags, Lume, SSG, and Deno, on the pages, executing this will generate list pages for the following 3 tags (all pages will have almost the same content).
- /tags/Lume
- /tags/SSG
- /tags/Deno
Of course, with this implementation, no additional implementation is needed even if the tags increase.
Here, the HTML rendering part is also described within the JavaScript template.
If you want to separate the implementation of logic and view, you can describe the HTML part in non-JavaScript such as Nunjucks and specify this as a layout.
In this case, it will be as follows.
- Nunjucks Template (post-list.njk)
---
layout: "layouts/blog.njk"
---
{%- for page in results %}
<div>
  <a href="{{ page.url }}">{{ page.title }}</a>
</div>
{%- endfor %}
- JavaScript Template
// Common front matter for all pages
export const layout = "layouts/post-list.njk"; // Layout for list pages

export default function* ({ search }: Lume.Data) {
  const tags = search.values("tags"); // Collect all tags
  for (const tag of tags) {
    yield {
      // Front matter for each page
      title: `List of ${tag} Pages`,
      url: `/tags/${tag}/`,
      // Link search results to the layout for list pages
      results: search.pages(tag as string, "date=desc")
    };
  }
}
The layout file created with Nunjucks is specified in the layout variable on the JavaScript template side.
In this example, the HTML is too simple to feel the effect, but separating it will make it cleaner if the template is complex.
Since JSX templates are also JavaScript, the same can be done.
Below is an excerpt of the generator function part using a JSX(TSX) template.
export default function* ({ search }: Lume.Data) {
  const tags = search.values("tags"); // Collect all tags
  for (const tag of tags) {
    const links = search.pages(tag as string, "date=desc").map((page, index) =>
      <div key={index}><a href={page.url}>{page.title}</a></div>
    );
    yield {
      // Front matter for each page
      title: `List of ${tag} Pages`,
      url: `/tags/${tag}/`,
      // Page content
      content: links
    };
  }
}
The implementation only changes the HTML part to JSX, so if you have the JSX plugin enabled, it is recommended to use this.
It is also easy to use JSX custom components as view components.
Creating List Pages with Pagination
#Finally, let's use pagination.
Even though we created list pages by tag, if the tag is generic, there will be a large number of pages to display in the list.
In such cases, pagination is often used.
Implementing this pagination manually is quite cumbersome, but Lume provides the Paginate plugin built-in, which can be used without special settings.
We have created 10 sample articles earlier. Here, we will create a list page with pagination, with 3 items per page.
export const layout = "layouts/blog.njk";
export default function* ({ search, paginate }: Lume.Data) {
const tags = search.values("tags"); // Collect all tags
for (const tag of tags) {
// Execute pagination using the paginate plugin
const paginateResults = paginate(search.pages(tag as string, "date=desc"), {
// 3 items per page
size: 3,
// 1st page is /tags/<tagname>/, subsequent pages are /tags/<tagname>/<n>/
url: (n: number) => `/tags/${tag}/${n > 1 ? `${n.toString()}/` : ""}`,
});
for (const paginateResult of paginateResults) {
const links = paginateResult.results.map((page) =>
`<div><a href="${page.url}">${page.title}</a></div>`
);
yield {
title: `List of ${tag} Pages`,
url: paginateResult.url,
// Page content
content: `
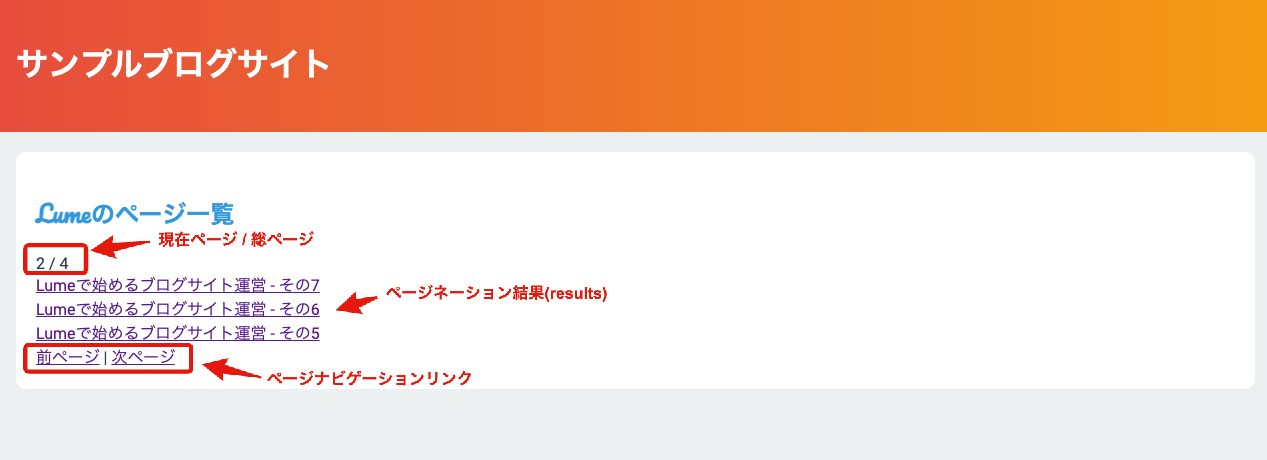
<div>${paginateResult.pagination.page} / ${paginateResult.pagination.totalPages}</div>
${links.join("")}
${paginateResult.pagination.previous ? `<a href="${paginateResult.pagination.previous}">Previous Page</a>` : "Previous Page"}
<span>|</span>
${paginateResult.pagination.next ? `<a href="${paginateResult.pagination.next}">Next Page</a>` : "Next Page"}`,
};
}
}
}
The key point here is the part where paginate is called. The first argument is the result of the Search plugin, and the second argument is the pagination settings (size/url).
The Paginate plugin splits the search results of the Search plugin according to these conditions.
The Paginate plugin stores the split results in results and the necessary pagination information such as the current page and next/previous page URLs in pagination.
Then, just generate the page content according to the results. It's very simple.
The above generates the following pages for each tag.
- 1st page: /tags/<tagname>/
- 2nd page: /tags/<tagname>/2/
- 3rd page: /tags/<tagname>/3/
- 4th page: /tags/<tagname>/4/
Below is one of the actual generated list pages.
Summary
#This time, we practiced managing pages with tags in Lume.
By using the Search plugin and Paginate plugin, we can see that it can be implemented easily and flexibly.
These plugins are not limited to tag management and can be used for various purposes depending on your ideas.
If you have a significant number of pages, getting used to these plugins will make site management easier.