Introduction to Lume (Part 1) - Quickly Create Static Sites with Deno-based Static Site Generator Lume
Back to TopTo reach a broader audience, this article has been translated from Japanese.
You can find the original version here.
Our site is about to reach its second anniversary.
Taking this opportunity, we have switched the static site generator (SSG) used for page generation to Lume.
Previously, we used Eleventy (11ty) for site generation.
While Eleventy had no major issues[1], I was drawn to Deno-based Lume and decided to make the switch.
During the migration, we took care to ensure that there were no significant changes to the writing experience in addition to the site itself.
In this regard, Lume was developed with Eleventy as a reference, making it highly compatible at the functional level and very easy to migrate to.
Having used Lume's features extensively, I would like to write introductory articles and tips about Lume.
In this first installment, we will look at setting up Lume and its basic usage.
On December 8, 2023, Lume received a major update to version 2. This article has been updated to work with version 2.
For more information about Deno itself, please refer to the series of articles on this site.
- Starting with Deno - Part 1 (Development Environment and Runtime)
- Starting with Deno - Part 2 (Using External Libraries)
- Starting with Deno - Part 3 (SSR)
- Starting with Deno - Part 4 (Using OS Functions and FFI)
- Starting with Deno - Part 5 (Using WebAssembly)
- Starting with Deno - Part 6 (Serving Static Files on Deno Deploy)
- Starting with Deno - Part 7 (All in one Deno Sub-commands)
Setting Up Lume
#As mentioned earlier, Lume runs on Deno, not Node.js.
If you haven't installed Deno yet, let's install it first.
The installation method varies depending on your environment, so please refer to the following official Deno page[2].
Next, set up Lume. Create a directory of your choice and execute the following as per Lume's official documentation.
deno run -Ar https://deno.land/x/lume/init.ts
 ? Choose the configuration file format › _config.ts (TypeScript)
 ? Do you want to install some plugins now? › Maybe later

Lume configuration file saved: _config.ts

🔥🔥🔥🔥🔥🔥🔥🔥🔥🔥🔥🔥🔥🔥🔥🔥

 Lume configured successfully!

    BENVIDO - WELCOME! 🎉🎉

🔥🔥🔥🔥🔥🔥🔥🔥🔥🔥🔥🔥🔥🔥🔥🔥

Quick start:
  Create the index.md file and write some content
  Run deno task serve to start a local server

See https://lume.land for online documentation
See https://discord.gg/YbTmpACHWB to propose new ideas and get help at Discord
See https://github.com/lumeland/lume to view the source code and report issues
See https://opencollective.com/lume to support Lume development

Deno configuration file saved: deno.json
When executed, you will be asked some questions about the configuration.
Here, we chose TypeScript for the _config.ts language and did not specify any plugins (Maybe later).
The following files are created in the root directory.
.
├── _config.ts
└── deno.json
It feels good not to have a node_modules folder.
deno.json is the configuration file for Deno itself, similar to package.json in Node.js.
_config.ts is the configuration file for Lume. The initial state is as follows:
import lume from "lume/mod.ts";

const site = lume();

export default site;
If you had specified any plugins during the setup questions, the plugin setup code would be generated here.
Additionally, you can specify build customizations, template filters, and other Lume-related settings here.
Generating Static Pages from Markdown Files
#Even without adding any settings, creating a Markdown file in this state will function as a static site generator.
Try creating the following Markdown file (index.md).
---
title: Running a Blog Site with Lume
url: /blogs/lume/
---

## What is Lume

[Lume](https://lume.land/) is a static site generator (SSG) that runs on Deno.

According to the [official documentation](https://lume.land/docs/overview/about-lume/), it has the following features:

- Supports multiple formats such as Markdown, JavaScript, JSX, Nunjucks, etc.
- Flexible extensibility by hooking into each processor
- Deno-based runtime environment

## Installation

First, install [Deno](https://deno.com/)!!

```shell
curl -fsSL https://deno.land/x/install/install.sh | sh
```

Next, set up Lume.

```shell
deno run -Ar https://deno.land/x/lume/init.ts
```
At the beginning (the part enclosed by ---), we set metadata such as the title and URL of the page, called front matter.
The content of this front matter is optional, but some data is treated specially by Lume.
For example, the url used here is used as the public URL of the page and as the path and file name when generating the page.
For more details on front matter, refer to the following official documentation.
Next, start the server in development mode for local verification.
deno task serve
# Alternatively
# deno task lume --serve
A DEV server will start on the local environment at port 3000 by default.
When you open your browser and access http://localhost:3000/blogs/lume/, the following page will be displayed.
Although it's a plain page, you can confirm that the Markdown file has been converted to HTML and displayed in the browser as a static page.
When you update the Markdown file in this state, Lume detects the changes, rebuilds, and reloads the browser. This allows you to create the page while checking its appearance.
Front matter is often the same not only for each page but also at the directory level.
In Lume, you can specify common front matter by placing _data.* in the directory.
For more details, refer to the following official documentation.
Note that if the same key is specified, the page-level front matter takes precedence.
To change the port for the local DEV server, specify the argument (--port) or set it in _config.ts.
Here is an example of changing the port to 8000.
deno task serve --port 8000
# Alternatively
# deno task lume --serve --port 8000
const site = lume({
  server: {
    port: 8000
  }
});
To generate static pages without starting the server, execute the following command.
deno task build
# Alternatively
# deno task lume
By default, pages are generated under the _site directory.
When deploying, simply upload the contents of this directory.
You can see that even in a zero-config state, you can easily preview and deploy static sites.
You can change the output directory by specifying the command argument (--dest) or in the _config.ts file.
Here is an example of changing it to the public directory.
deno task build --dest public
# Alternatively
# deno task lume --dest public
const site = lume({
  dest: "public"
});
Improving Page Appearance with Stylesheets
#Let's add some settings to make the page look better.
First, let's apply styles to the page. Although you can create regular CSS, let's use SCSS for this.
Create a css directory directly under the project root and place the following SCSS (style.scss) in it.
@import url('https://fonts.googleapis.com/css2?family=Pacifico&family=Roboto:wght@400;700&display=swap');

$font-stack-body: 'Roboto', sans-serif;
$font-stack-heading: 'Pacifico', cursive;
$primary-color: #e74c3c;
$secondary-color: #f39c12;
$tertiary-color: #3498db;
$text-color: #2c3e50;
$background-color: #ecf0f1;

@mixin border-radius($radius) {
  -webkit-border-radius: $radius;
  -moz-border-radius: $radius;
  -ms-border-radius: $radius;
  border-radius: $radius;
}

body {
  font-family: $font-stack-body;
  background-color: $background-color;
  color: $text-color;
  margin: 0;
  padding: 0;
}

header {
  background: linear-gradient(to right, $primary-color, $secondary-color);
  color: white;
  padding: 20px;

  h1 {
    font-family: $font-stack-heading;
    font-size: 2em;
  }
}

article {
  margin: 20px;
  padding: 20px;
  background-color: white;
  @include border-radius(10px);

  h2 {
    color: $tertiary-color;
    font-family: $font-stack-heading;
  }
}

footer {
  background: linear-gradient(to left, $secondary-color, $primary-color);
  color: white;
  text-align: center;
  padding: 10px;
  bottom: 0;
  width: 100%;
}
Next, load this into the HTML generated from the Markdown file. For this, we use a layout file.
A layout file defines the framework of the page and is created as a common part for each page.
Many template languages are supported for layout files, but here we will use Mozilla's Nunjucks.
Until Lume v1, Nunjucks was a built-in template engine, but from v2, Vento is now built-in.
To use Nunjucks, add the following to _config.ts.
import nunjucks from "lume/plugins/nunjucks.ts";

const site = lume();
site.use(nunjucks()); // Use Nunjucks plugin
This allows you to create layouts with Nunjucks.
Create a _includes/layouts directory and place the following blog.njk in it.
<!DOCTYPE html>
<html lang="ja">
<head>
<meta charset="UTF-8" />
<meta name="viewport" content="width=device-width, initial-scale=1.0" />
<title>{{ title }}</title>
<link rel="stylesheet" href="/css/style.css" />
<link rel="stylesheet" href="https://cdn.jsdelivr.net/npm/prismjs@1.29.0/themes/prism.min.css" />
</head>
<body>
<header>
<h1>Sample Blog Site</h1>
</header>
<main>
<article>
<h2>{{ title }}</h2>
{{ content | safe }}
</article>
</main>
<footer>
<p>© 2023 Mamezou Blog</p>
</footer>
</body>
</html>
In the head tag, we load the CSS file with <link rel="stylesheet" href="/css/style.css" />.
However, since we placed it as SCSS earlier, it will result in a loading error as is. We will use a plugin for this, which will be discussed later.
Additionally, we have also added Prism's CSS (prism.min.css) for code highlighting from a CDN.
There are a few other points to note.
First, we use the variable title, which was specified in the front matter when creating the Markdown file. You can use it directly as a placeholder in the template file.
Another is content. This is a special variable. It contains the body of the template using the layout (in this case, the Markdown file) set by Lume.
The safe filter used here is a built-in filter[3] in Nunjucks that marks this content as safe.
The _include directory where the layout file is placed is recognized as a special directory and is not subject to page generation.
Since components used within the page are also placed here, layout files are often placed in subdirectories such as layouts rather than directly under _include.
Note that this directory name can also be changed in _config.ts.
Here is an example of changing it to _common.
const site = lume({
  includes: "_common"
});

// Or
// site.includes([".njk"], "_common");
Modify the Markdown file to use this layout file.
This is done by specifying the layout variable in the front matter of the Markdown file.
---
title: Running a Blog Site with Lume
url: /blogs/lume/
# Added
layout: layouts/blog.njk
---
Finally, set up the SCSS conversion and code highlighting. This is very easy with Lume.
Here, we use the following plugins:
Modify _config.ts as follows.
import lume from "lume/mod.ts";
// Added
import sass from "lume/plugins/sass.ts";
import prism from "lume/plugins/prism.ts";
import "npm:prismjs@1.29.0/components/prism-bash.js";

const site = lume();
// Added
site.use(sass())
site.use(prism())
That's all there is to it. Just this much allows the plugins to handle CSS conversion and code highlighting.
Of course, it also immediately reflects changes while previewing[4].
At this stage, the site looks like this.
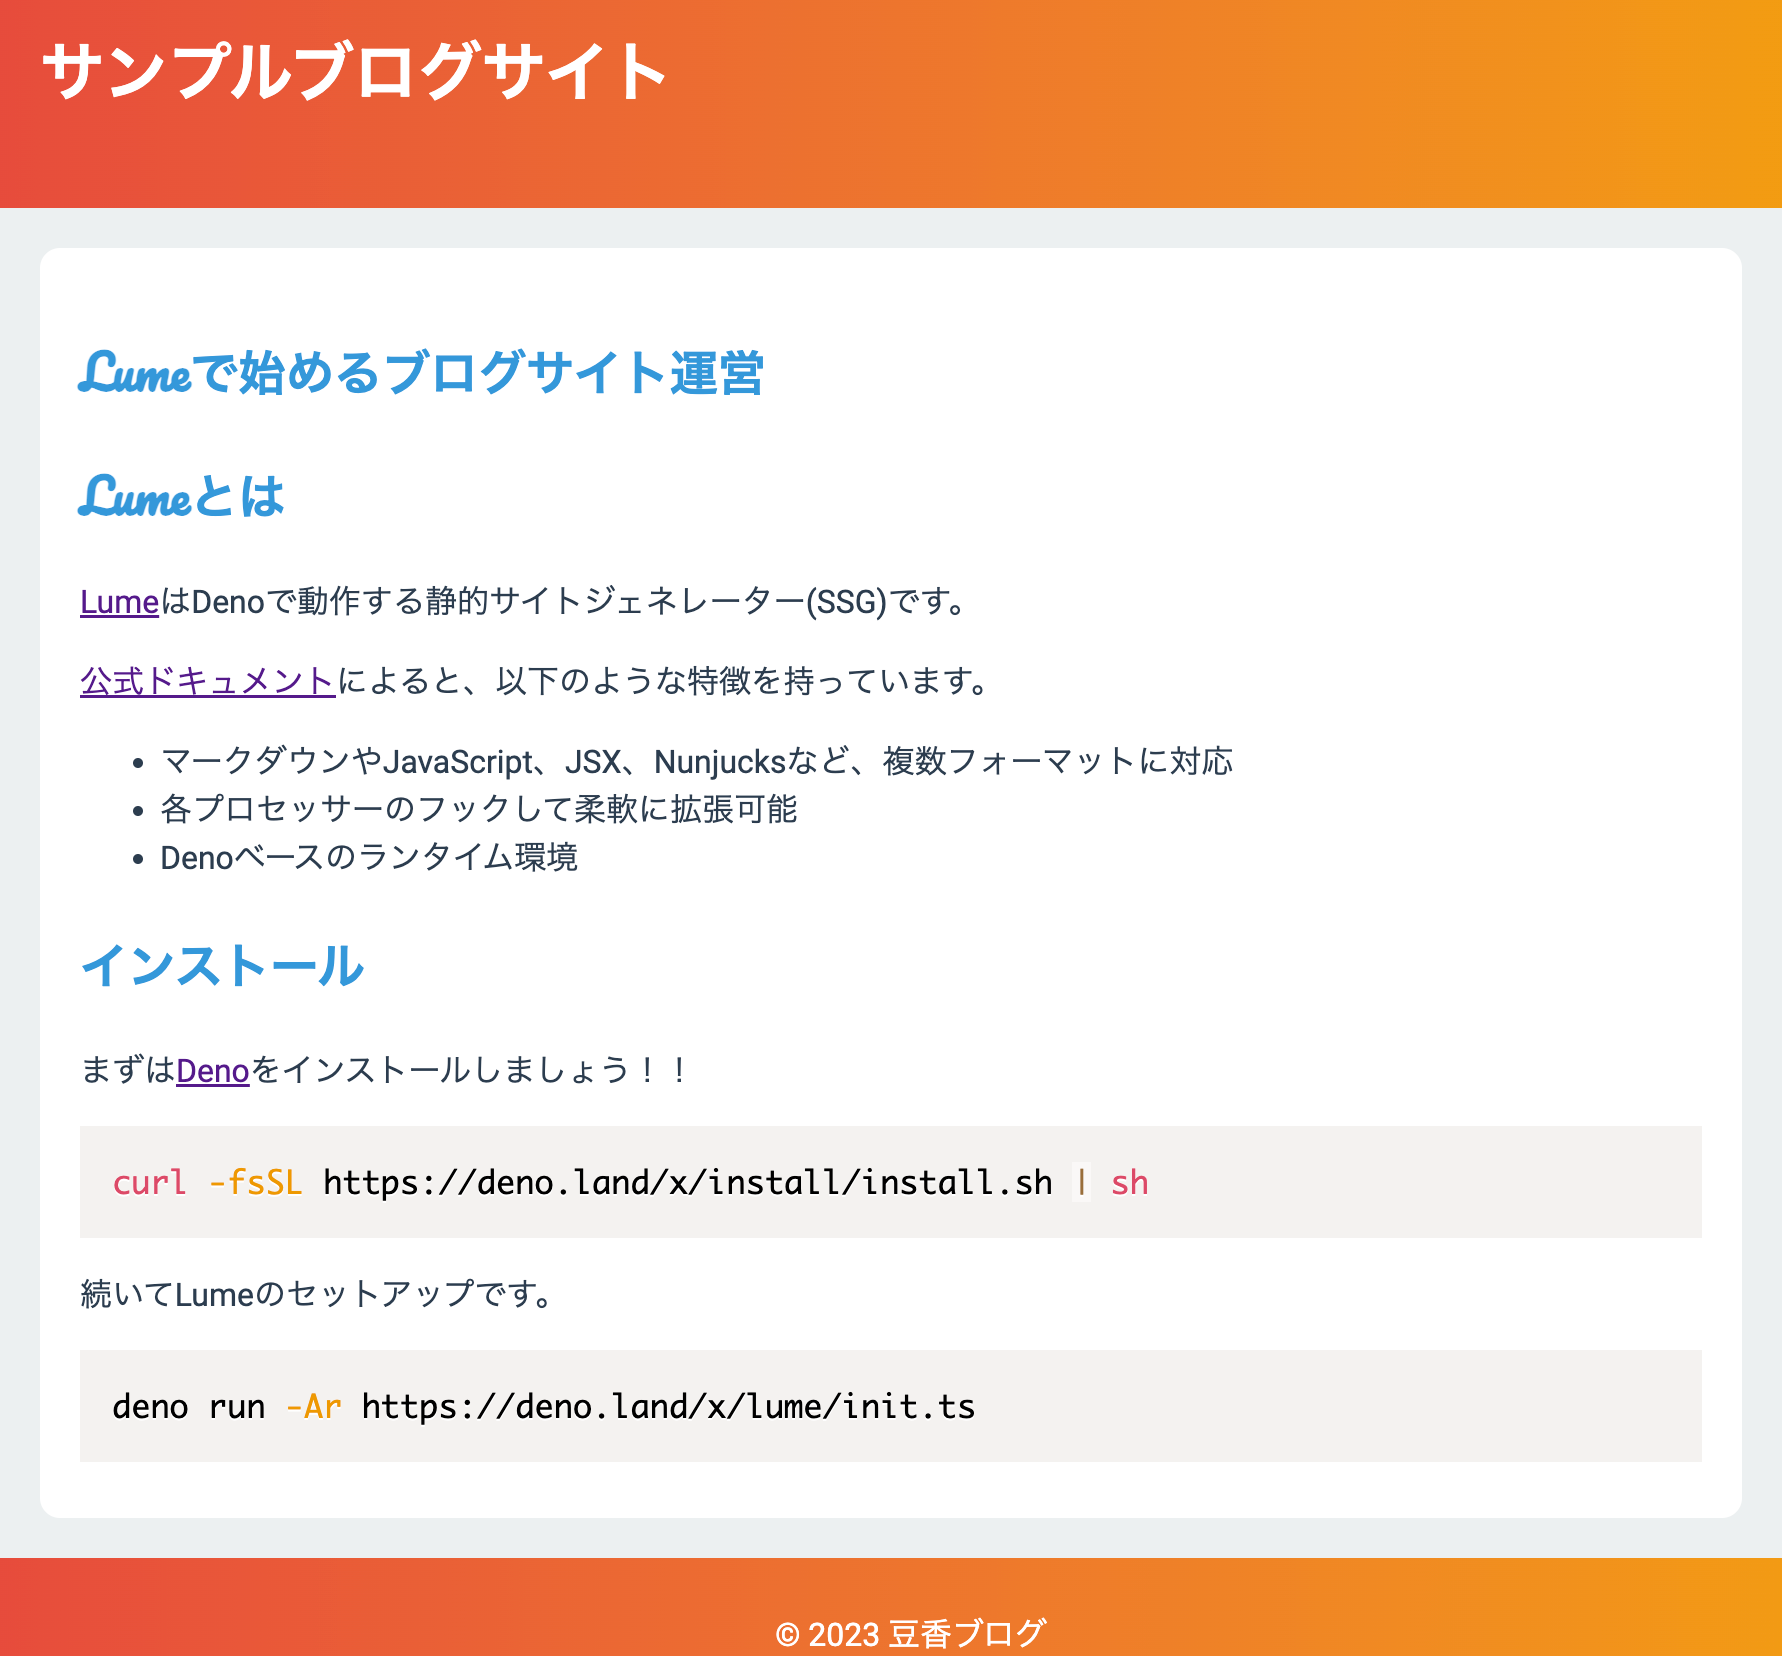
The appearance has improved significantly. With just a few additional settings, a full-fledged static site has been built.
While you can create your own plugins, many plugins are provided by Lume.
It's beneficial to first look for something that suits your needs from here.
If you decide to create your own, referencing the source code of these plugins can help you create them quickly.
Lume uses markdown-it as the Markdown parser.
Although not implemented here, you can customize and extend markdown-it with plugins.
To customize or use markdown-it plugins in Lume, modify _config.ts.
For example, to set up Markdown line breaks and use the markdown-it FootNote plugin (annotation feature), do the following.
import footNote from "npm:markdown-it-footnote@^3.0.3"; // Retrieved from npm repository
import { Options as MarkdownOptions } from "lume/plugins/markdown.ts";

const markdown: Partial<MarkdownOptions> = {
  options: {
    breaks: true // Convert Markdown line breaks to <br> tags
  },
  plugins: [ footNote ] // FootNote plugin
};

const site = lume({}, { markdown });
With Deno now officially supporting the npm repository, applying this is simple.
For more details, refer to the following official documentation.
Summary
#In this article, we created a simple static site using Lume.
Not only did we convert simple HTML, but we also created a full-fledged static site easily by using various plugins.
After actually using it, I felt that it was as fast and extensible as Eleventy and could be operated on our site.
We have only introduced a small part of the features here, so we will delve deeper in the next installments.