Analyze Open Data Easily Using Excel (Advanced Edition)
Back to TopTo reach a broader audience, this article has been translated from Japanese.
You can find the original version here.
In the previous article, we introduced a method to easily analyze publicly available data on the internet using Excel and PowerQuery. While this is sufficient for obtaining and analyzing data easily, by building it a bit more, it can be utilized as a simple data analysis tool.
Especially in terms of data acquisition, there are times when you want to address specific needs based on the API specifications of the data you want to acquire. Therefore, this time we will delve into the content of PowerQuery. Although there is a bit of coding work (not just GUI operations), I will explain it as clearly as possible[1].
Coding is the process of defining the content of computer processing by writing it in a notation rule that is "easy for humans to understand," such as a programming language. Creating this "source code" to define the content of computer processing is coding.
Review of the Previous Article
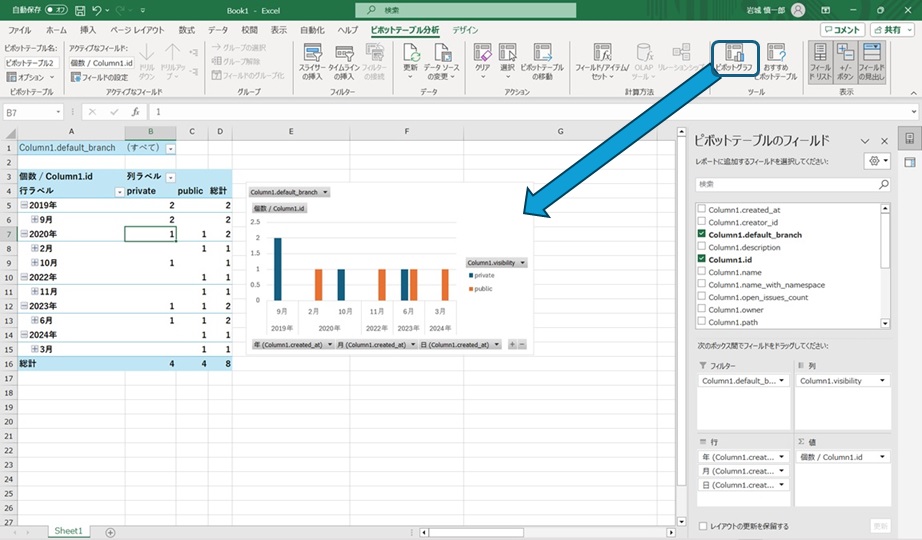
#We introduced an example of using PowerQuery built into Excel to obtain a list of projects created by the author from the API published by Gitlab and aggregate them by creation date[2].
With this content, you can achieve it without being particularly conscious of coding, just by setting it from the GUI. However, considering actual use, there are some points you might want to improve, such as:
- Switching data acquisition conditions without recreating or modifying PowerQuery steps
- For example, changing the data to your own projects instead of the author's, or using a Gitlab server operated by your company (not gitlab.com) as the data acquisition source.
- Acquiring and analyzing other data below the projects for a series of acquired projects
- Handling cases where the amount of data to be acquired is large and the necessary data cannot be obtained with a single API call
Therefore, under the assumption of "switching the server and user account for data acquisition and aggregating the pipeline usage results of the acquired series of projects," we will develop the tool from the previous article into a more versatile one. I will explain the pattern of building PowerQuery, so please refer to it and try various builds to get an image of how the program works.
When developing, you may want to test if there are no issues with the changes when you modify the source code or create an actual working application from the modified source code. Gitlab provides a feature called "pipelines" for such cases, allowing you to execute processes on the Gitlab server according to the configured content.
Parameterization of Processing Conditions
#The author's sample was to obtain data from Gitlab's public API https://gitlab.com/api/v4/users/shinichiro-iwaki/projects and aggregate the projects by creation date. If you want to aggregate the project information of taro-yamada[3] instead of the author's projects, you can change the API access destination to users/taro-yamada/projects and perform the same processing.
It would be fine to recreate the query for taro-yamada's project aggregation, but creating the same processing for the obtained data multiple times is a waste of effort. It would be convenient if you could switch only the user ID part of the API and use it. In such cases, you can use PowerQuery's "parameters." Like variables x in mathematics, the "parameter" value is reflected in the setting location of the "parameter." For example, if you use a parameter named target_user_id for the user ID, you can change the query to obtain a list of projects for the specified user just by switching the parameter value.
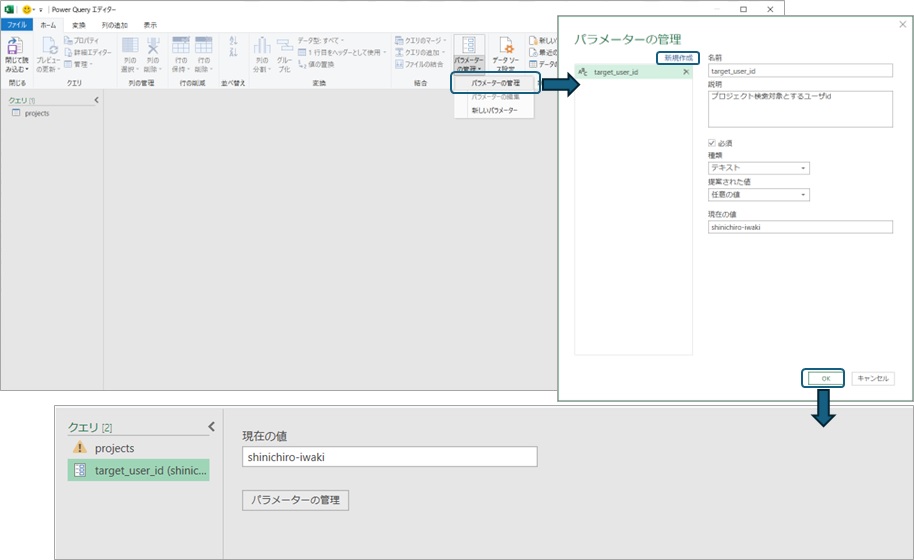
You can create parameters in PowerQuery from the ribbon menu on the GUI. For example, select "Manage Parameters" and then "New" to set the parameter name, type, and current value, and the parameter with the set name will be added to the editor. You can choose the type of parameter from values that PowerQuery can handle, such as numbers, dates, and text. Here, we select "text" because we want to use it in the URL string.
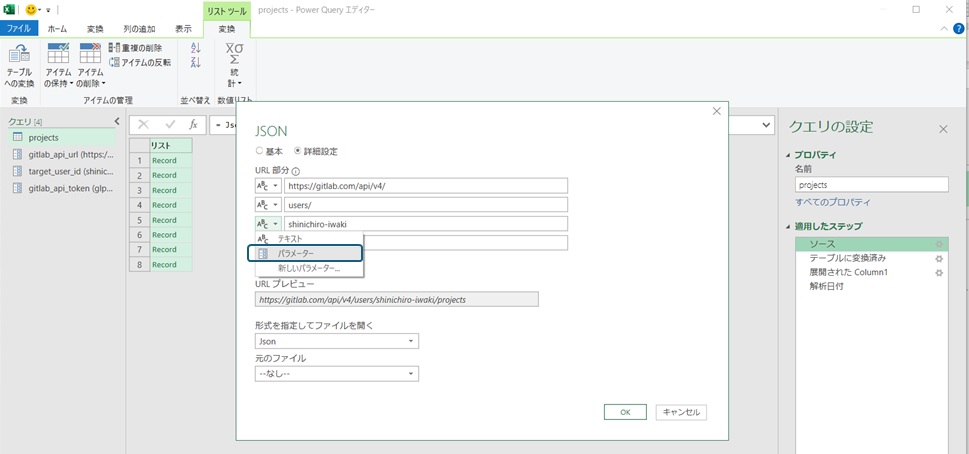
The created parameter can be specified in the PowerQuery editor. Since we want to use the parameter in part of the URL when acquiring data, we can open the query settings of the created "source" and specify the "parameter" on the detailed settings screen of the URL to include the created parameter in the data acquisition URL. By changing the parameter value, you can change the user ID to be the data acquisition target without modifying the query.
Here, if you check the small window at the top of the editor, you will see that the value "shinichiro-iwaki" has been changed to the variable target_user_id[4]. Here, the processing content of each step is displayed in the notation of Power Query M language (M language). The displayed content changes when you modify the processing content on the Query editor, but you can also directly edit the notation to change the processing content.
Some things, like the token value set in the header when calling the API in the previous article, cannot be changed from the editor's GUI, but you can also parameterize the value by directly modifying the source code defined in M language. Since changing a string value to a variable is a simple rewrite as mentioned above, it is safe to parameterize the token by directly modifying the source code.
Access tokens are information used for authenticated access when accessing information that requires authentication, such as logging in.
If logging in with an ID/password or fingerprint is like a house key, a token can be likened to a duplicate key that can only open specific doors.
As long as you are using the "data analysis tool" from the previous article for personal use, having the token information directly written is like "having your house key yourself," and it's not a big problem. However, you need to be careful when giving it to others.
If you were to publish a duplicate key and a burglar broke in, part of the responsibility would fall on you (though you might get some sympathy...), so you need to handle information that enables authenticated access, like access tokens, with caution.
To avoid the risk of leaving information when giving it to others, it is recommended to get into the habit of summarizing information like tokens in parameters and checking if you might "accidentally give it to someone."
Creating and Using Custom Functions
#It is common to want to obtain data held by each project for a series of acquired "Gitlab projects." For example, the information of pipelines used in each project can be obtained with /projects/:projectID:/pipelines. Gitlab is very convenient for easy development as most of the necessary features for development can be used with a free account[5], but at the time of writing, there are usage limits such as 5GiB of storage and 400 minutes of pipeline usage per month. While you can check rough information like whether the pipeline usage is within the free limit from the Gitlab account screen, you need to check the usage information individually for analysis like when/which project/how much was used.
Now, we can obtain a list of Gitlab projects from the specified user ID. Similarly, you can create a query to obtain a list of project pipelines from the specified project ID. However, the current queries create data for each specified ID, so if you want to obtain a list of pipelines used by the author, you need to specify the ID of the project list result one by one to output the pipeline list. It's very inconvenient to have to manually extract data multiple times even though we've created the data extraction process.
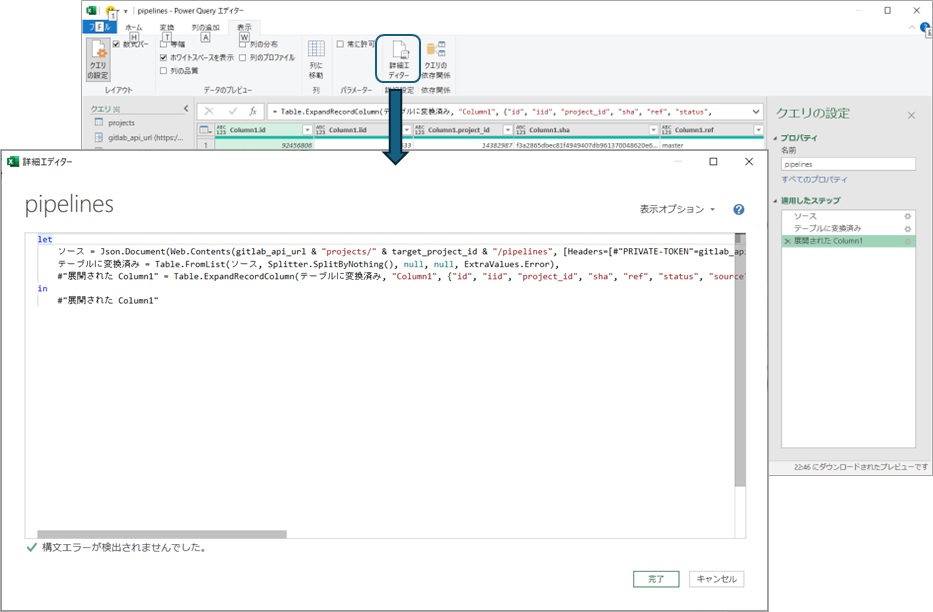
In such cases where you want to "use another query B with the result of a query A," you can create a custom function that does the same processing as query B and call it in the steps of query A. This requires some coding work, so let's check the content of the query to obtain the pipeline list. If you select "Advanced Editor" from the ribbon menu, you can check the source code of the selected query.
The pipeline list query created by the author is to "① obtain the project list from Gitlab's API," "② convert the result to a table," and then "③ expand all the data" to output a table, so the source code looks like this. Note that lines starting with "//" are comments added for explanation and are not included in the actual source code.
// Define the query processing. The expressions below let perform intermediate calculations (allowing intermediate results to be checked on the editor GUI)
let
    // ① The "source" is the data stored in JSON format (Json.Document) from the web access (Web.Contents) to the URL specified by target_project_id in Gitlab's projects API
    ソース = Json.Document(Web.Contents(gitlab_api_url & "projects/" & target_project_id & "/pipelines", [Headers=[#"PRIVATE-TOKEN"=gitlab_api_token]])),
    // ② The "converted to table" is the data converted to table format (Table.FromList) from the "source"
    テーブルに変換済み = Table.FromList(ソース, Splitter.SplitByNothing(), null, null, ExtraValues.Error),
    // ③ The "expanded Column1" is the data expanded into columns (Table.ExpandRecordColumn) from "converted to table" with {"id", "iid", "project_id", ...} to {"Column1.id", "Column1.iid", "Column1.project_id", ...}
    #"展開された Column1" = Table.ExpandRecordColumn(テーブルに変換済み, "Column1", {"id", "iid", "project_id", "sha", "ref", "status", "source", "created_at", "updated_at", "web_url", "name"}, {"Column1.id", "Column1.iid", "Column1.project_id", "Column1.sha", "Column1.ref", "Column1.status", "Column1.source", "Column1.created_at", "Column1.updated_at", "Column1.web_url", "Column1.name"})
// Define the output of this query
in
    // The output of this query is "expanded Column1" = "data from Gitlab in JSON format (source) converted to table format (converted to table) and expanded into columns"
    #"展開された Column1"
This source code is written in the notation of Power Query M language (M language) and follows the "functional" notation. Think of it as similar to "finding z when y=x+2 and z=2y-3" in your math classes. In mathematics, we wrote arithmetic expressions, but in M language, we define processing expressions using functions provided by the language, such as "Web.Contents."
Explaining the specific content could fill a book, so for now, it's enough to understand it as "this is how you write it."
I've mentioned "functional" several times, which indicates the way to define content in source code. The corresponding concept is "procedural."
"Procedural" programming defines the specific processing the computer should perform. It defines at the computer's processing level, including intermediate state control and branching of processing, such as "allocating memory for data storage" or "interrupting in case of processing errors." It is well-suited for controlling states and is often used in business systems and web systems.
On the other hand, "functional" programming defines only the relationship between the input and output the computer should achieve[6], leaving the specific processing content to the programming language. It allows for simple and side-effect-free definitions, but it can be difficult to understand intuitively if you're not used to it.
As a non-programming analogy, when you want someone to attend a meeting in Osaka on a business trip, "functional" would be like instructing "visit Company A in Osaka at 12:00 and attend the meeting," leaving the route to them, while "procedural" would be like giving specific instructions such as "take the 9:00 Shinkansen from Tokyo, transfer to the Hankyu train at Shin-Osaka station at 11:30...".
In the procedural case, as long as the assumptions hold, you can fine-tune the optimal route, but if there are unexpected changes in the schedule, following the instructions might risk missing the meeting.
| \ | Source Code Definition Content | Advantages | Disadvantages |
|---|---|---|---|
| Procedural | Specific computer processing Including state and control processing |
Performance tuning possible Intuitive understanding |
Tends to have a large amount of code Risk of unexpected side effects |
| Functional | Only the relationship between input and output required by the computer | Simple notation Easy to eliminate side effects (as it does not maintain state) |
Potentially inefficient in performance Tends to be difficult to understand intuitively |
There is no definitive answer as to which is correct, so understanding that there are such schools of thought will help you progress in understanding.
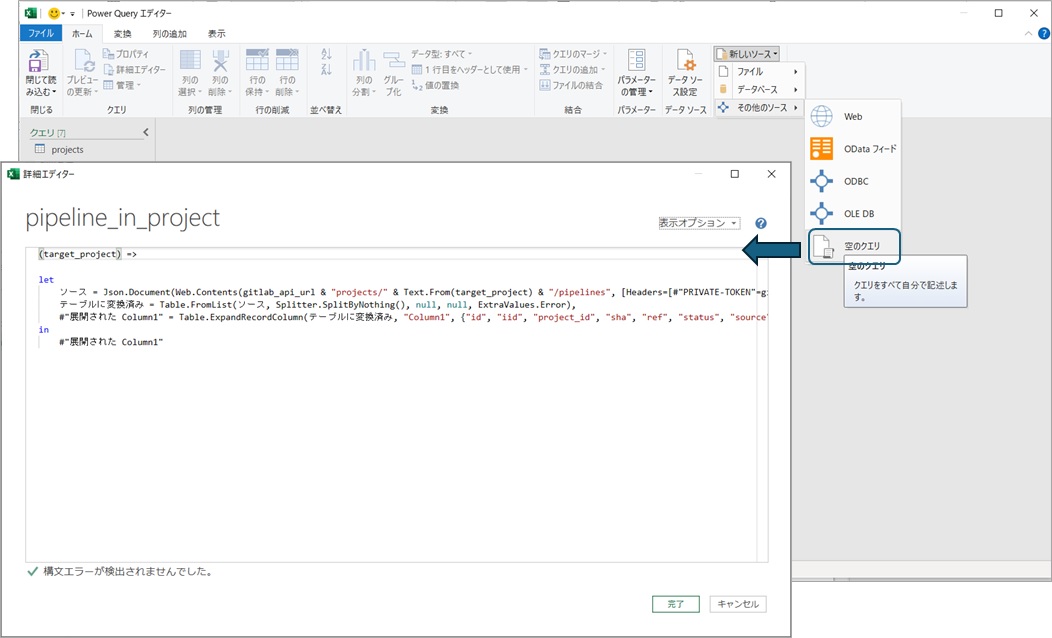
When you want to create a custom function with unique processing, you can add a query by selecting "New Source -> Other Sources -> Blank Query" from the ribbon menu, and then write the source code in the advanced editor (giving it a name you like).
Experienced users can directly create the source code, but you can create a function that does the same processing as the query by copying the source code displayed in the editor. Here, the target_project_id parameter specified in the query should be the value you want to specify when calling the processing. In M language, you can define the input by specifying (input_value, as many as you want, separated by commas) => at the beginning of the function definition, so it looks like this:
// Define that this function receives an input value named target_project
(target_project) =>

let
    // Create the URL using the input value target_project (not the query parameter target_project_id). The input value is converted to text format as the URL is a string
    ソース = Json.Document(Web.Contents(gitlab_api_url & "projects/" & Text.From(target_project) & "/pipelines", [Headers=[#"PRIVATE-TOKEN"=gitlab_api_token]])),
    // The rest of the code can be reused from the query created from the GUI
    テーブルに変換済み = Table.FromList(ソース, Splitter.SplitByNothing(), null, null, ExtraValues.Error),
    #"展開された Column1" = Table.ExpandRecordColumn(テーブルに変換済み, "Column1", {"id", "iid", "project_id", "sha", "ref", "status", "source", "created_at", "updated_at", "web_url", "name"}, {"Column1.id", "Column1.iid", "Column1.project_id", "Column1.sha", "Column1.ref", "Column1.status", "Column1.source", "Column1.created_at", "Column1.updated_at", "Column1.web_url", "Column1.name"})
in
    #"展開された Column1"
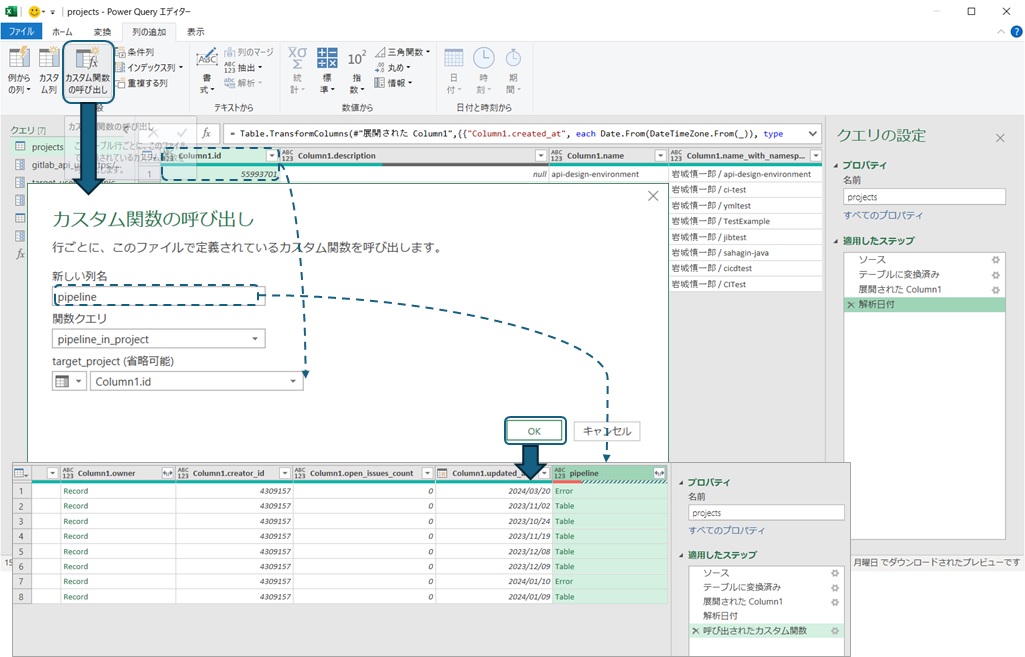
The created query can be executed by specifying the input value in the editor, but since it's a "function," it can also be called from another query. This time, we want to obtain the pipeline information using the project ID as input and add it to the data, so we select "Add Column" from the menu and choose to add a custom function. The new column name will be the name of the added column, so enter an easy-to-understand name and select the created query. Since this query is set with the input value target_project, you can set the input value by selecting the query. Here, set the column name (Column1.id) of the project ID in the original data, and you can obtain a list of pipelines using the project ID as input for each row.
If there are projects that haven't executed pipelines, the result of the pipeline column may be an error, so exclude the error rows and expand the pipeline results to analyze the execution results of the pipelines. For example, if you aggregate the number of pipelines by status (success/failure), you can create a graph like this:
Advanced Edition: Custom Function Building with Coding
#The pipeline list created in the previous section actually only retrieves a portion of the pipeline information.
Gitlab's API responds with data divided into multiple pages if the amount of data is large[7], so the current setup aggregates up to 20 pipeline records per project.
To retrieve all pipeline data via the API, you need to implement a loop that "keeps switching pages to fetch data until there is no more data." For such looping processes that cannot be created with GUI operations[8], you need to write code to build the process.
There are several ways to implement looping, but searching through Microsoft's documentation on M language, the List.Generate function seems to "execute the process until a condition is met and output the results in a list."
List.Generate(initial as function, condition as function, next as function, optional selector as nullable function) as list: Starts from the state specified by the initial function, continues executing next as long as the condition function is met, and can specify the output values with the selector function (translated by the author).
By calling the API sequentially in next and setting the condition to continue until the data obtained is empty, we can achieve our goal. Let's set up the initial state with a page counter for switching pages and a variable to store the data, and then define the List.Generate function.
- Set "page counter" and "variable to store API response data" in initial
- Set "number of items in the API response data is not zero" in condition
- In next, move the page counter to the next page and fetch the data for the specified page via API
- Optional: Output data is the collection of "variable to store API response data"
let
    // Create the URL using the input value target_project (not the query parameter target_project_id). The input value is converted to text format as the URL is a string
    ソース =
        List.Generate(
            () => [ pagecounter = 0, items = {null}],
            each List.Count( [items] ) > 0,
            each [
                pagecounter = [pagecounter] + 1,
                items = Json.Document(
                    Web.Contents(
                        gitlab_api_url & "projects/" & Text.From(target_project) & "/pipelines?per_page=100&page=" & Text.From(pagecounter) ,
                        [Headers=[#"PRIVATE-TOKEN"=gitlab_api_token]]
                        )
                    )
                ],
            each [items]
        ),
    // Remove null from the initial data (which contains empty content) and then create a table from the result of List.Generate
    リスト = List.RemoveNulls(List.Combine(ソース)),
    テーブルに変換済み = Table.FromList(リスト, Splitter.SplitByNothing(), null, null, ExtraValues.Error),
    ・・・
The input to the List.Generate function is a function, so the input is defined in the format of M language functions (input) => function content. each is a shorthand for setting a function for each element of the input (_) => {function content}, and this shorthand is called "syntactic sugar."
By rewriting the content of the custom function created earlier, you can now retrieve all data even when the data volume is large.
Summary
#While incorporating some simple coding, we built a simple data analysis tool using Excel's features.
Although I said "simple," in my subjective view, functional programming is difficult to understand intuitively, and I think the learning curve is high. However, with the support of the GUI, you can "see the intermediate state" while confirming the operation, making it a tool that helps with understanding.
When I first started programming, I struggled to visualize how the code I wrote would work. Since you can easily confirm the operation of the code while developing, I think it will be easier to understand if you try it when you need to analyze data.
This was just an introductory touch, but I wrote this article hoping you would get a feel for programming and find it convenient. The PowerQuery tool I created is available on Gitlab, so if you're interested, please try it out.
For those who feel motivated to master PowerQuery, I recommend moving on to the documentation provided by Microsoft on PowerQuery and M language.
The author is not a PowerQuery expert, so there may be parts that are not explained accurately, but please forgive me as I prioritize ease of understanding. ↩︎
To briefly summarize for those who haven't read it, we used PowerQuery to "obtain the author's projects from the project API published by Gitlab (GET /users/shinichiro-iwaki/projects)," converted the data into a table with "creation date, public/private, project ID, etc.," and created a graph aggregated by creation date using Excel's "pivot table." Since this is a prerequisite for this article, if you can't visualize it, reading the previous article might help you understand better. ↩︎
Of course, this is a dummy name. I haven't checked if it's an actual user ID on Gitlab. If you look at the author's icon, some of you might know who I'm imagining. ↩︎
In M language notation, values enclosed in
"are actual values, and values without"are treated as variables with that name."shinichiro-iwaki"means the string value "shinichiro-iwaki," andtarget_user_idmeans reflecting the value set in the parameter target_user_id, not the value "target_user_id." For now, it's enough to understand it as "that's how you write it." ↩︎When I created my account, it was very easy to use pipelines with a free account, but looking at the official page now, it seems that even free accounts might need to register payment information to prevent misuse. ↩︎
If you do a bit of research, you'll come across difficult keywords like "① lack of side effects," "② referential transparency," and "③ higher-order functions (first-class functions)." In my limited understanding, it means defining processing with functions that "① do nothing other than the determined output for the input (e.g., no database saving)," and "② always output the same result for the same input." As in mathematics, where you could substitute
y=x+2intoz=2y-3to getz=2(x+2)-3=2x+1, "③ function definitions can be stored in variables and operated on." ↩︎This method is called pagination. The number of data items per page can be set when calling the API, but if the data volume exceeds the upper limit, all data cannot be retrieved in one API call. ↩︎
The editor does not provide settings for operations that control looping processes. I made a blanket statement, but if it turns out you can do it, my apologies as I am not deeply familiar with PowerQuery editor. ↩︎
