Installing Moodle 4.4 on Amazon EC2
Back to TopTo reach a broader audience, this article has been translated from Japanese.
You can find the original version here.
Hello, I'm Shoji.
Recently, you may have heard more about "reskilling," where organizations lead the acquisition of new knowledge and skills needed for new tasks, and "recurrent education" where people relearn at universities and other institutions. Moodle, a Learning Management System (LMS) often used in such training, is an open-source software with a proven track record in many universities and companies, and it also has the capability to issue open badges that can be used to certify learned materials and acquired skills.
Moodle operates in a LAMP environment, which stands for Linux, Apache, MySQL, and PHP. In this article, I will explain how to set up MySQL using Amazon RDS and configure Linux, Apache, and PHP to run on Amazon EC2.
Purpose of This Article
#This article explains how to create a Moodle AMI (Amazon Machine Image). Creating a machine image can reduce the toil of repeatedly executing installation instructions on multiple virtual machines, and also opens the way to flexible scaling through autoscaling and providing a portable image that can be deployed across account IDs.
Images provided by AWS Marketplace and the community are good to consider if you want to easily understand what Moodle is or if it fits your use case. The motivation for writing this article was the desire to have an environment where I could freely try out database selection and plugin installation.
An AMI is an Amazon Machine Image required to launch virtual machine instances on EC2 or Snowball Edge. Created AMIs can be published to other users or listed on AWS Marketplace.
There are dedicated tools like HashiCorp's Packer for creating AMIs, but this article will not use such tools.
This article focuses on the following two explanations:
- How to create an AMI
- How to install Moodle
Preparation
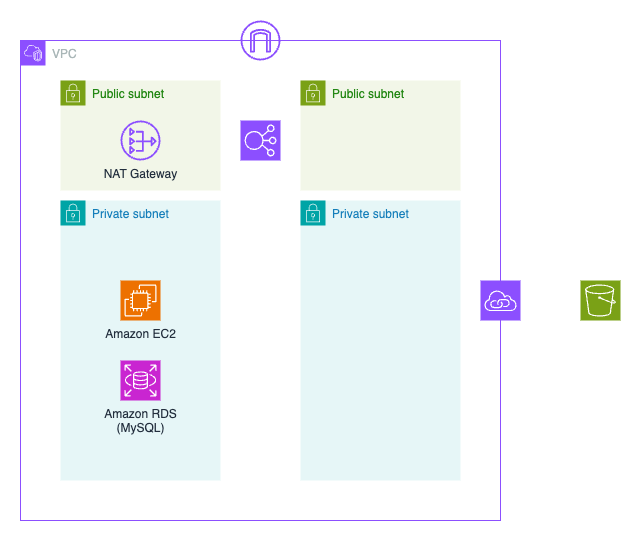
#Prepare the network and access policies necessary for installing and running Moodle.
- Create an S3 bucket with any bucket name in your region[1].
- Use the following CloudFormation template to create an IAM role and instance profile.
AWSTemplateFormatVersion: "2010-09-09"

Parameters:
  BucketName:
    Description: A bucket name
    Type: String

Resources:
  Role:
    Type: AWS::IAM::Role
    Properties:
      AssumeRolePolicyDocument:
        Version: "2012-10-17"
        Statement:
          - Effect: Allow
            Principal:
              Service:
                - ec2.amazonaws.com
            Action:
              - 'sts:AssumeRole'
      Path: /
      ManagedPolicyArns:
        - arn:aws:iam::aws:policy/AmazonSSMManagedInstanceCore
        - arn:aws:iam::aws:policy/AmazonSSMPatchAssociation
      RoleName: RoleForMoodle

  Policy:
    Type: AWS::IAM::Policy
    Properties:
      PolicyName: PolicyForMoodle
      PolicyDocument:
        Version: "2012-10-17"
        Statement:
          - Effect: Allow
            Action:
              - s3:ListBucket
            Resource:
              - !Sub 'arn:aws:s3:::${BucketName}'
          - Effect: Allow
            Action:
              - s3:PutObject
              - s3:GetObject
            Resource:
              - !Sub 'arn:aws:s3:::${BucketName}/*'
      Roles:
        - !Ref Role

  InstanceProfile:
    Type: AWS::IAM::InstanceProfile
    Properties:
      InstanceProfileName: MoodleInstanceProfile
      Path: /
      Roles:
        - !Ref Role
- Use the following CloudFormation template to configure the network, security groups, etc.
AWSTemplateFormatVersion: "2010-09-09"

Parameters:
  EnvironmentName:
    Description: An environment name that is prefixed to resource names
    Type: String

Resources:
  VPC:
    Type: AWS::EC2::VPC
    Properties:
      CidrBlock: 10.0.0.0/16
      EnableDnsHostnames: true
      EnableDnsSupport: true
      Tags:
        - Key: Name
          Value: !Ref EnvironmentName

  InternetGateway:
    Type: AWS::EC2::InternetGateway
    Properties:
      Tags:
        - Key: Name
          Value: !Ref EnvironmentName

  InternetGatewayAttachement:
    Type: AWS::EC2::VPCGatewayAttachment
    Properties:
      InternetGatewayId: !Ref InternetGateway
      VpcId: !Ref VPC

  PublicSubnet1:
    Type: AWS::EC2::Subnet
    Properties:
      AvailabilityZone:
        Fn::Select:
          - 0
          - Fn::GetAZs: ""
      CidrBlock: 10.0.0.0/24
      MapPublicIpOnLaunch: true
      VpcId: !Ref VPC
      Tags:
        - Key: Name
          Value: !Sub ${EnvironmentName} Public Subnet (AZ1)

  PublicSubnet2:
    Type: AWS::EC2::Subnet
    Properties:
      AvailabilityZone:
        Fn::Select:
          - 1
          - Fn::GetAZs: ""
      CidrBlock: 10.0.1.0/24
      MapPublicIpOnLaunch: true
      VpcId: !Ref VPC
      Tags:
        - Key: Name
          Value: !Sub ${EnvironmentName} Public Subnet (AZ2)

  NatGateway1EIP:
    Type: AWS::EC2::EIP
    Properties:
      Domain: vpc

  NatGateway1:
    Type: AWS::EC2::NatGateway
    Properties:
      AllocationId: !GetAtt NatGateway1EIP.AllocationId
      SubnetId: !Ref PublicSubnet1
      Tags:
        - Key: Name
          Value: !Sub ${EnvironmentName} NatGateway 1 (AZ1)

  PublicRouteTable:
    Type: AWS::EC2::RouteTable
    Properties:
      VpcId: !Ref VPC
      Tags:
        - Key: Name
          Value: !Sub ${EnvironmentName} Public Routes

  DefaultPublicRoute:
    Type: AWS::EC2::Route
    Properties:
      DestinationCidrBlock: 0.0.0.0/0
      GatewayId: !Ref InternetGateway
      RouteTableId: !Ref PublicRouteTable

  PublicSubnet1RouteTableAssociation:
    Type: AWS::EC2::SubnetRouteTableAssociation
    Properties:
      RouteTableId: !Ref PublicRouteTable
      SubnetId: !Ref PublicSubnet1

  PublicSubnet2RouteTableAssociation:
    Type: AWS::EC2::SubnetRouteTableAssociation
    Properties:
      RouteTableId: !Ref PublicRouteTable
      SubnetId: !Ref PublicSubnet2

  PrivateSubnet1:
    Type: AWS::EC2::Subnet
    Properties:
      AvailabilityZone:
        Fn::Select:
          - 0
          - Fn::GetAZs: ""
      CidrBlock: 10.0.2.0/24
      MapPublicIpOnLaunch: false
      VpcId: !Ref VPC
      Tags:
        - Key: Name
          Value: !Sub ${EnvironmentName} Private Subnet (AZ1)

  PrivateSubnet2:
    Type: AWS::EC2::Subnet
    Properties:
      AvailabilityZone:
        Fn::Select:
          - 1
          - Fn::GetAZs: ""
      CidrBlock: 10.0.3.0/24
      MapPublicIpOnLaunch: false
      VpcId: !Ref VPC
      Tags:
        - Key: Name
          Value: !Sub ${EnvironmentName} Private Subnet (AZ2)

  PrivateRouteTable:
    Type: AWS::EC2::RouteTable
    Properties:
      VpcId: !Ref VPC
      Tags:
        - Key: Name
          Value: !Sub ${EnvironmentName} Private Routes

  PrivateSubnet1RouteTableAssociation:
    Type: AWS::EC2::SubnetRouteTableAssociation
    Properties:
      RouteTableId: !Ref PrivateRouteTable
      SubnetId: !Ref PrivateSubnet1

  PrivateSubnet2RouteTableAssociation:
    Type: AWS::EC2::SubnetRouteTableAssociation
    Properties:
      RouteTableId: !Ref PrivateRouteTable
      SubnetId: !Ref PrivateSubnet2

  RouteNatGateway1:
    Type: AWS::EC2::Route
    Properties:
      RouteTableId: !Ref PrivateRouteTable
      DestinationCidrBlock: '0.0.0.0/0'
      NatGatewayId: !Ref NatGateway1

  S3VPCEndpoint:
    Type: AWS::EC2::VPCEndpoint
    Properties:
      RouteTableIds:
        - !Ref PrivateRouteTable
      ServiceName: !Sub com.amazonaws.${AWS::Region}.s3
      VpcEndpointType: Gateway
      VpcId: !Ref VPC

  MySQLSubnetGroup:
    Type: AWS::RDS::DBSubnetGroup
    Properties:
      DBSubnetGroupDescription: MySQL DBSubnet Group
      DBSubnetGroupName: MySQLSubnet
      SubnetIds:
        - !Ref PrivateSubnet1
        - !Ref PrivateSubnet2

  ElastiCacheSubnetGroup:
    Type: AWS::ElastiCache::SubnetGroup
    Properties:
      CacheSubnetGroupName: ElastiCacheSubnetGroup
      Description: ElastiCache Subnet Group
      SubnetIds:
        - !Ref PrivateSubnet1
        - !Ref PrivateSubnet2

  LBSecurityGroup:
    Type: AWS::EC2::SecurityGroup
    Properties:
      GroupDescription: Load Balancer Security Group
      GroupName: !Sub ${EnvironmentName}-LB-SecurityGroup
      VpcId: !Ref VPC

  EC2SecurityGroup:
    Type: AWS::EC2::SecurityGroup
    Properties:
      GroupDescription: EC2 Security Group
      GroupName: !Sub ${EnvironmentName}-EC2-SecurityGroup
      VpcId: !Ref VPC

  LBSecurityGroupIngress:
    Type: AWS::EC2::SecurityGroupIngress
    Properties:
      IpProtocol: tcp
      CidrIp: 0.0.0.0/0
      FromPort: 443
      ToPort: 443
      GroupId:
        Fn::GetAtt:
          - LBSecurityGroup
          - GroupId

  EC2SecurityGroupIngress:
    Type: AWS::EC2::SecurityGroupIngress
    Properties:
      IpProtocol: tcp
      FromPort: 80
      ToPort: 80
      SourceSecurityGroupId:
        Fn::GetAtt:
          - LBSecurityGroup
          - GroupId
      GroupId:
        Fn::GetAtt:
          - EC2SecurityGroup
          - GroupId

  MySQLSecurityGroup:
    Type: AWS::EC2::SecurityGroup
    Properties:
      GroupDescription: MySQL Security Group
      GroupName: !Sub ${EnvironmentName}-MySQL-SecurityGroup
      VpcId: !Ref VPC

  MySQLSecurityGroupIngress:
    Type: AWS::EC2::SecurityGroupIngress
    Properties:
      IpProtocol: tcp
      FromPort: 3306
      ToPort: 3306
      SourceSecurityGroupId: !Ref EC2SecurityGroup
      GroupId:
        Fn::GetAtt:
          - MySQLSecurityGroup
          - GroupId

Outputs:
  VPC:
    Description: A reference to the created VPC
    Value: !Ref VPC
    Export:
      Name: !Sub ${EnvironmentName}-VPC

  PublicSubnet1:
    Description: A reference to the public subnet in the 1st Availability Zone
    Value: !Ref PublicSubnet1
    Export:
      Name: !Sub ${EnvironmentName}-PublicSubnet1

  PublicSubnet2:
    Description: A reference to the public subnet in the 2nd Availability Zone
    Value: !Ref PublicSubnet2
    Export:
      Name: !Sub ${EnvironmentName}-PublicSubnet2

  PrivateSubnet1:
    Description: A reference to the private subnet in the 1st Availability Zone
    Value: !Ref PrivateSubnet1
    Export:
      Name: !Sub ${EnvironmentName}-PrivateSubnet1

  PrivateSubnet2:
    Description: A reference to the private subnet in the 2nd Availability Zone
    Value: !Ref PrivateSubnet2
    Export:
      Name: !Sub ${EnvironmentName}-PrivateSubnet2

  PrivateRouteTable:
    Description: A reference to the private route table
    Value: !Ref PrivateRouteTable
    Export:
      Name: !Sub ${EnvironmentName}-PrivateRouteTable

  LBSecurityGroup:
    Description: A reference to the load balancer security group
    Value: !Ref LBSecurityGroup
    Export:
      Name: !Sub ${EnvironmentName}-LBSecurityGroup

  EC2SecurityGroup:
    Description: A reference to the ec2 security group
    Value: !Ref EC2SecurityGroup
    Export:
      Name: !Sub ${EnvironmentName}-EC2SecurityGroup

  MySQLSubnetGroup:
    Description: A reference to the mysql db subnet group.
    Value: !Ref MySQLSubnetGroup
    Export:
      Name: !Sub ${EnvironmentName}-MySQLSubnetGroup
- Create MySQL on Amazon RDS. Create MySQL with username 'root' and password authentication.
Install Moodle on Ubuntu
#Launch the installation using the "Ubuntu Server 24.04 LTS (HVM), SSD Volume Type" AMI on a t3a.small instance type.
Click the "Edit" button next to "Network settings".
- Select the VPC created in Preparation for "VPC".
- Select "Private Subnet (AZ1)" for "Subnet".
- For "Firewall (Security Group)", select "Choose an existing security group" and choose "EC2-SecurityGroup".
Open "Advanced details". - Select "MoodleInstanceProfile" for "IAM instance profile".
Click the "Launch Instance" button.
- In the "Select an existing key pair or create a key pair" dialog, select "Continue without a key pair" and click the "Launch Instance" button.
Wait a few minutes for it to launch. You can operate the launched instance using the Session Manager of the System Manager due to the instance profile created earlier. Once launched, click the "Connect to instance" button and then click the "Connect" button from the "Session Manager" tab.
Install php, git, and mysql-client
#Executing apt install php installs PHP 8.3. Since there were some doubts about its compatibility with 8.3, PHP 8.1 is installed based on some information on the internet.
sudo add-apt-repository ppa:ondrej/php -y
sudo apt update
sudo apt upgrade -y
sudo apt install -y php8.1
sudo apt install -y php8.1-mysql php8.1-iconv php8.1-mbstring php8.1-curl php8.1-tokenizer php8.1-xmlrpc php8.1-soap php8.1-ctype php8.1-zip php8.1-gd php8.1-simplexml php8.1-xml php8.1-intl
Next, install git and MySQL Client.
sudo apt install -y git mysql-client
Use git to obtain Moodle.
cd /opt
sudo git clone git://git.moodle.org/moodle.git
Find the line ;max_input_vars=1000 that is commented out in the files /etc/php/8.1/apache2/php.ini and /etc/php/8.1/cli/php.ini, and change it to max_input_vars=5000 and save.
Copy Moodle 4.4
#Retrieve the list of branches with the following command.
cd /opt/moodle
sudo git branch -a
Instruct git for Moodle 4.4.
sudo git branch --track MOODLE_404_STABLE origin/MOODLE_404_STABLE
sudo git checkout MOODLE_404_STABLE
Copy Moodle 4.4 and create the data directory, etc.
sudo cp -R /opt/moodle /var/www/html/
sudo mkdir /var/moodledata
sudo chown -R www-data /var/moodledata
sudo chmod -R 777 /var/moodledata
sudo chmod -R 0755 /var/www/html/moodle
Add a file for the health check of the load balancer
#Create a file /var/www/html/moodle/phpinfo.php with the following content.
<?php
phpinfo();
Save the AMI up to this point
#Although it's still in progress, save the image up to this point as an AMI. The remaining steps involve database connection settings and load balancer settings, which are highly dependent on the execution environment. Therefore, obtaining an AMI at this stage allows you to acquire a portable image.
Stop the EC2 instance you are operating from "Instance State" (be careful not to select "Terminate Instance"). Once stopped, select "Actions" from "Images and Templates", then "Create Image".
In the "Create Image" dialog, enter a name for the image and click the "Create Image" button.
Once the image creation is complete, select the stopped instance and start it from "Instance State". Once started, connect using the "Session Manager".
Create the moodle database on MySQL
#Replace HOSTNAME with the endpoint of the Amazon RDS created during preparation, and create the moodle database as follows.
mysql -h HOSTNAME -u root -p
CREATE DATABASE moodle DEFAULT CHARACTER SET utf8mb4 COLLATE utf8mb4_unicode_ci;
Configure the Moodle configuration file (config.php)
#sudo php /var/www/html/moodle/admin/cli/install.php
Describe the parts other than the default values.
== Data directories permission ==
type value, press Enter to use,default value (2777)
: 00777
== Web address ==
type value
: https://<YOUR Domain Name>
== Data directory ==
type value, press Enter to use default value (/var/www/html/moodledata)
: /var/moodledata
== Database host ==
type value, press Enter to use default value (localhost)
: <Amazon RDS endpoint (hostname)>
== Database port ==
type value, press Enter to use default value ()
: 3306
== Database password ==
type value
: <MySQL root user PASSWORD>
== Full site name ==
type value
: <Site Name>
== Short name for site (eg single word) ==
type value
: <Site Short Name>
== New admin user password ==
type value
: <Moodle Administrator (admin) Password>
Have you read these conditions and understood them?
type y (means yes) or n (means no)
: y
Add $CFG->sslproxy = true; above the line $CFG->wwwroot = in /var/www/html/moodle/config.php.
$CFG->sslproxy  = true;
$CFG->wwwroot   = ...;
Change the mode of /var/www/html/moodle/config.php.
sudo chmod 664 /var/www/html/moodle/config.php
Finally, modify the DocumentRoot in /etc/apache2/sites-available/000-default.conf as follows.
DocumentRoot /var/www/html/moodle
Save the AMI
#Save the image up to this point as an AMI. This AMI can evolve to be used as the AMI necessary for autoscaling, as it is highly dependent on the execution environment.
Stop the EC2 instance you are operating from "Instance State" (be careful not to select "Terminate Instance"). Once stopped, select "Actions" from "Images and Templates", then "Create Image".
In the "Create Image" dialog, enter a name for the image and click the "Create Image" button.
Once the image creation is complete, select the stopped instance and start it from "Instance State".
Browser Operations
#Preparation for Operations
#To connect securely, the following preparations are necessary:
- Acquire a domain name
- Register a hosted zone in Route 53
- Obtain a certificate to set up on the load balancer
Create a Load Balancer
#The CloudFormation template for constructing the load balancer resources is as follows.
AWSTemplateFormatVersion: "2010-09-09"

Parameters:
  EnvironmentName:
    Description: An environment name that is prefixed to resource names
    Type: String

  CertificateArn:
    Description: A certificate arn
    Type: String

  HostedZoneId:
    Description: A hosted zone id
    Type: String

  DomainName:
    Description: A domain name
    Type: String

Resources:
  LoadBalancer:
    Type: AWS::ElasticLoadBalancingV2::LoadBalancer
    Properties:
      IpAddressType: ipv4
      Name: !Sub ${EnvironmentName}-lb
      Scheme: internet-facing
      SecurityGroups:
        - Fn::ImportValue: !Sub ${EnvironmentName}-LBSecurityGroup
      Subnets:
        - Fn::ImportValue: !Sub ${EnvironmentName}-PublicSubnet1
        - Fn::ImportValue: !Sub ${EnvironmentName}-PublicSubnet2

  TargetGroup:
    Type: AWS::ElasticLoadBalancingV2::TargetGroup
    Properties:
      HealthCheckPath: /phpinfo.php
      HealthCheckProtocol: HTTP
      HealthCheckTimeoutSeconds: 5
      Matcher:
        HttpCode: 200
      Name: !Sub ${EnvironmentName}-tg
      Port: 80
      Protocol: HTTP
      ProtocolVersion: HTTP1
      TargetType: instance
      VpcId:
        Fn::ImportValue: !Sub ${EnvironmentName}-VPC

  LoadBalancerListener:
    Type: AWS::ElasticLoadBalancingV2::Listener
    Properties:
      Certificates:
        - CertificateArn: !Ref CertificateArn
      DefaultActions:
        - TargetGroupArn: !Ref TargetGroup
          Type: forward
      LoadBalancerArn: !Ref LoadBalancer
      Port: 443
      Protocol: HTTPS

  LBRecordSet:
    Type: AWS::Route53::RecordSet
    Properties:
      AliasTarget:
        DNSName:
          Fn::GetAtt:
            - LoadBalancer
            - DNSName
        EvaluateTargetHealth: no
        HostedZoneId:
          Fn::GetAtt:
            - LoadBalancer
            - CanonicalHostedZoneID
      Name: !Ref DomainName
      HostedZoneId: !Ref HostedZoneId
      Type: A
Register the Target
From the EC2 service's load balancing, target groups in the AWS Management Console, select the target group created above, check the instances displayed under "Available Instances," click the "Include as pending" button, and then click the "Create Target Group" button.
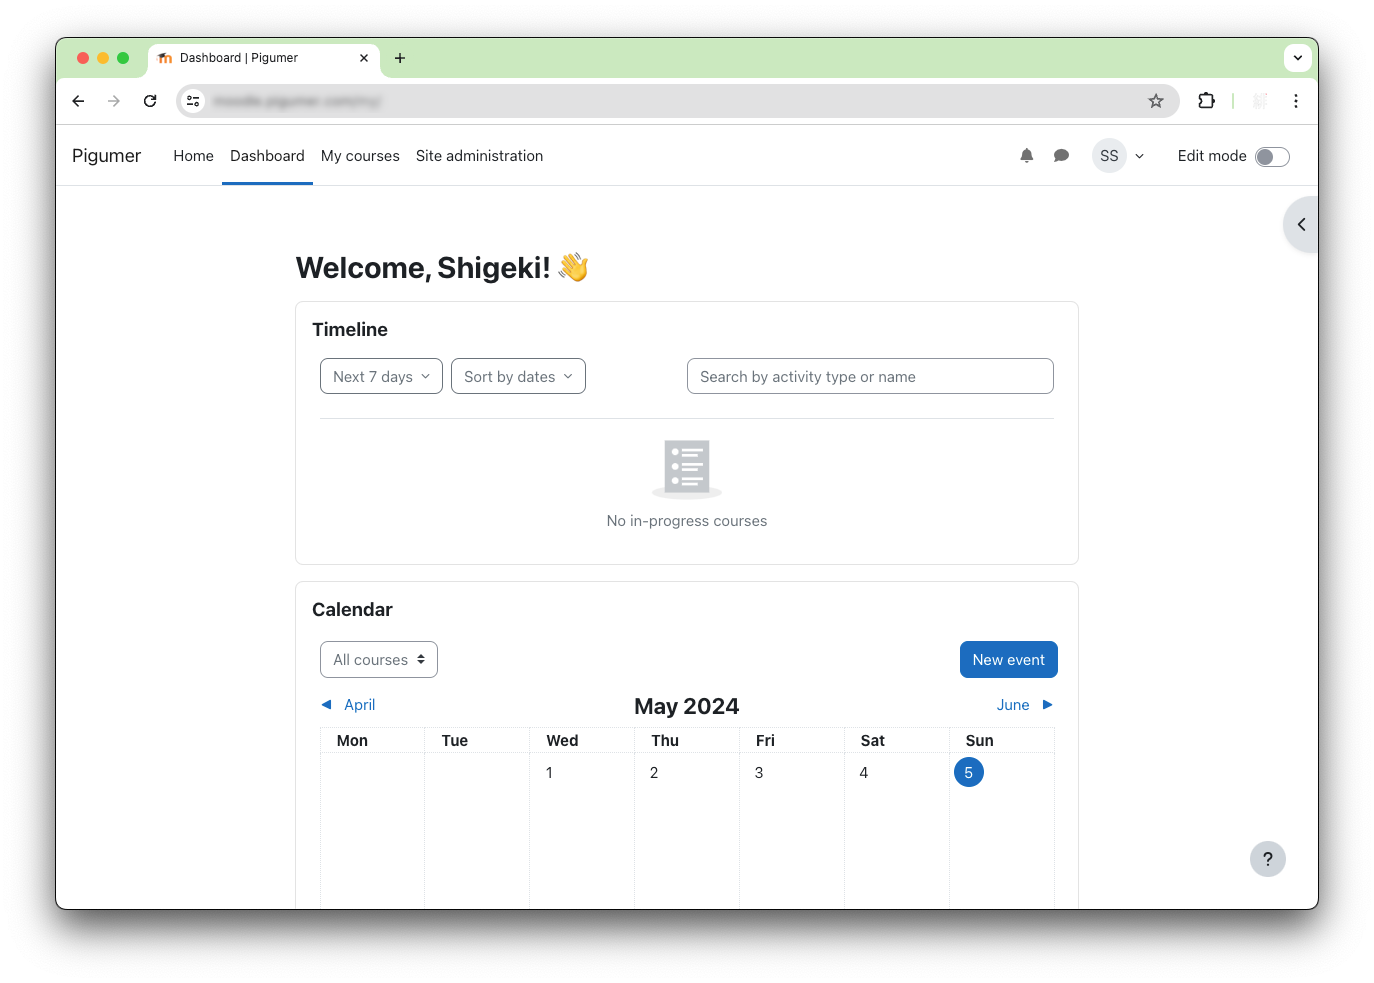
Access from a Browser
#Enter the domain name registered in Route 53 (https://<YOUR DOMAIN NAME>) in your browser. After logging in, the Dashboard will be displayed as follows.
Conclusion
#There are still challenges in achieving high availability and portability with the AMI created. It may be necessary to hold login sessions in ElastiCache (redis, memcached) or use NFS or S3 for data that should be shared across multiple servers. However, by reviewing and evolving the settings based on the AMI created this time, you can efficiently aim for your goals. I plan to introduce the challenges not covered in this article in subsequent sequels.
References
#- Step-by-step Installation Guide for Ubuntu
- Preparing for Open Badge Issuance, Installing Moodle 4.1 LTS with PHP8.1 on Ubuntu 22.04
- Server Cluster
S3 is included as it is planned to be used for storing shared files to enhance availability. ↩︎