Get back to where the joy of programming
Back to TopTo reach a broader audience, this article has been translated from Japanese.
You can find the original version here.
Introduction
#A former colleague once talked about why he was in the IT field, saying:
"When I was in elementary school, I created a simple game with programming. Looking back, it was a completely trashy program, but when it worked, I was very happy and moved.
That original experience is why I am now in the IT field."
I heard this story over ten years ago, but I vividly remember my colleague speaking with a distant look in his eyes.
Thinking back, I also transcribed games in BASIC when I was in elementary school, not knowing anything. Of course, there was no internet, and I remember making something like a block-breaking game while trying and erring with limited information.
Unfortunately, I didn't have an original experience like my colleague, but I still remember having fun.
The root of the fun
#The root of the fun and joy, of course, includes the fact that we were young, but I think there was a sense of omnipotence that we were controlling everything with limited information.
Thinking about it that way, today might be an unfortunate era. IT is becoming more sophisticated day by day, information is overflowing, and the simple joy of creating seems to be diminishing day by day. Whatever you start, peripheral tools and frameworks overflow, and the knowledge gained today immediately becomes unusable. It even feels like we are not using peripheral tools and frameworks, but rather, they are using us. In such a situation, it is not easy to have an experience where you feel a sense of omnipotence as if you are controlling everything.
Regaining the excitement of the heart
#In this article, I will try to regain the excitement of those days by creating a low-level Tetris clone in Rust. And if possible, I would like to let people who have never programmed before experience the joy that my colleague once felt.
Tetris Clone Titris
#Due to trademark issues, the application will be called Titris, which stands for tiny Tetris.
The implementation of Titris is not too simple, not too complex, everyone knows the rules, and above all, it is fun to play, so it is an ideal subject for this purpose. Of course, it is true that it is a bit of a hurdle for those who are new to programming to start with Rust. Therefore, even if you only have a rough understanding of Rust's syntax, I would like you to feel the joy of creation by creating a working program. The source code will be completed in about 300 lines, so I think you will be able to feel how the program works.
Let's go on a tour to create Titris.
Assumed readers and prerequisites
#The readers assumed in this article are as follows:
- Those who are new to programming or equivalent
- Those who want to get a rough idea of programming with the Rust language
We will explain the way of thinking about programming and Rust language together, but we will not go into detail about Rust's syntax. Let's start by making and moving to get the atmosphere.
Tools used
#The tools to be used are as follows.
- Rust
- Command prompt or terminal
- Text editor (notepad is acceptable)
It is assumed that Rust is already installed. If you have not installed it yet, please complete the installation by referring to Install Rust or similar.
To run Rust in a Windows environment, Microsoft C++ Build Tools must be installed.
If it is not installed, you will launch the Microsoft C++ Build Tools installer during the procedure, but it may be unclear what to choose, so I will attach an image.
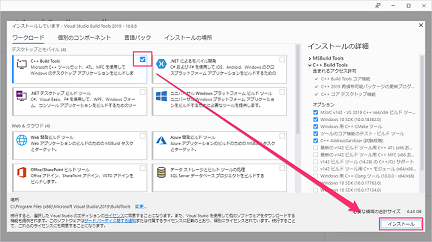
It is sufficient to select only C++ Build Tools.
If you are not familiar with the term "command prompt", type cmd in the search box on the Windows taskbar and select "Command Prompt" to launch it.
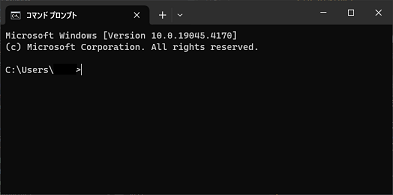
Enter commands on this screen.
The version of Rust used at the time of writing this article is as follows.
> rustc --version
rustc 1.76.0 (07dca489a 2024-02-04)
> cargo --version
cargo 1.76.0 (c84b36747 2024-01-18)
Commands used
#In this article, we will execute commands in the command prompt or terminal, but we will only use the following five.
| Command | Content | Example |
|---|---|---|
| mkdir |
Create a directory with the specified name | mkdir titris |
| cd |
Move into the specified directory | cd titris |
| cargo init | Create an application project in the current directory | cargo init |
| cargo add |
Add a crate dependency to the Rust application | cargo add rand |
| cargo run | Execute the application | cargo run |
cargo is a command that becomes available by installing Rust.
Starting application creation
#Now, let's start creating Titris. First, create a folder for application development in the command prompt or terminal.
Run the following commands.
mkdir titris
cd titris
What we did here is to create a folder named titris and move into that folder. It's just like creating and opening a folder with Explorer or Finder using commands.
Next, to create a Rust application project, run the following command.
cargo init
This command automatically creates a template file necessary for creating an application in Rust.
When you run the command, a file named Cargo.toml and a file named main.rs in the src folder are created in the current directory. Cargo.toml defines the configuration information for the application, but we will not touch it in this article.
main.rs is the file where you will write the source code of the application.
Adding crates
#We will gradually create the application from now on, but let's get some preparations done first. Run the following commands in the same place where you executed cargo init.
cargo add winit
cargo add softbuffer
cargo add tiny-skia
cargo add rand
These commands add the parts to be used in the application we will create to the Cargo.toml file. After running the commands, if you open the Cargo.toml file with a text editor, you will see that the settings have been added.
These parts are called crates, and they are chunks of source code published on the Internet. When creating an application, you can use the necessary parts (crates) by registering them in Cargo.toml, making them available from your own source code. This allows you to incorporate features that have already been created into your application without having to write everything yourself.
The crates added here are as follows.
| Crate | Description |
|---|---|
winit |
Create windows and handle events such as mouse operations |
softbuffer |
Buffer for drawing graphics in a window |
tiny-skia |
Library for drawing 2D graphics. Can draw shapes such as circles and squares |
rand |
Library for generating random numbers. Used here to generate random blocks |
We will see them later, so just remember that we added four crates here.
Let's run the application
#Now that we have prepared for creating the application, let's start programming right away.
In Rust, you write the program in the file main.rs in the src folder. Open this file with a text editor.
Something is already written there. This is the source code template created by the cargo init command.
fn main() {
    println!("Hello, world!");
}
You can run the application at this template stage.
Let's try running the following command.
cargo run
After a while, the following text should be displayed.
 ...
Hello, world!
What happened?
The cargo run command compiles the source code, links the compiled file with other libraries, creates an executable file, and executes it. Just understand that the content written in main.rs has been converted into a form that the computer can understand and executed. From now on, you will repeat the process of changing the source code and executing it with cargo run.
Looking at the Hello, world program
#Let's take another look at the content written in main.rs. The first line is as follows.
fn main() {
fn is an abbreviation for function, and it declares a function named main. A function is a chunk of source code that performs some kind of processing, and { to } defines this function.
Functions can return calculation results or execute some kind of processing based on the values passed to them. In the source code here, it only executes the process println!("Hello, world!");. Programming is about calling such functions to achieve what you want to do.
The function named main has a special meaning. When you run the application, this main function is executed first. In other words, this function is the entrance to the application.
Let's take a look inside the main function.
println!("Hello, world!");
As you read, it tells you to display the string "Hello, world!" on the screen. print!() is an abbreviation for print line, and it is a command to output the specified string with a newline at the end. There is also a print!() command, which outputs a string without a newline.
println!() is implemented as a macro. In Rust, macros end with the ! symbol. Other commonly used macros include the vec! macro.
The definition of the println!() macro is as follows.
macro_rules! println {
    () => {
        $crate::print!("\n")
    };
    ($($arg:tt)*) => {{
        $crate::io::_print($crate::format_args_nl!($($arg)*));
    }};
}
You don't need to understand the details of macros. Just grasp that at compile time, macro calls are expanded and replaced with Rust code.
Implementation of the application, but before that
#Well, we have understood the content of the Hello, world program. Let's move on to the implementation of Titris, but let's first check what we need to create.
The big picture of Titris
#When programming, it is important to understand what you are trying to do. Even things that you think you understand may not be fully understood when you stop and think about them. The subject of this time, Tetris, is content that everyone knows, but let's stop and check once.
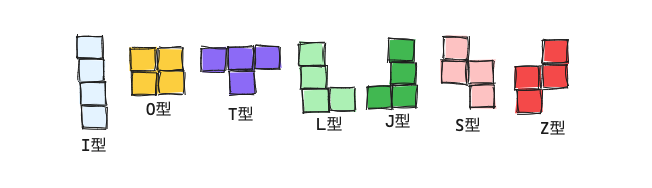
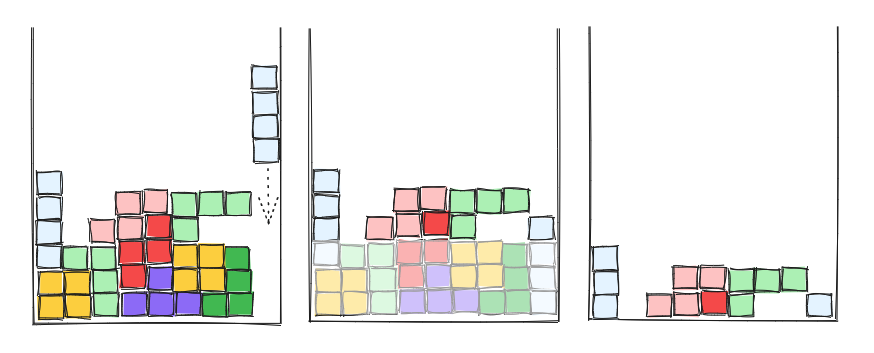
Tetromino
#A polygon made by combining four squares of the same size along the edges is called a tetromino. There are 7 types of tetrominos if you consider those that become the same shape by rotation operations as the same (5 types if you consider mirror images as the same).
Falling blocks
#In Titris, tetromino blocks falling from above are placed in the board without gaps by moving them left and right and rotating them. Rows that are filled without gaps disappear, and the remaining upper blocks fall. Points are awarded according to the number of rows that could be removed, and these points are competed.
What to do in Titris
#To summarize, it is as follows.
- There are 7 different shapes of tetrominos
- Operate randomly selected tetrominos (hereinafter referred to as blocks)
- Falling blocks can move left and right, rotate, and fall over time
- Falling blocks cannot move outside the board or to positions where blocks already exist
- When a row on the board is filled with blocks without gaps, the row blocks are deleted, and the upper blocks fall
- Points are awarded according to the blocks that could be removed
- It is necessary to remember the positions of the blocks (already fallen) on the board
Now that we know what to do, let's proceed with programming step by step.
Let's start with tetrominos.
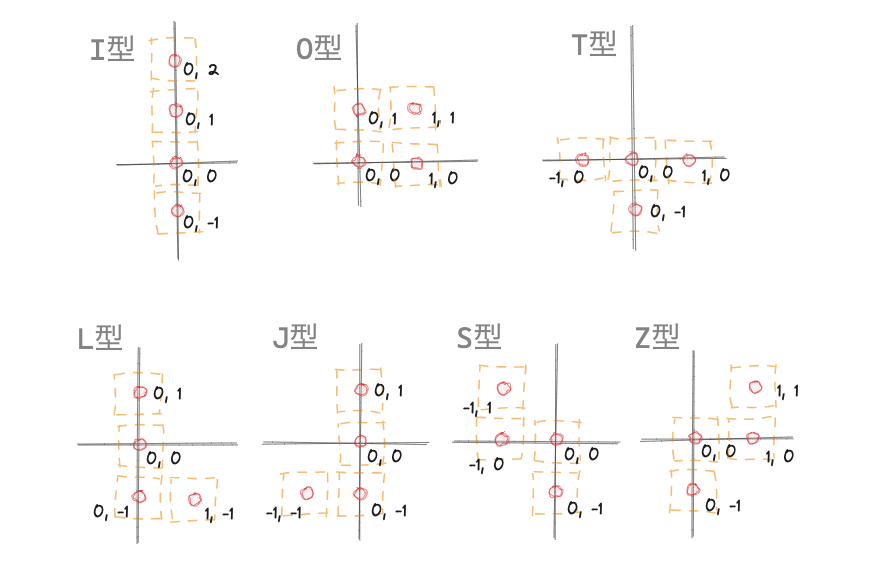
Defining tetrominos
#There are 7 types of tetrominos: I, O, T, J, L, S, and Z. You can think of each tetromino's shape in a 2D coordinate system as follows.
When representing several types, enumeration (enum) is often used in programming.
Enumeration is a definition of several types as a type, declared by the enum keyword.
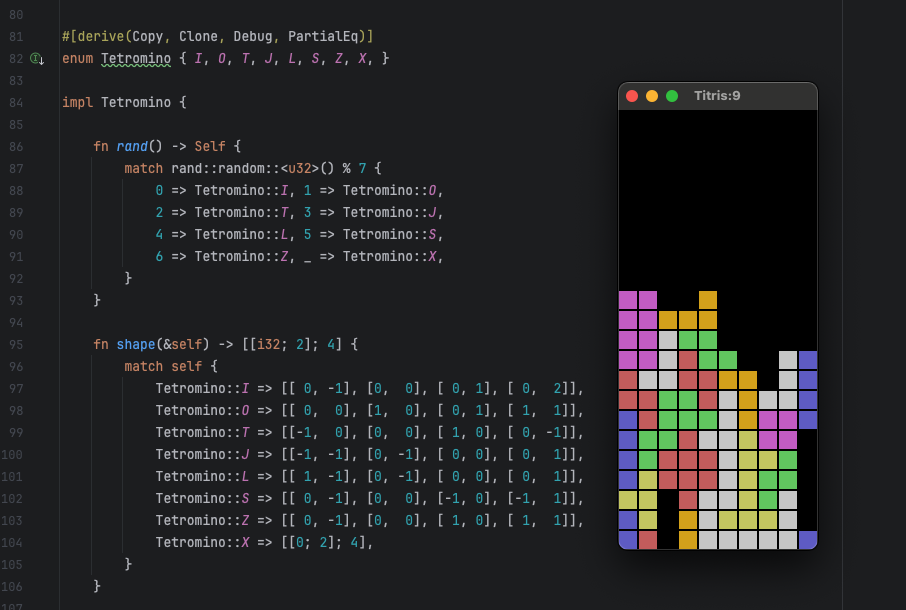
Add the following to the main.rs file (keep the main function as is and add it below).
#[derive(Copy, Clone, Debug, PartialEq, Eq)]
enum Tetromino { I, O, T, J, L, S, Z, X, }

impl Tetromino {

    fn rand() -> Self {
        match rand::random::<u32>() % 7 {
            0 => Tetromino::I, 1 => Tetromino::O,
            2 => Tetromino::T, 3 => Tetromino::J,
            4 => Tetromino::L, 5 => Tetromino::S,
            6 => Tetromino::Z, _ => Tetromino::X,
        }
    }

    fn shape(&self) -> [[i32; 2]; 4] {
        match self {
            Tetromino::I => [[ 0, -1], [0,  0], [ 0, 1], [ 0,  2]],
            Tetromino::O => [[ 0,  0], [1,  0], [ 0, 1], [ 1,  1]],
            Tetromino::T => [[-1,  0], [0,  0], [ 1, 0], [ 0, -1]],
            Tetromino::J => [[-1, -1], [0, -1], [ 0, 0], [ 0,  1]],
            Tetromino::L => [[ 1, -1], [0, -1], [ 0, 0], [ 0,  1]],
            Tetromino::S => [[ 0, -1], [0,  0], [-1, 0], [-1,  1]],
            Tetromino::Z => [[ 0, -1], [0,  0], [ 1, 0], [ 1,  1]],
            Tetromino::X => [[0; 2]; 4],
        }
    }

}
Let's look at the added content (code) one by one.
Enumeration type Tetromino
#The first thing is the following code. It declares an enumeration type named Tetromino.
#[derive(Copy, Clone, Debug, PartialEq, Eq)]
enum Tetromino { I, O, T, J, L, S, Z, X, }
Tetromino has 8 variations: I, O, T, J, L, S, Z, and X. There are 7 types of tetrominos, but X is added to represent an empty background. This is for easier handling of blocks later.
The declaration of enumeration is preceded by #[derive(Copy, Clone, Debug, PartialEq, Eq)], which is an attribute. By specifying this attribute, code corresponding to the specified attribute is automatically output at compile time. Attributes have the following meanings, but we will not go into details here (you don't have to worry too much about it).
Copy: The specified type becomes a Copy type, and the assignment operation is copied instead of moved.Clone: You can create a copy of yourself.Debug: Make it possible to output with the{:?}format of theprintln!macro.PartialEq: Make it possible to compare yourself with other instances using==or!=.Eq: A marker trait that compares for equality based on the equality of all fields.
Implementation of Tetromino
#Following the declaration of the Tetromino type, the following code continues. This is the code to add implementation to the type using impl.
impl Tetromino {
    // ...
}
You define the functionality that the type can perform within { }. One of the functions defined here is the following function, which generates a random Tetromino.
    fn rand() -> Self {
        match rand::random::<u32>() % 7 {
            0 => Tetromino::I,
            1 => Tetromino::O,
            // ...
            6 => Tetromino::Z,
            _ => Tetromino::X,
        }
    }
This function is named rand() and is defined to return Self, that is, its own type, Tetromino, when called.
Functions are defined in the form fn function_name(argument_list) -> return_type { function_body }. In this case, the argument list is empty, so it is empty. For example, if you think of a function that adds numbers, you can write it as fn add(a: i32, b: i32) -> i32 { a + b } (i32 is a 32-bit integer type). Then, if you call add(2, 3), you will get 5.
The rand() function (as described later because it does not take &self as an argument) is a type-related function and can be considered as a static method in object-oriented languages.
The following line contains rand::random::<u32>(). Here, we are using the functionality of the rand crate we introduced earlier to obtain a random number. ::<u32> is a specification of a type parameter, and it,generates a random number in the range of 0 to 4,294,967,295 (an unsigned 32-bit value).
The generated random number is then subjected to the % 7 calculation to obtain the remainder of the division by 7 (the division quotient is obtained using the / operator). For example, if the randomly generated number is 9, the remainder is 2. By dividing by 7, no remainder greater than 7 occurs, so the result is a random number in the range of 0 to 6.
The range of numbers from 0 to 6 is then matched using match and the subsequent 0 => ..., (called the arm of the match expression) to direct the process to the corresponding one. If the random number obtained is 0, the match expression selects Tetromino::I, which becomes the return value of the function.
The last arm is written as _ => Tetromino::X,. _ is called the wildcard pattern and matches anything, ignoring the value. So in this case, it can be read as "in all other cases".
The match for processing branching is called pattern matching and is a frequently used writing style in Rust programming.
The shape() function, which appears next, also uses pattern matching.
    fn shape(&self) -> [[i32; 2]; 4] {
        match self {
            Tetromino::I => [[ 0, -1], [0,  0], [ 0, 1], [ 0,  2]],
            // ..
            Tetromino::X => [[0; 2]; 4],
        }
    }
This shape() function is used to obtain the coordinate points of the four squares that make up the tetromino (the coordinate points defined in the earlier figure).
shape(&self) takes &self as an argument, which is a reference to itself. The rand() we saw earlier is a function associated with the Tetromino type, a type-related function, but this one is a method that can be called on an instance of the type. Methods take a reference to their own instance as the first argument, &self.
Type-related functions are called by calling the function on the type, like Tetromino::rand(). On the other hand, methods are called on an instance of the type, like tetromino.shape(). We'll discuss function calls later, so let's move on for now.
Rust's unsigned integer types are u8, u16, u32, u64, u128, usize, and signed (including negative) integer types are i8, i16, i32, i64, i128, isize (the numbers at the end indicate the number of bits, i.e., the size of the numbers that can be stored). These are "types" that restrict the types of values that can be stored.
If you write let x: i32 = 6;, the number 6 is placed in memory, and you can access that number through the variable name x of type i32. In this case, the value 6 is an instance. It represents the actual value itself.
The return value of the shape() function is specified as -> [[i32; 2]; 4]. What does this mean?
[[i32; 2]; 4] is a two-dimensional array. An array is a sequence of values (etc.) of the same type, and here, a sequence of x and y coordinate values (one-dimensional array) is arranged four times to form a two-dimensional array.
The array type is defined as [type; number of elements], and [i32; 2] means a type with 2 elements of i32 (32-bit integer). [i32; 2] arranged four times becomes [[i32; 2]; 4], and this array represents four sequences of x, y coordinates that make up the shape of the tetromino.
match self is the same pattern matching we've seen before. self here is the instance of itself received as an argument, and depending on whether it is Tetromino::I or Tetromino::X, the process is branched. If it is Tetromino::I, it returns the sequence of four points of x, y coordinates [[0, -1], [0, 0], [0, 1], [0, 2]].
The pattern matching at the end has Tetromino::X => [[0; 2]; 4], which is written a bit differently. This is a specification for initializing all elements of an array with the same value, specified as [initial value; number of elements]. [0; 2] means an array of 2 elements initialized with 0, and [[0; 2]; 4] means that four such arrays are lined up in a row. Thus, Tetromino::X results in all elements being zero.
Displaying tetrominos
#Now that we have defined Tetromino, let's try displaying it on the screen.
Using the functions rand() and shape() defined in Tetromino, you should be able to output tetrominos on the screen.
Rewrite the main() function as follows.
fn main() {

    let tetromino = Tetromino::rand();
    for y in (-2..=2).rev() {
        print!("| ");
        for x in -2..2 {
            let mut sq = " ";
            for i in 0..4 {
                if tetromino.shape()[i][0] == x && tetromino.shape()[i][1] == y {
                    sq = "*";
                };
            }
            print!("{}", sq);
        }
        println!(" |");
    }
}
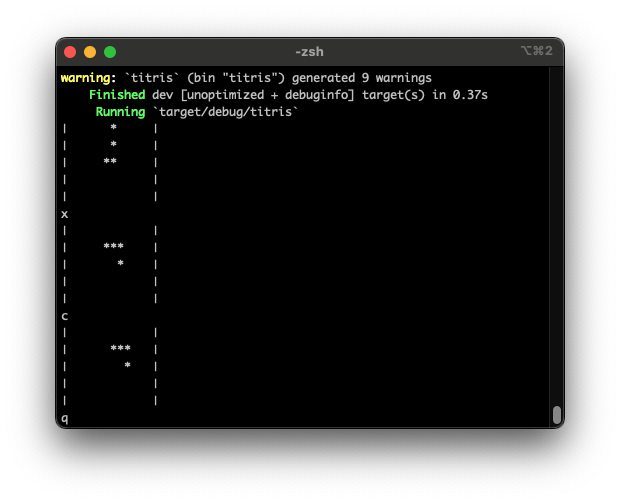
As usual, run it with cargo.
cargo run
Pressing x and pressing Enter will display the tetromino rotated counterclockwise. The c and z keys move left and right, respectively (also requiring Enter input). The program ends with q + Enter.
The rotation and movement of blocks seem to be working fine.

Implementation of tetromino display
#Let's take a look at the contents of the main() function we just created (you can delete this main() function later, so just briefly).
The first thing is the following code.
let tetromino = Tetromino::rand();
The instance of Tetromino generated by the related function is assigned to the variable tetromino using the let statement.
The let statement declares a local variable. Normally, you specify the type as let variable_name: type = ..., but if the type can be inferred from the context (as determined by the Rust compiler), it can be omitted. In this case, it is clear that it is of type Tetromino because of Tetromino::rand(), so the type specification can be omitted. If you write it without omitting it, it becomes let tetromino: Tetromino = Tetromino::rand();.
By declaring the local variable tetromino with the let statement, you can use this name to operate on the randomly generated Tetromino. In other words, you can access the value of Tetromino type allocated in memory through the name tetromino.
The following code is a loop process using for.
    for y in (-2..=2).rev() {
        for x in -2..2 {
            // ...
        }
    }
(-2..=2) represents a range (range, generated by the .. operator), written as start..end. For example, if you write 0..5, it starts from 0 and goes up to but not including 5, i.e., 0, 1, 2, 3, 4. If you want to include 5, you specify it as 0..=5.
Here, (-2..=2).rev() is written, which means reversing the sequence of -2, -1, 0, 1, 2. Here, we are looping through the y-coordinates from high to low. The current coordinate value in the loop is available through the variable y.
The next line has another for loop, forming a nested structure. for x in -2..2 loops through the x-coordinates from -2 to 2, so it starts from the top left, looks horizontally, finishes, moves down one line in the outer loop, and looks horizontally again.
The contents of the for loop are as follows.
  let mut sq = " ";
  for i in 0..4 {
    if tetromino.shape()[i][0] == x && tetromino.shape()[i][1] == y {
      sq = "*";
    };
  }
This process checks if the x and y coordinates in the loop match any of the tetromino's four square coordinates, and if they do, sets the * mark.
let mut sq = " "; is a variable declaration with the mut keyword (abbreviation for mutable). Variables with mut are mutable, allowing values to be reassigned to the variable (on the contrary, without the mut keyword, reassignment is not possible). " " means that there is no block. If there is a block, this variable sp is reassigned to *. That's the plan.
Since the tetromino consists of four blocks, we check the coordinates of these blocks one by one with the for i in 0..4 { ... } loop.
tetromino.shape()[i][0] == x checks if the x-coordinate of the ith square of the tetromino matches, and tetromino.shape()[i][1] == y checks if the y-coordinate matches. tetromino.shape() returns a two-dimensional array as a return value, so you can take out the contents of the array by specifying the location as [i][0]. For example, if you have an array let array = [2, 4, 8], you can take out 2 with array[0] and 8 with array[2]. This is what tetromino.shape()[i][1] means for a two-dimensional array.
To check if the values match, use the == operator. If they match, the result is true, and if they do not match, it is false. Here, two comparisons are connected with && for an and condition, so the result is true only if both comparisons are true. The comparison result is used for conditional branching with the if expression. If the comparison result is true, only the process in { } following it is executed. Here, the block presence is set to *.
The set block is output with print!("{}", sq);. The content of sp (either or * here) is embedded in the string at the position of {} and displayed on the screen.
Loops, conditional branching, and the essence of programming
#Here, we have seen loop processing with for and conditional branching with if. In the process, we perform assignments to variables and comparisons, executing calculations through variables.
Essentially, programming is about controlling the computer's processing through loops and conditional branching and executing calculations through variables. When you think about it, there's no need to be apprehensive about programming.
Well, we have defined the tetromino, so let's move on to the falling blocks.
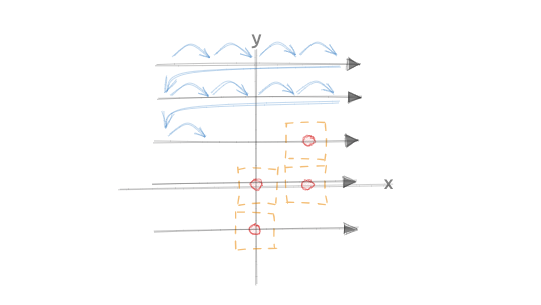
Moving and rotating falling blocks
#Falling blocks are represented by the type (which tetromino), the coordinate system of the block itself (here called the local coordinate system), and the x and y coordinates in the parent coordinate system.
If a block of type Tetromino::L is at coordinates 4, 6, it looks like this.

The points in the figure represent the positions of each square of the block in the local coordinate system. These points are initially set from the definition of the tetromino and rewritten to the coordinates corresponding to the rotation when the block is rotated.
The positions of each block in the parent coordinate system are obtained by adding the values of x and y to each point in points. Moving left, right, or down is done by simply adding/subtracting the values of x and y.
Regarding the rotation of the block, let's add a little more explanation. Since the block can only rotate 90 degrees at a time, for example, a 90-degree clockwise rotation simply swaps the x and y coordinates and then multiplies the swapped y-coordinate by -1 to reverse the sign.

For a 90-degree counterclockwise rotation, you also swap the x and y coordinates, but this time, you multiply the swapped x-coordinate by -1 to reverse the sign.
Let's implement this block in code.
#[derive(Copy, Clone, Debug)]
struct Block {
    kind: Tetromino,
    points: [[i32; 2]; 4],
    x: i32, y: i32,
}

impl Block {

    fn new(x: i32, y: i32) -> Self {
        let kind = Tetromino::rand();
        Block {
            kind,
            points: kind.shape(),
            x,
            y: y - kind.shape().iter().max_by_key(|p| p[1]).unwrap()[1],
        }
    }

    fn empty() -> Self {
        let kind = Tetromino::X;
        Block { kind, points: kind.shape(), x: 0, y: 0 }
    }

    fn is_empty(&self) -> bool { self.kind == Tetromino::X }
    fn point(&self, i: usize) -> (i32, i32) {
        (self.x + self.points[i][0], self.y + self.points[i][1])
    }

    fn left(&self)  -> Block { Block { x: self.x - 1, ..*self } }
    fn right(&self) -> Block { Block { x: self.x + 1, ..*self } }
    fn down(&self)  -> Block { Block { y: self.y - 1, ..*self } }

    fn rotate_right(&self) -> Block { self.rotate(true) }
    fn rotate_left(&self)  -> Block { self.rotate(false) }
    fn rotate(&self, clockwise: bool) -> Block {
        let mut points: [[i32; 2]; 4] = [[0; 2]; 4];
        for i in 0..4 {
            points[i] = if clockwise {
                [self.points[i][1], -self.points[i][0]]
            } else {
                [-self.points[i][1], self.points[i][0]]
            };
        }
        Block { points, ..*self }
    }

}
The first thing is the structure definition. A structure is defined with struct, and it allows you to bundle multiple types into one structure and give it a name.
#[derive(Copy, Clone, Debug)]
struct Block {
    kind: Tetromino,
    points: [[i32; 2]; 4],
    x: i32,
    y: i32,
}
The structure named Block is defined, bundling four fields (elements). That is, the type of tetromino, the coordinate array of each square, the x-coordinate of the block in the parent coordinate system, and the y-coordinate.
The #[derive(Copy, Clone, Debug)] attribute is specified, so this structure can be copied as a value, and println!("{:?}", block) can be used for debug output.
Implementation of Block
#You can add implementation to the structure with impl. It's the same as what we've seen for the enumeration Tetromino.
The first defined function is new(x: i32, y: i32) -> Self.
impl Block {

    fn new(x: i32, y: i32) -> Self {
        let kind = Tetromino::rand();
        Block {
            kind,
            points: kind.shape(),
            x,
            y: y - kind.shape().iter().max_by_key(|p| p[1]).unwrap()[1],
        }
    }
    // ...
The function new(x: i32, y: i32) is a related function of the Block structure because it does not include &self as an argument. The return value is Self, which means it generates a new instance of the Block type. This is the same as a constructor in object-oriented languages.
The new() function takes two arguments. One is x: i32, and the other is y: i32. Both are 32-bit integer types, and they mean the initial position of the block's x and y coordinates. Presumably, x is the center position of the board, and y is the top position of the board, and it will gradually fall after that.
let kind = Tetromino::rand(); assigns the instance of Tetromino generated randomly to the variable kind. The following line, Block { ... }, creates a new Block. By specifying the values to be assigned to each element name of the structure, you can create a new Block.
Note that we are using the abbreviation notation for structure generation here. Normally, you specify the structure's field name and the value to be set as kind: kind,, but if the names are the same, you can omit the kind: (the same abbreviation notation is used for x,).
The code at the end, y - kind.shape().iter().max_by_key(|p| p[1]).unwrap()[1], may not be clear what it means. This code intends to shift down the amount,by which any part of the tetromino exceeds the top y-coordinate due to its initial positioning.
The code kind.shape().iter().max_by_key(|p| p[1]).unwrap()[1] is iterating (iter()) over each square of the tetromino, selecting the maximum y-coordinate (max_by_key(|p| p[1])), extracting the value from the resulting Option type (unwrap()), and accessing the y-coordinate ([1]). This ensures that the tetromino is positioned such that its highest square does not exceed the board's top edge when initially placed.
The same thing could be written using a for loop, like this:
fn max_y(&self) -> i16 {
    let mut ret = self.points[0][1];
    for i in 0..4 {
      ret = std::cmp::max(ret, self.points[i][1]);
    }
    ret
}
In this code, the last line is ret, without a semicolon ;. In Rust, if the body of a function ends with an expression without a semicolon, that expression is the return value of the function. You can explicitly specify it as return ret; as in other languages, but usually, you write it by omitting the semicolon (all the code we've seen so far also uses the last expression as the return value without a semicolon).
The argument specified in .max_by_key(|p| p[1]) is a closure. A closure is like an anonymous function. Functions take arguments enclosed in (), but Rust closures enclose input variables in ||. If the body of the closure is a single expression, you can omit the { ... } block. If not omitted, it is written as |argument: argument_type| -> return_type { body };.
There is more to discuss about closures, but we will omit it here. If you are interested, please refer to Closures: Anonymous Functions That Can Capture Their Environment.
.max_by_key(|p| p[1]) returns an Option. Option is an enum that can be either Some(T) or None. If there was no value when selecting the maximum, it becomes None, and if there was a value, it becomes Some(T) with the value stored inside. unwrap() is an operation to extract the value from Option, and if there is no value, it causes a panic, and the program terminates. Normally, you check if it is None and perform appropriate processing, but here, since we know there is a value, we are lazily using unwrap() to extract the value.
A similar construct is Result, which can be either Ok(T) or Err(E). Result is used for operations like I/O that might fail (Rust uses Result instead of exceptions). You can also lazily use unwrap() to extract a value from Result if it is not an error, but usually, you use pattern matching or similar to handle errors as shown below.
match result {
    Ok(ret)  => { ... }
    Err(err) => { ... }
}
Now, let's return to the remaining functions in Block.
The next function is for generating an empty block.
    fn empty() -> Self {
        let kind = Tetromino::X;
        Block { kind, points: kind.shape(), x: 0, y: 0 }
    }
This simply generates a block of type Tetromino::X, which requires no further explanation.
The following function is a utility method to determine the type of block.
fn is_empty(&self) -> bool { self.kind == Tetromino::X }
This method compares its own type with Tetromino::X and returns the result directly. You can compare Tetromino with == because the #[derive(PartialEq)] attribute is specified for Tetromino.
Next is another utility method, point().
    fn point(&self, i: usize) -> (i32, i32) {
        (self.x + self.points[i][0], self.y + self.points[i][1])
    }
This function returns a tuple of x and y coordinates for the specified index number i (here, 0 to 4). A tuple is a data type that expresses a combination of n arbitrary types (here, coincidentally, two of the same type i32).
An array also handles sequences of data, but an array cannot contain mixed types of data.
A tuple is defined by separating the elements with commas and enclosing them in (). In Rust, tuples are often used to return multiple values from a function. This is because, as we will see later, tuples are well-suited for handling with pattern matching.
The next three methods handle the movement of the block.
    fn left(&self)  -> Self { Block { x: self.x - 1, ..*self } }
    fn right(&self) -> Self { Block { x: self.x + 1, ..*self } }
    fn down(&self)  -> Self { Block { y: self.y - 1, ..*self } }
As the names suggest, these methods update the block's coordinates and return the updated new Block. ..*self is specifying that the rest of the elements are supplemented from *self (see the explanation of reference resolution below).
Moving the block is just changing either the x-coordinate or the y-coordinate, and the rest of the elements are simply copied. Instead of specifying each element, you can reduce the amount of code by specifying .. to copy the rest from the specified one.
This kind of copy operation is possible because the #[derive(Copy, Clone)] attribute is specified for Block.
&x creates a reference to x (accurately, it "borrows a reference to x"). This reference can be used to read the value, but you cannot change the value at the reference destination. In other words, it becomes a non-modifiable shared reference (&mut x becomes an exclusive mutable reference).
A reference indicates where a value is located in memory. For example, instead of attaching a large image file to an email, if you write only the storage location link in the email, you can avoid overloading the mailbox. This link corresponds to a reference. To retrieve the value from a reference, you use *r on the reference r to get the value at the reference destination of r. It's like opening a link in an email.
let x = 10;
let r = &x; // shared reference to x
assert!(*r == 10);
Note that in Rust, the . operator implicitly resolves references on the left side as needed. Therefore, explicit reference resolution with * is not often necessary.
The last methods in the Block implementation handle rotation.
    fn rotate_right(&self) -> Self { self.rotate(true) }
    fn rotate_left(&self)  -> Self { self.rotate(false) }

    fn rotate(&self, clockwise: bool) -> Self {
        let mut points: [[i32; 2]; 4] = [[0; 2]; 4];
        for i in 0..4 {
            points[i] = if clockwise {
                [self.points[i][1], -self.points[i][0]]
            } else {
                [-self.points[i][1], self.points[i][0]]
            };
        }
        Block { points, ..*self }
    }
As explained at the beginning, a 90-degree clockwise rotation swaps the x and y coordinates and then multiplies the swapped y-coordinate by -1 to reverse the sign ([self.points[i][1], -self.points[i][0]]). For a counterclockwise rotation, you also swap the x and y coordinates, but this time, you multiply the swapped x-coordinate by -1 to reverse the sign ([-self.points[i][1], self.points[i][0]]).
The coordinate swapping code ends without a semicolon ;, making it the return value of the if expression, which is directly assigned to points[i]. This operation is performed for all four points with for i in 0..4, and the changed coordinates are returned as a new Block instance with Block { points, ..*self } (also without a semicolon).
Will this Block work properly?
Let's add a simple implementation and see how it works.
Moving the block
#Let's rewrite the main() function as follows.
It updates the Block based on input and displays it on the screen. The implementation is kept to a minimum for simple verification.
use std::io::Read;

fn main() {

    let mut block = Block::new(5,4);
    print(block);

    loop {

        let input = std::io::stdin().bytes().next()
            .and_then(|result| result.ok())
            .map(|byte| byte as char)
            .unwrap();
        match input {
            'z' => { block = block.left(); },
            'c' => { block = block.right(); },
            'x' => { block = block.rotate_left(); },
            'q' => { break; },
            _ => continue
        }
        print(block);
    }
    fn print(block: Block) {
        for y in (0..5).rev() {
            print!("| ");
            for x in 0..10 {
                let mut sq = " ";
                for i in 0..4 {
                    let (px, py) = block.point(i);
                    if px == x && py == y {
                        sq = "*";
                    };
                }
                print!("{}", sq);
            }
            println!(" |");
        }
    }
}
As usual, run it with cargo.
cargo run
Entering x and pressing Enter rotates the block counterclockwise. The c and z keys move it left and right, respectively (also requiring Enter input). The program ends with q + Enter.
The rotation and movement of the blocks seem to be working fine.
Let's focus on the newly introduced parts in the main() function.
The first thing is the following code.
let mut block = Block::new(5,4);
print(block);
A new block is generated with the specified initial position, and its initial state is displayed.
The following loop { ... } is a loop process, as the name suggests.
loop {
  //...
}
loop loops indefinitely. You can exit this loop by using break.
Inside the loop, keyboard input from the screen is received.
let input = std::io::stdin().bytes().next()
  .and_then(|result| result.ok())
  .map(|byte| byte as char)
  .unwrap();
It gets an iterator of bytes from standard input (std::io::stdin()), reads the next byte (bytes().next()), extracts the contents from the result (and_then(|result| result.ok())), converts it to a char type (map(|byte| byte as char)), and extracts the char content (unwrap()).
The content of input is then processed with pattern matching according to the block's methods.
The rest is the implementation when displaying the block, which has not changed from the previous explanation.
The implementation of Block has been obtained, so let's move on to putting the game together.
Board and game control
#Let's consider the game board as a rectangle of 10 cells wide by 22 cells high. The coordinates are considered in the following coordinate system with the bottom left as the origin.

The number of cells on the board is 10×22, but since these are handled as arrays, the maximum index value is -1 from the value, so be careful. Also, arrays and vectors in Rust specify the number of elements with usize, so when specifying the number of elements, you need to cast the type (i32 to usize) with as usize.
Definition of constants
#Let's add the number of cells on the board and other necessary implementations for the game first.
const UNIT_SIZE: i32 = 20;
const BOARD_WIDTH: i32 = 10;
const BOARD_HEIGHT: i32 = 22;

enum Key { LEFT, RIGHT, UP, DOWN, SP, OTHER, }

fn index_at(x: i32, y: i32) -> usize {
    (y * BOARD_WIDTH + x) as usize
}
const is a keyword for defining constants, and here we define three constants: UNIT_SIZE, BOARD_WIDTH, and BOARD_HEIGHT. UNIT_SIZE is intended as the size of one cell (number of pixels for screen drawing).
Constants give names to values, similar to let, but constants defined with const have their values embedded everywhere they are used during compilation. When you need to define a global value that does not change during runtime, use const. Constants are conventionally defined in all uppercase. If you do not use constants and directly write 22 in the program code, it becomes difficult to change, and since there is no name, it becomes unclear what the number means. In such cases, it is standard practice to define it as a const.
Next, the Key enumeration is declared, which will be used for game operations.
Lastly, the utility function index_at() is prepared. Since we plan to declare the game board as a one-dimensional array, this function converts x, y coordinates to an array index.
Implementation of the game body
#The game body is as follows.
It's a bit long, but the structure Game is defined, and its implementation is defined with impl, which is the same flow as before.
struct Game {
    board: [Tetromino; (BOARD_WIDTH  * BOARD_HEIGHT) as usize],
    current: Block,
    stopped: bool,
    time: std::time::SystemTime,
    score: u32,
}

impl Game {

    fn new() -> Self {
        Game {
            board: [Tetromino::X; (BOARD_WIDTH  * BOARD_HEIGHT) as usize],
            current: Block::empty(),
            stopped: false,
            time: std::time::SystemTime::now(),
            score: 0,
        }
    }

    fn tick(&mut self) {
        if self.current.is_empty() {
            self.put_block();
        } else if self.time.elapsed().unwrap() >
            std::time::Duration::from_millis((1000 - self.score) as u64) {
            self.down();
            self.time = std::time::SystemTime::now();
        }
    }

    fn put_block(&mut self) {
        self.stopped = !self.try_move(Block::new(BOARD_WIDTH / 2, BOARD_HEIGHT - 1));
    }

    fn try_move(&mut self, block: Block) -> bool {
        for i in 0..4 {
            let (x, y) = block.point(i);
            if x < 0 || x >= BOARD_WIDTH || y < 0 || y >= BOARD_HEIGHT {
                return false;
            }
            if self.board[index_at(x, y)] != Tetromino::X {
                return false;
            }
        }
        self.current = block;
        true
    }

    fn down(&mut self) {
        if !self.try_move(self.current.down()) {
            self.block_dropped();
        }
    }

    fn drop_down(&mut self) {
        while self.current.y > 0 {
            if !self.try_move(self.current.down()) {
                break;
            }
        }
        self.block_dropped();
    }

    fn block_dropped(&mut self) {
        for i in 0..4 {
            let (x, y) = self.current.point(i);
            self.board[index_at(x, y)] = self.current.kind;
        }
        self.remove_complete_lines();
        if self.current.is_empty() {
            self.put_block();
        }
    }

    fn key_pressed(&mut self, key: Key) {
        if self.stopped || self.current.is_empty() {
            return;
        }
        match key {
            Key::LEFT  => { self.try_move(self.current.left()); },
            Key::RIGHT => { self.try_move(self.current.right()); },
            Key::UP    => { self.try_move(self.current.rotate_right()); },
            Key::DOWN  => { self.try_move(self.current.rotate_left()); },
            Key::OTHER => { self.down(); },
            Key::SP    => { self.drop_down(); },
        };
    }

    fn remove_complete_lines(&mut self) {
        let mut line_count = 0;

        for y in (0..BOARD_HEIGHT).rev() {
            let mut complete = true;
            for x in 0.. BOARD_WIDTH {
                if self.board[index_at(x, y)] == Tetromino::X {
                    complete = false;
                    break
                }
            }
            if complete {
                line_count += 1;
                for dy in y..BOARD_HEIGHT - 1 {
                    for x in 0..BOARD_WIDTH {
                        self.board[index_at(x, dy)] = self.board[index_at(x, dy + 1)];
                    }
                }
            }
        }
        self.score += line_count * line_count;
        self.current = Block::empty();
    }
}
That's the end of the main part, so let's take a little at a time and look at it.
Game structure
#The game body is defined as the following structure.
struct Game {
    board: [Tetromino; (BOARD_WIDTH  * BOARD_HEIGHT) as usize],
    current: Block,
    stopped: bool,
    time: std::time::SystemTime,
    score: u32,
}
board is the game board, an array of Tetromino with a length of BOARD_WIDTH * BOARD_HEIGHT. Since the number of elements in an array or vector in Rust,is specified by usize, we perform a type cast (as usize) here (since usize is a type that depends on the address space size of the target machine, it is usually 64 bits). Initially, the board array is filled with Tetromino::X, and as blocks settle on the board, their respective Tetromino values other than X are stored at their positions. This allows us to know what block exists at any position on the board, which is useful for both rendering the board and determining if the falling block can move to a desired position. Access to the board array is done by converting x, y coordinates to an array index using the previously defined index_at() function.
current: Block represents the currently falling (and controllable) block.
stopped: bool is a flag indicating whether the game is in progress or has stopped. The bool type can either be true or false.
time: std::time::SystemTime is used to control the speed of falling blocks by recording the system time when the block last fell.
Finally, score: u32 is, as the name suggests, used to keep track of the score.
Implementation of the Game structure
#The first thing defined is the new() function.
    fn new() -> Self {
        Game {
            board: [Tetromino::X; (BOARD_WIDTH  * BOARD_HEIGHT) as usize],
            current: Block::empty(),
            stopped: false,
            time: std::time::SystemTime::now(),
            score: 0,
        }
    }
This is similar to what we've seen before, so no further explanation is needed.
One thing to note is that the board is initially filled with Tetromino::X, and the current time is set as the initial value with time: std::time::SystemTime::now().
Next is the tick(&mut self) function, which advances the game time.
    fn tick(&mut self) {
        if self.current.is_empty() {
            self.put_block();
        } else if self.time.elapsed().unwrap() >
            std::time::Duration::from_millis((1000 - self.score) as u64) {
            self.down();
            self.time = std::time::SystemTime::now();
        }
    }
tick() takes &mut self as an argument, allowing modifications to the Game instance within the function.
if self.current.is_empty() { ... } checks if the current block is empty, and if so, calls a method to add a new block.
The subsequent else if { ... } only evaluates its condition if the previous if did not meet its condition. Here, it checks if the elapsed time since the last block fell exceeds one second, and if so, it performs a falling operation for the block (std::time::Duration is a structure provided by Rust's standard library that represents elapsed time).
The falling time is shortened as the score increases by calculating 1000 - self.score. Once the score exceeds 500, the block falls at an interval of 0.5 seconds. After letting the block fall, the time is updated with self.time = std::time::SystemTime::now().
New blocks are added with put_block().
    fn put_block(&mut self) {
        self.stopped = !self.try_move(Block::new(BOARD_WIDTH / 2, BOARD_HEIGHT - 1));
    }
Block::new(BOARD_WIDTH / 2, BOARD_HEIGHT - 1) generates a block at the center top position of the board and passes it to the try_move() function. This function checks if the block can be placed on the board (i.e., it doesn't collide with other blocks or go out of the board bounds), and if it can, it reflects that block on the board and returns true. If the block cannot be placed, it returns false, and in that case, stopped = true, stopping the game.
Let's look inside this try_move() function.
    fn try_move(&mut self, block: Block) -> bool {
        for i in 0..4 {
            let (x, y) = block.point(i);
            if x < 0 || x >= BOARD_WIDTH || y < 0 || y >= BOARD_HEIGHT {
                return false;
            }
            if self.board[index_at(x, y)] != Tetromino::X {
                return false;
            }
        }
        self.current = block;
        true
    }
This function checks if the block passed as an argument can be placed on the board without exceeding the board boundaries or colliding with other blocks. If any of the block's squares are out of bounds or collide with non-empty squares on the board, the function returns false. If none of these conditions are met, the block is considered successfully moved, and true is returned.
Block is composed of four squares, so the function iterates four times with for i in 0..4 { .. } to check each square.
let (x, y) = block.point(i); retrieves the x and y coordinates of the i-th square of the block. The subsequent condition checks if these coordinates are within the valid range of the board.
If the coordinates are valid, the function checks if the corresponding square on the board is empty (Tetromino::X). If not, the block cannot be placed there, and the function returns false.
If the block can be moved down, down() is called:
    fn down(&mut self) {
        if !self.try_move(self.current.down()) {
            self.block_dropped();
        }
    }
self.current.down() moves the current block down one unit. If try_move() returns false (meaning the block can't move down further), block_dropped() is called to handle the block that has reached its final position.
drop_down() is similar but moves the block all the way down until it can't move any further:
    fn drop_down(&mut self) {
        while self.current.y > 0 {
            if !self.try_move(self.current.down()) {
                break;
            }
        }
        self.block_dropped();
    }
This function uses a while loop to keep moving the block down until it either can't move any further or it reaches the bottom of the board (self.current.y > 0).
When a block has finished falling, block_dropped() is called:
    fn block_dropped(&mut self) {
        for i in 0..4 {
            let (x, y) = self.current.point(i);
            self.board[index_at(x, y)] = self.current.kind;
        }
        self.remove_complete_lines();
        if self.current.is_empty() {
            self.put_block();
        }
    }
This function places the block on the board by copying the block's type (self.current.kind) to the board array at the positions occupied by the block. It then calls remove_complete_lines() to check for and clear any complete lines, updating the score accordingly. If the current block is empty (which it sets in remove_complete_lines() if lines were removed), a new block is placed on the board.
remove_complete_lines() checks each line from top to bottom to see if it's complete (i.e., has no empty squares). If a line is complete, it is removed from the board, and all lines above it are moved down:
    fn remove_complete_lines(&mut self) {
        let mut line_count = 0;

        for y in (0..BOARD_HEIGHT).rev() {
            let mut complete = true;
            for x in 0.. BOARD_WIDTH {
                if self.board[index_at(x, y)] == Tetromino::X {
                    complete = false;
                    break;
                }
            }
            if complete {
                line_count += 1;
                for dy in y..BOARD_HEIGHT - 1 {
                    for x in 0..BOARD_WIDTH {
                        self.board[index_at(x, dy)] = self.board[index_at(x, dy + 1)];
                    }
                }
            }
        }
        self.score += line_count * line_count;
        self.current = Block::empty();
    }
For each complete line, it increments line_count, which is then used to calculate the score based on the number of lines cleared at once (squared to reward clearing multiple lines simultaneously). After updating the board, it sets the current block to empty, prompting put_block() to place a new block at the top of the board.
Finally, key_pressed() handles keyboard input to move the current block or rotate it:
    fn key_pressed(&mut self, key: Key) {
        if self.stopped || self.current.is_empty() {
            return;
        }
        match key {
            Key::LEFT  => { self.try_move(self.current.left()); },
            Key::RIGHT => { self.try_move(self.current.right()); },
            Key::UP    => { self.try_move(self.current.rotate_right()); },
            Key::DOWN  => { self.try_move(self.current.rotate_left()); },
            Key::OTHER => { self.down(); },
            Key::SP    => { self.drop_down(); },
        };
    }
This function checks if the game is stopped or if there is no current block before handling the input. Depending on the key pressed, it either moves the block left, right, down, rotates it, or drops it all the way down.
This covers the main functionality of the game, handling block movement, rotation, line clearing, and scoring.
Displaying the Window
#Displaying a window involves dealing with the specific operating system's way of handling windows, which can vary significantly between systems. However, by using the winit crate, we can abstract away these differences and use the same code across different operating systems.
The basic usage of winit for creating and managing windows is as follows (you don't need to understand every detail here—just get a general sense of the process):
use winit::event::{Event, WindowEvent};
use winit::event_loop::{ControlFlow, EventLoop};
use winit::window::WindowBuilder;

fn main() {
    // Create an event loop
    let event_loop = EventLoop::new().unwrap();
    event_loop.set_control_flow(ControlFlow::Poll);

    // Create a window
    let window = WindowBuilder::new()
        .with_inner_size(winit::dpi::LogicalSize::new(400, 200))
        .build(&event_loop) // Tie to the event loop
        .unwrap();

    // Event loop
    let _ = event_loop.run(move |event, elwt| {
        // Match on the event that occurred
        match event {
            // Close operation
            Event::WindowEvent { event: WindowEvent::CloseRequested, .. } => elwt.exit(),

            Event::AboutToWait => {
                // Here, update the application and request a redraw if necessary
                window.request_redraw();
            },

            Event::WindowEvent {
                window_id, event: WindowEvent::RedrawRequested
            } if window_id == window.id() => {
                // Here, perform the application's redraw operation
            },

            _ => ()
        }
    });
}
Running this code will display a window like the one shown below (you don't need to run it yourself):
The key point to note here is that window applications are controlled by responding to events notified by the operating system, rather than by calling processing functions directly.
Operations like moving the mouse cursor or entering keys are handled by the OS, which then notifies the application of these events. These notifications are mapped to winit events and flow into the event loop, where the application processes them based on the type of event.
So, the application is not "called" but rather "responds" to events. This is true for all applications you interact with, like your web browser or text editor—they all operate by responding to events from the OS.
How do we draw to the window, then? Drawing is handled in response to the WindowEvent::RedrawRequested event. There are many ways to draw to a screen, but here, we will use the softbuffer and tiny_skia crates we introduced earlier.
Displaying a Square in a Window
#Here's a sample code for drawing a square in a window. You don't need to look into it in detail—just glance through the comments.
use winit::event::{Event, WindowEvent};
use winit::event_loop::{ControlFlow, EventLoop};
use winit::window::WindowBuilder;
use tiny_skia::{FillRule, Paint, PathBuilder, Pixmap, Rect, Transform};

fn main() {

    let event_loop = EventLoop::new().unwrap();
    event_loop.set_control_flow(ControlFlow::Poll);

    let window = WindowBuilder::new()
        .with_inner_size(winit::dpi::LogicalSize::new(400, 200))
        .build(&event_loop).unwrap();

    // Prepare for using softbuffer to get the surface
    let window = std::rc::Rc::new(window);
    let context = softbuffer::Context::new(window.clone()).unwrap();
    let mut surface = softbuffer::Surface::new(&context, window.clone()).unwrap();

    let _ = event_loop.run(move |event, elwt| {
        match event {
            Event::WindowEvent { event: WindowEvent::CloseRequested, .. } => elwt.exit(),
            Event::AboutToWait => {
                window.request_redraw();
            },
            Event::WindowEvent {
                window_id, event: WindowEvent::RedrawRequested
            } if window_id == window.id() => {

                // Get the current window size
                let (width, height) = {
                    let size = window.inner_size();
                    (size.width, size.height)
                };

                // Resize the surface to the screen size
                surface.resize(
                    core::num::NonZeroU32::new(width).unwrap(),
                    core::num::NonZeroU32::new(height).unwrap(),
                ).unwrap();

                // Generate a pixel buffer for drawing
                let mut pixmap = Pixmap::new(width, height).unwrap();
                draw_block(&mut pixmap);

                // Reflect on the screen buffer
                let mut buffer = surface.buffer_mut().unwrap();
                for index in 0..(width * height) as usize {
                    buffer[index] =
                        pixmap.data()[index * 4 + 2] as u32
                     | (pixmap.data()[index * 4 + 1] as u32) << 8
                     | (pixmap.data()[index * 4 + 0] as u32) << 16;
                }
                buffer.present().unwrap();
            },
            _ => ()
        }
    });
}

/// Write a square to the pixel buffer
fn draw_block(pixmap: &mut Pixmap) {
    let rect = Rect::from_xywh(190.0, 90.0, 20.0, 20.0).unwrap();
    let path = PathBuilder::from_rect(rect);
    let mut paint = Paint::default();
    paint.set_color_rgba8(104, 102, 204, 255);
    pixmap.fill_path(
        &path,
        &paint,
        FillRule::EvenOdd,
        Transform::identity(),
        None,
    );
}
Executing this code will display a window like the one shown below:

The square is drawn in the draw_block() function, which you can mimic to draw the game.
Displaying the Titris Window
#Now that we have an overview of window drawing, let's move on to drawing the Titris window.
The main() function looks like this:
use winit::event::{ Event, WindowEvent };
use winit::event_loop::{ ControlFlow, EventLoop };
use winit::window::WindowBuilder;
use winit::keyboard::{ Key::Named, NamedKey };
use tiny_skia::{ FillRule, Paint, PathBuilder, Pixmap, Rect, Transform };

fn main() {

    let event_loop = EventLoop::new().unwrap();
    event_loop.set_control_flow(ControlFlow::Poll);

    let window = WindowBuilder::new()
        .with_inner_size(winit::dpi::LogicalSize::new(BOARD_WIDTH * UNIT_SIZE, BOARD_HEIGHT * UNIT_SIZE))
        .with_title("Titris")
        .build(&event_loop).unwrap();

    let window = std::rc::Rc::new(window);
    let context = softbuffer::Context::new(window.clone()).unwrap();
    let mut surface = softbuffer::Surface::new(&context, window.clone()).unwrap();

    let mut game: Game = Game::new();

    let _ = event_loop.run(move |event, elwt| {
        match event {
            Event::WindowEvent { event: WindowEvent::CloseRequested, .. } => elwt.exit(),
            Event::WindowEvent {
                event: WindowEvent::KeyboardInput {event, .. },
                ..
            } if event.state.is_pressed() => {
                match event.logical_key {
                    Named(NamedKey::ArrowRight) => game.key_pressed(Key::RIGHT),
                    Named(NamedKey::ArrowLeft)  => game.key_pressed(Key::LEFT),
                    Named(NamedKey::ArrowDown)  => game.key_pressed(Key::DOWN),
                    Named(NamedKey::ArrowUp)    => game.key_pressed(Key::UP),
                    Named(NamedKey::Space)      => game.key_pressed(Key::SP),
                    _ => game.key_pressed(Key::OTHER),
                };
                window.request_redraw();
            },
            Event::AboutToWait => {
                if !game.stopped {
                    game.tick();
                    window.set_title(format!("Titris:{}", game.score).as_str());
                    window.request_redraw();
                }
            },
            Event::WindowEvent {
                window_id, event: WindowEvent::RedrawRequested
            } if window_id == window.id() => {
                let (width, height) = {
                    let size = window.inner_size();
                    (size.width, size.height)
                };
                surface.resize(
                    core::num::NonZeroU32::new(width).unwrap(),
                    core::num::NonZeroU32::new(height).unwrap(),
                ).unwrap();

                let mut pixmap = Pixmap::new(width, height).unwrap();
                game.draw(&mut pixmap);
                let mut buffer = surface.buffer_mut().unwrap();
                for index in 0..(width * height) as usize {
                    buffer[index] =
                        pixmap.data()[index * 4 + ,+ 2] as u32
                     | (pixmap.data()[index * 4 + 1] as u32) << 8
                     | (pixmap.data()[index * 4 + 0] as u32) << 16;
                }
                buffer.present().unwrap();
            },
            _ => ()
        }
    });
}
Explanation of Key Points in the main() function
#-
Game Instance Creation: A new game instance is created, which will manage the state and logic of the game.
-
Keyboard Input Handling: The application responds to keyboard inputs by adjusting the game state accordingly. This includes moving or rotating the current block, or dropping it down. After processing the input, a redraw of the window is requested to update the visual display.
-
Game Progression: In the absence of other events, the game's state is advanced by calling
game.tick(). This method handles the automatic downward progression of the current block and updates the game's score. If the game is still active, a redraw is requested, and the window title is updated to reflect the current score. -
Game Rendering: When a redraw is requested, the game's visual state is painted onto a
Pixmap, which is then transferred to the window's display buffer. This involves drawing each block on the board and the currently active block.
Drawing Tetrominoes with Colors
#The Game struct includes a method for drawing the game state. Here's how the blocks are drawn with different colors based on their Tetromino type:
impl Game {
    fn draw(&self, pixmap: &mut Pixmap) {
        for y in 0..BOARD_HEIGHT {
            for x in 0..BOARD_WIDTH {
                Game::draw_square(pixmap, x, y, self.board[index_at(x, y)]);
            }
        }
        for i in 0..4 {
            let (x, y) = self.current.point(i);
            Game::draw_square(pixmap, x, y, self.current.kind);
        }
    }

    fn draw_square(pixmap: &mut Pixmap, x: i32, y: i32, kind: Tetromino) {
        let x = x * UNIT_SIZE;
        let y = (BOARD_HEIGHT - 1 - y) * UNIT_SIZE;
        let rect = Rect::from_xywh(
            (x + 1) as f32,
            (y + 1) as f32,
            (UNIT_SIZE - 2) as f32,
            (UNIT_SIZE - 2) as f32,
        ).unwrap();
        let path = PathBuilder::from_rect(rect);
        let mut paint = Paint::default();
        let (r, g, b) = kind.color();
        paint.set_color_rgba8(r, g, b, 255);
        pixmap.fill_path(
            &path,
            &paint,
            FillRule::EvenOdd,
            Transform::identity(),
            None,
        );
    }
}
Each Tetromino type has an associated color, defined in the color() method of the Tetromino enum. When drawing each square of the game board or the current block, draw_square() uses this color information to fill the square with the appropriate color.
Conclusion
#With the complete setup and implementation explained, you now have a fully functioning Tetris game running in a window, handling user inputs, and rendering colorful blocks. This example illustrates not only game development concepts but also how to interact with windowing systems and handle real-time user inputs in a Rust application.