DJI无人机开发技巧 - 自定义载荷设备的 Application Binding
Back to Top为了覆盖更广泛的受众,这篇文章已从日语翻译而来。
您可以在这里找到原始版本。
介绍
#is正在开发太阳能发电板清洁机器人系统。
本系统由清洁太阳能发电板的机器人和用于运送该机器人的无人机构成。本文介绍了无人机端开发技术 Payload SDK 中的 Application Binding。
有关Payload SDK,也请参考以下文章。
关于 Application Binding
#在部分机型中,在使用载荷设备之前,需要进行名为 Application Binding 的以下步骤。
- 连接机体和载荷设备,并启动使用 Payload SDK 开发的应用程序
- 在 Payload SDK 的初始化序列中将等待与机体的绑定
- 连接机体和 PC 并启动 DJI Assistant 2
- 将显示处于等待绑定状态的载荷设备列表
- 在 DJI Assistant 2 中将机体与载荷设备绑定
- SDK 的初始化序列将开始接收到机体的响应,SDK 的 API 可使用
绑定后的载荷设备信息将被持久化保存在机体内,此后可使用对应的载荷设备。
需要 Application Binding 的机型
#以下是现行机型提供的扩展端口一览。摘自Standard Hardware Port Introduction。
| Aircraft | Port Name | Supports App Binding |
|---|---|---|
| FlyCart 100 | E-Port Lite | – |
| FlyCart 30 | E-Port Lite | – |
| Matrice 4D/4TD | E-Port, E-Port Lite | ✓ |
| Matrice 4E/4T | E-Port, E-Port Lite | ✓ |
| Matrice 3D/3TD | E-Port, E-Port Lite | – |
| Matrice 30/30T | E-Port | – |
| Mavic 3E/3T | E-Port | – |
| M400 | E-Port V2 | ✓ |
| M350 RTK | E-Port | – |
| M350 RTK | Gimbal Port | ✓ |
| M300 RTK | OSDK Port | – |
| M300 RTK | Gimbal Port | ✓ |
对于 Supports App Binding 列打勾的机型的扩展端口连接载荷设备时,需要进行绑定。
连接到 E-Port、E-Port V2 或 Gimbal Port 的载荷设备都属于需要绑定的范围,但在 Matrice 系列中,自 Matrice 4E/4T 起才需要绑定。今后发布的机型(除 E-Port Lite 外)基本上都需要对载荷设备进行绑定。
SDK 认证芯片
#对需要绑定的第三方载荷设备,需要安装 DJI SDK 认证芯片(简称 DJI SDK CC)。
可在DJI 商店购买50个装。
下面照片中的细长片状包装就是所购买的认证芯片。袋子上方放置的是用于安装认证芯片的适配器(后述)。

认证芯片是用于对机体与第三方载荷设备之间通信进行认证和加密的硬件安全模块。
通过此认证芯片,机体端可以识别各载荷设备,并将已绑定载荷设备的信息(认证芯片信息)持久化保存在机体内。
此芯片是针对第三方提供的,但我认为 DJI 自产的载荷设备中也内置了类似的认证芯片或相应机制。
SDK 认证芯片的连接
#在SDK Certified Chip Quick Start中记录了针对 Raspberry Pi 4B 的连接示例,以下基于该示例进行说明。
SDK 认证芯片的接口
#认证芯片通过 I²C 接口与主机(Raspberry Pi)通信。
下图为认证芯片的引脚布局。
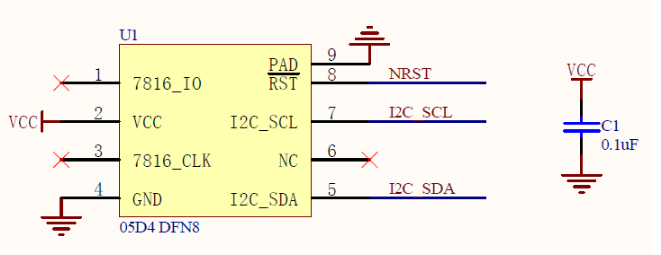
- VCC:电源输入引脚(工作电压范围:1.62 V - 5.5 V)
- GND:地线引脚
- NRST:外部复位引脚
- I2C_SCL:I²C 总线接口引脚(Serial Clock Line)
- I2C_SDA:I²C 总线接口引脚(Serial Data Line)
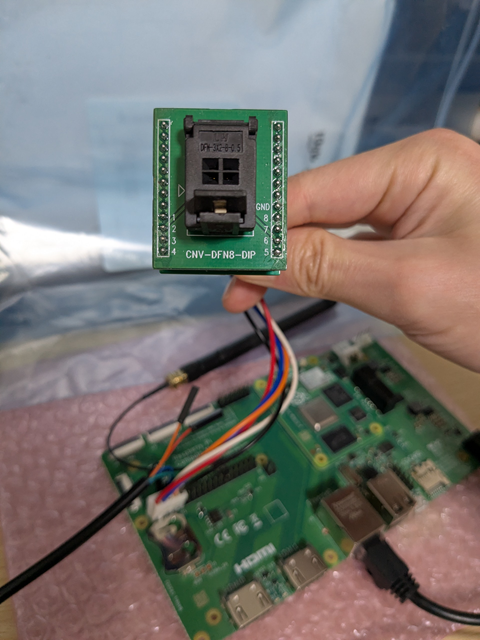
芯片的封装类型为 DFN8 2x3。由于外形尺寸仅为 2 mm × 3 mm,非常小型,直接焊接引线十分困难。因此,使用如下照片所示的可连接至 DIP8 插座的转换适配器。
SDK 认证芯片与 Raspberry Pi 的连接
#连接 Raspberry Pi 的 40-pin GPIO header 引脚与认证芯片。
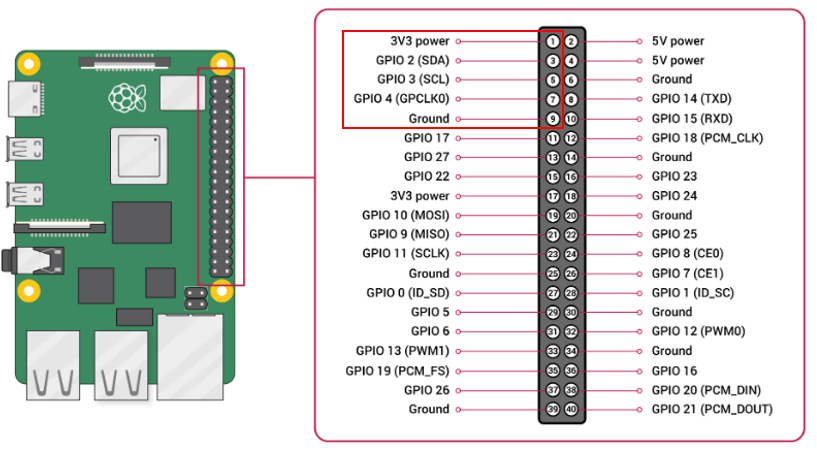
认证芯片与 GPIO 引脚对应如下。
| 认证芯片 | GPIO |
|---|---|
| 1pin(7816IO) | (NC) |
| 2pin(Vcc) | 1pin(3.3V power) |
| 3pin(7816CLK) | (NC) |
| 4pin(GND) | 9pin(Ground) |
| 5pin(I2C_SDA) | 3pin(GPIO2:SDA) |
| 6pin(NC) | (NC) |
| 7pin(I2C_SCL) | 5pin(GPIO3:SCL) |
| 8pin(NRST) | 7pin(GPIO4:GPCLK0) |
| 9pin(GND) | 9pin(Ground) |
在通过设备树启用 I²C 后,如果使用 i2cdetect 等命令能显示出 I²C 地址则表示 OK。
以下示例中,分配给认证芯片的设备为 /dev/i2c-1。
$ ls /dev/i2c-*
/dev/i2c-1  /dev/i2c-20  /dev/i2c-21
仅为认证芯片的 Vcc 供电 3.3V 时不会有响应。
$ sudo i2cdetect -y 1
     0  1  2  3  4  5  6  7  8  9  a  b  c  d  e  f
00:                         -- -- -- -- -- -- -- --
10: -- -- -- -- -- -- -- -- -- -- -- -- -- -- -- --
20: -- -- -- -- -- -- -- -- -- -- -- -- -- -- -- --
30: -- -- -- -- -- -- -- -- -- -- -- -- -- -- -- --
40: -- -- -- -- -- -- -- -- -- -- -- -- -- -- -- --
50: -- -- -- -- -- -- -- -- -- -- -- -- -- -- -- --
60: -- -- -- -- -- -- -- -- -- -- -- -- -- -- -- --
70: -- -- -- -- -- -- -- --
如下所示,将 GPIO4(与认证芯片的 NRST 连接)先设置为 LOW 再设置为 HIGH,可对认证芯片进行复位,检测到 I²C 地址 0x2a。
$ sudo gpioset gpiochip0 4=0
$ sudo i2cdetect -y 1
     0  1  2  3  4  5  6  7  8  9  a  b  c  d  e  f
00:                         -- -- -- -- -- -- -- --
10: -- -- -- -- -- -- -- -- -- -- -- -- -- -- -- --
20: -- -- -- -- -- -- -- -- -- -- -- -- -- -- -- --
30: -- -- -- -- -- -- -- -- -- -- -- -- -- -- -- --
40: -- -- -- -- -- -- -- -- -- -- -- -- -- -- -- --
50: -- -- -- -- -- -- -- -- -- -- -- -- -- -- -- --
60: -- -- -- -- -- -- -- -- -- -- -- -- -- -- -- --
70: -- -- -- --

$ sudo gpioset gpiochip0 4=1
$ sudo i2cdetect -y 1
     0  1  2  3  4  5  6  7  8  9  a  b  c  d  e  f
00:                         -- -- -- -- -- -- -- --
10: -- -- -- -- -- -- -- -- -- -- -- -- -- -- -- --
20: -- -- -- -- -- -- -- -- -- -- 2a -- -- -- -- --
30: -- -- -- -- -- -- -- -- -- -- -- -- -- -- -- --
40: -- -- -- -- -- -- -- -- -- -- -- -- -- -- -- --
50: -- -- -- -- -- -- -- -- -- -- -- -- -- -- -- --
60: -- -- -- -- -- -- -- -- -- -- -- -- -- -- -- --
70: -- -- -- -- -- -- -- --
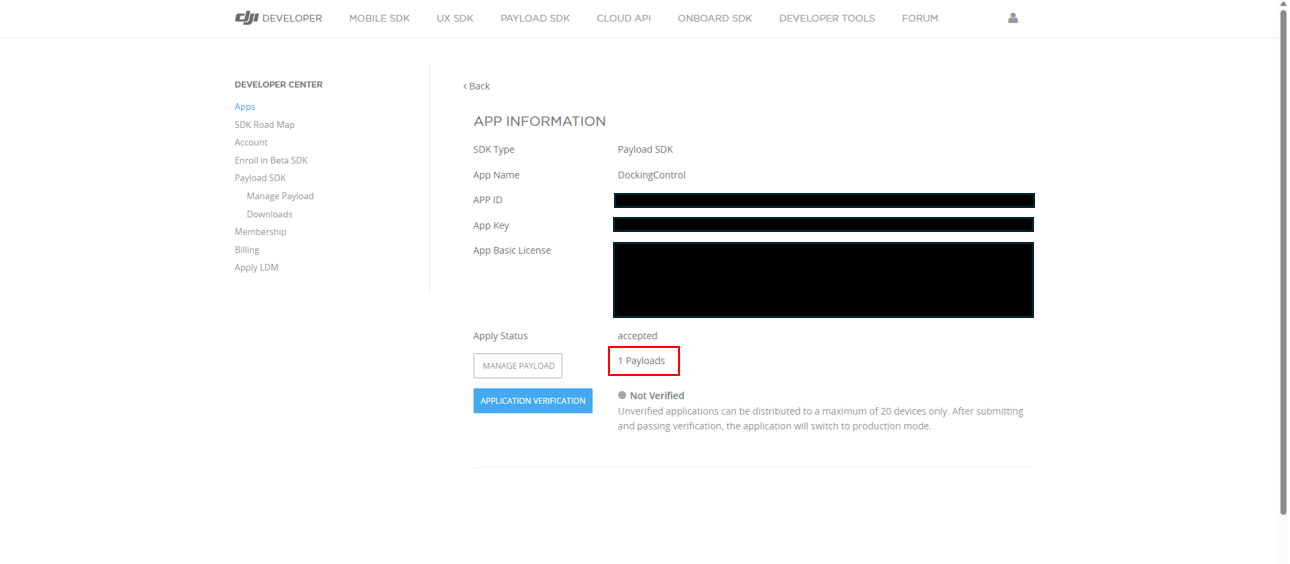
在 DJI 开发者中心注册 Payload SDK 应用
#在进行绑定之前,需要在DJI 开发者中心注册 Payload SDK 应用。
填写应用信息。
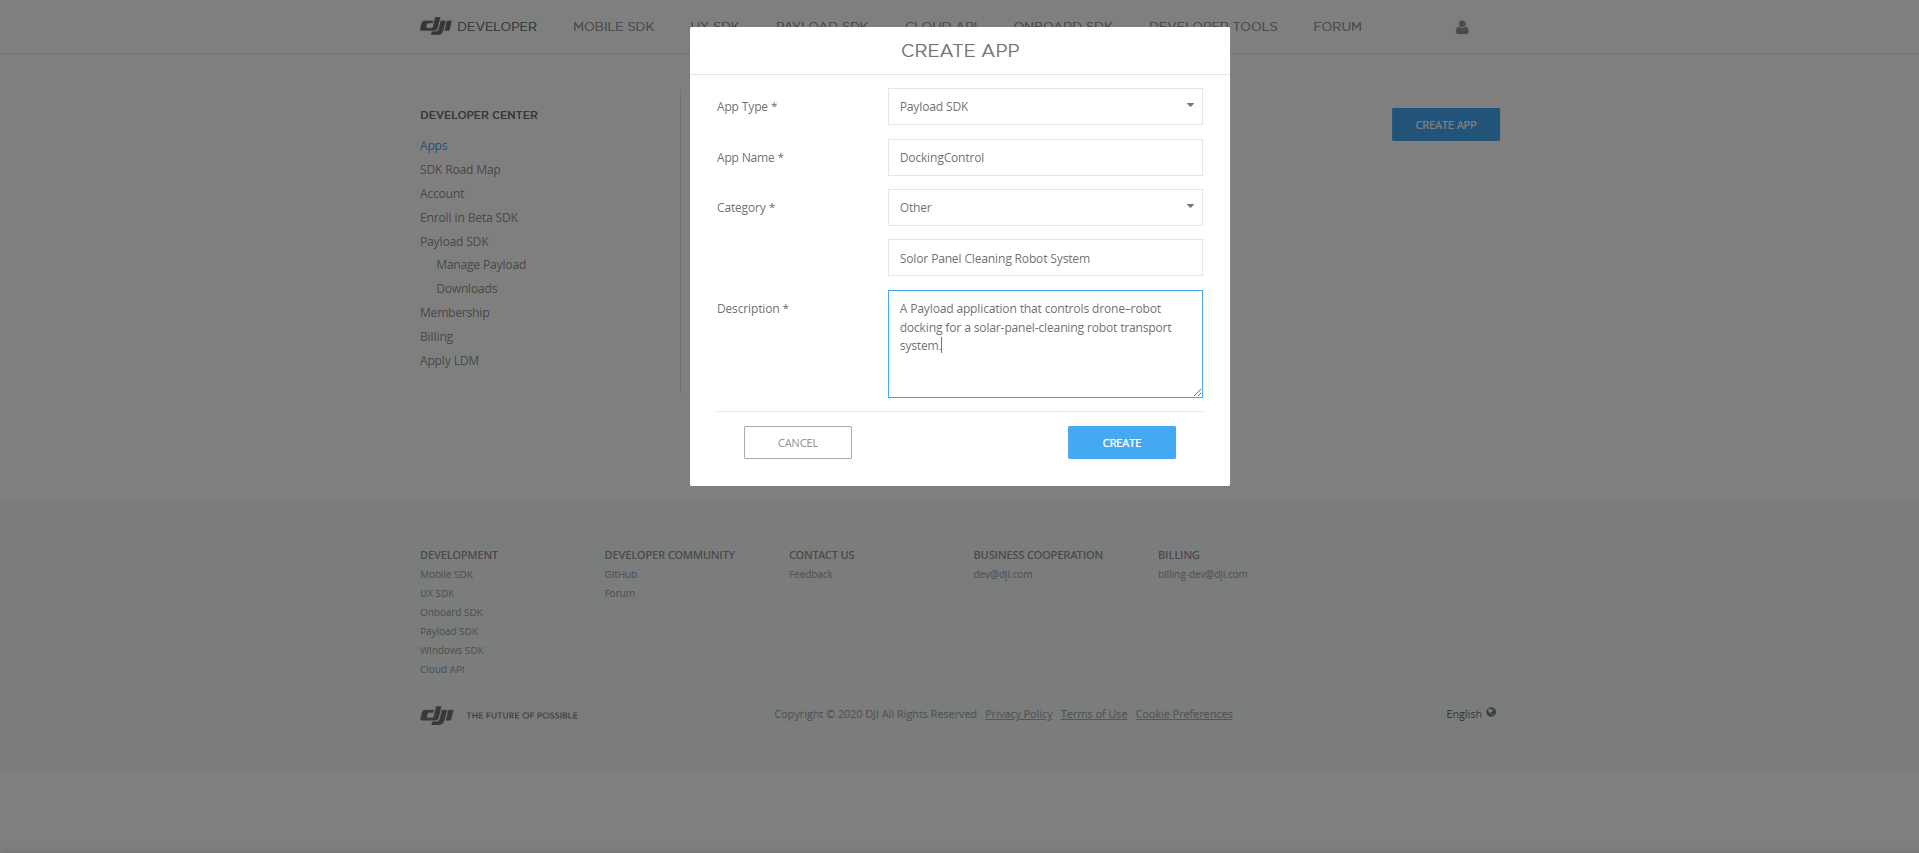
注册应用后,点击 Send Email 按钮会发送激活邀请邮件。
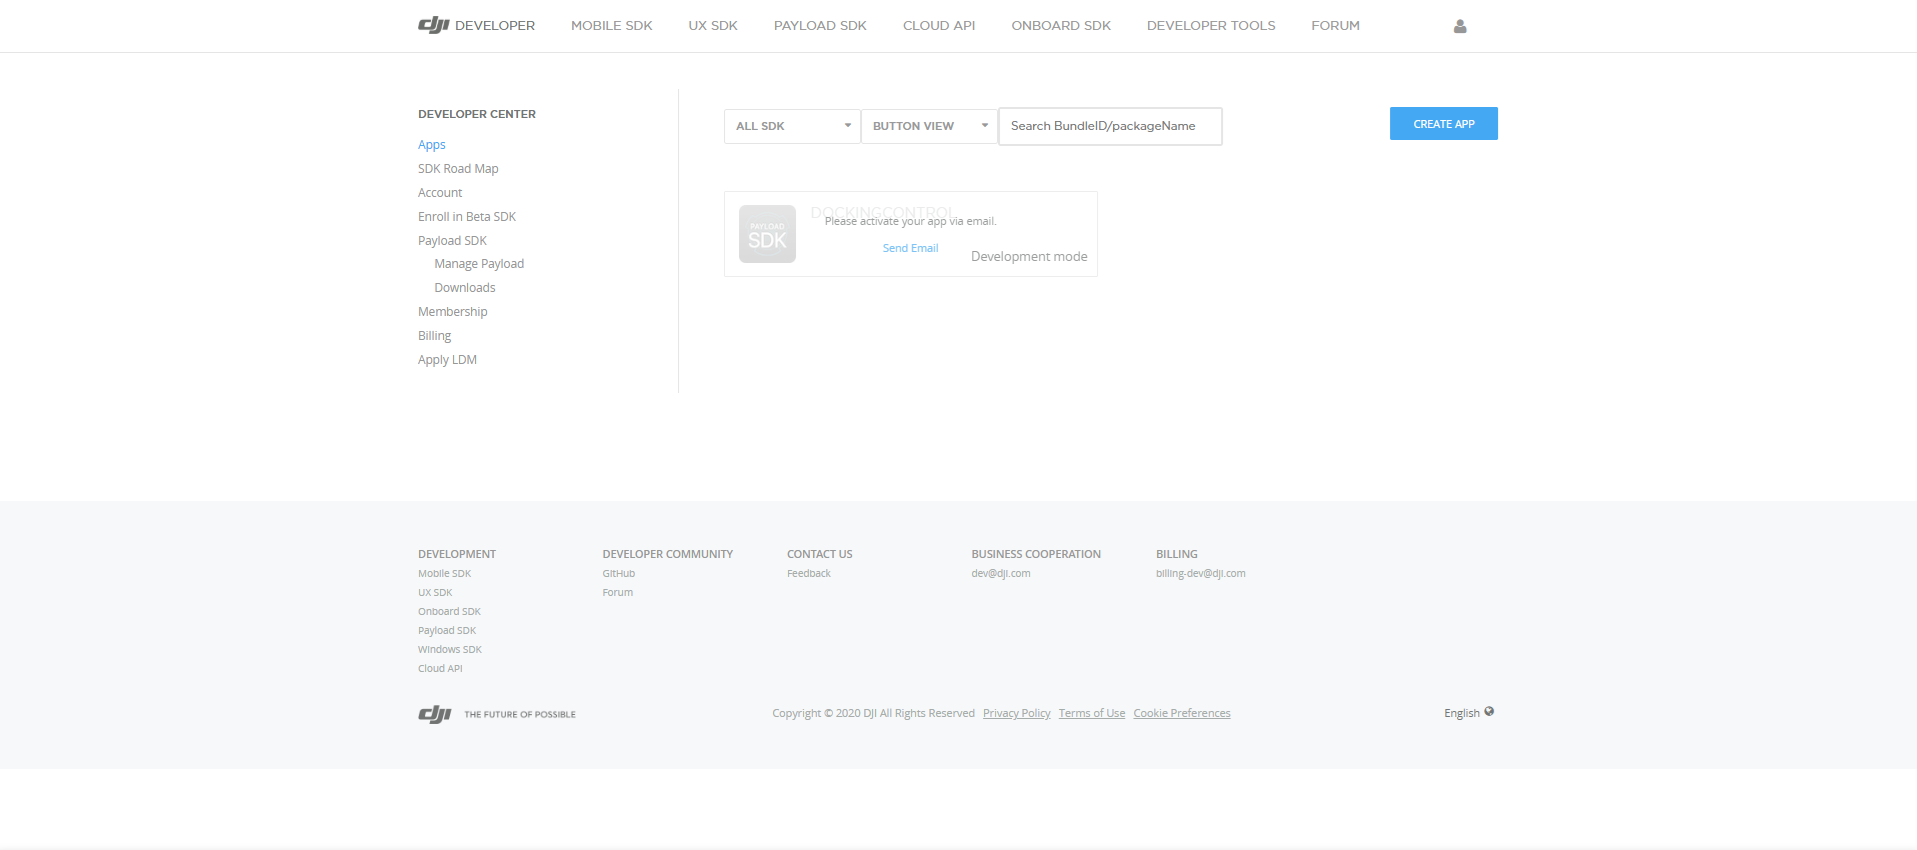
打开邮件中的链接后即可完成激活,并显示 ID 和 KEY。
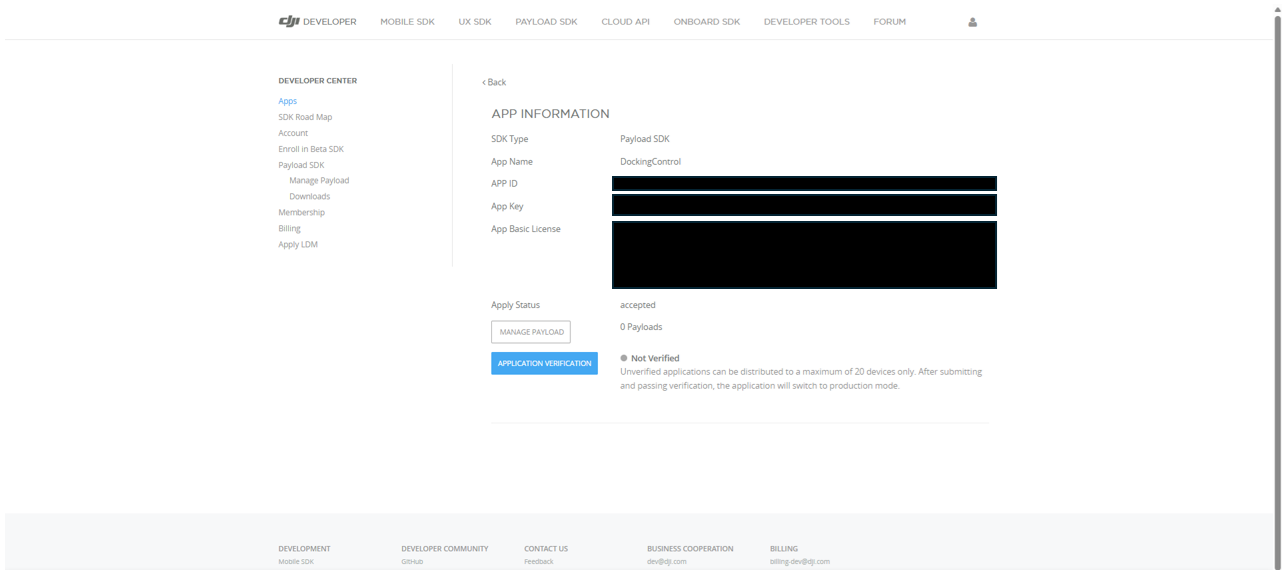
如页面所示,已注册应用最多可绑定 20 台载荷设备。
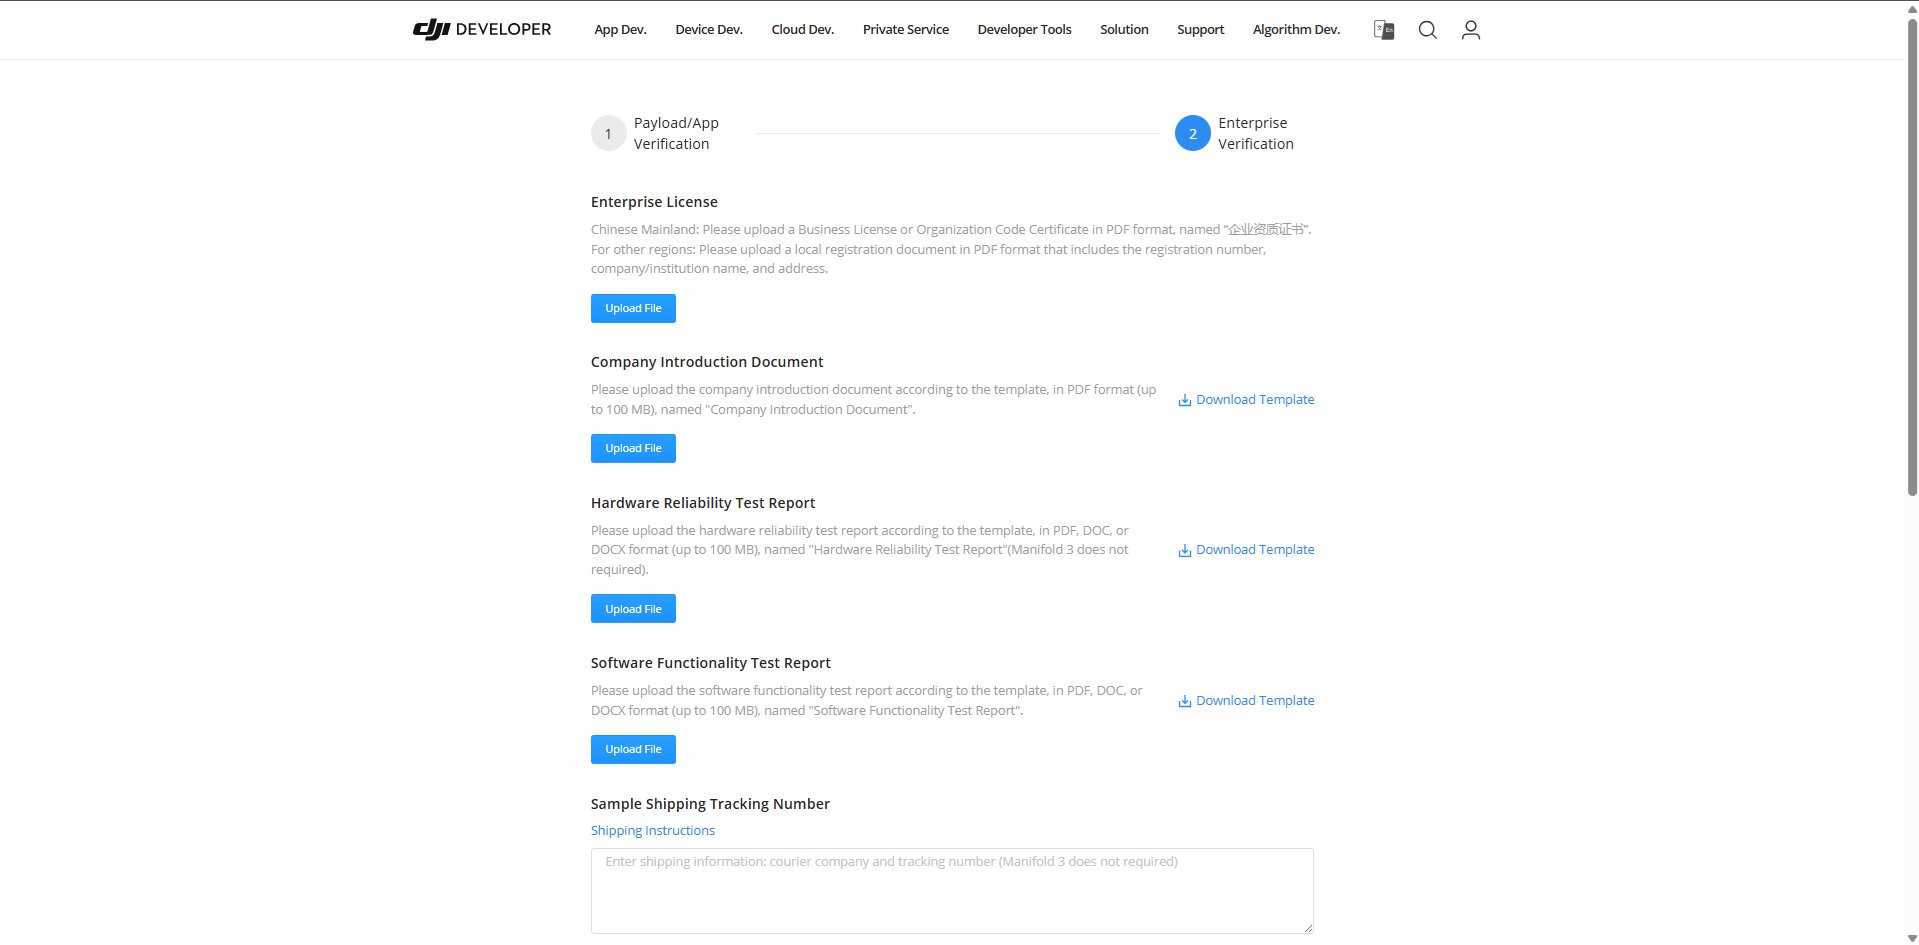
在 Application Verification 页面提供公司说明、载荷设备测试报告等各种文件并通过审核后,即可解除数量限制。开发初期阶段,此数量限制一般不会成为问题,但在载荷设备量产阶段,请准备测试报告并提交申请。
Payload SDK 应用的设置
#这里以 Payload SDK 的 Raspberry Pi 示例应用为例说明 SDK 的设置内容。
将在 DJI 开发者中心注册的应用信息配置到以下文件中。
Payload-SDK/samples/sample_c++/platform/linux/raspberry_pi/application/dji_sdk_app_info.h
/* Exported constants --------------------------------------------------------*/
// ATTENTION: User must goto https://developer.dji.com/user/apps/#all to create your own dji sdk application, get dji sdk application
// information then fill in the application information here.
#define USER_APP_NAME               "your_app_name"
#define USER_APP_ID                 "your_app_id"
#define USER_APP_KEY                "your_app_key"
#define USER_APP_LICENSE            "your_app_license"
#define USER_DEVELOPER_ACCOUNT      "your_developer_account"
#define USER_BAUD_RATE              "460800"
| 常量名 | 说明 | 示例 |
|---|---|---|
| USER_APP_NAME | 与 DJI 开发者中心注册信息中的 App Name 对应 |
DockingControl |
| USER_APP_ID | 与 DJI 开发者中心注册信息中的 App ID 对应 |
(省略) |
| USER_APP_KEY | 与 DJI 开发者中心注册信息中的 App Key 对应 |
(省略) |
| USER_APP_LICENSE | 与 DJI 开发者中心注册信息中的 App Basic License 对应 |
(省略) |
| USER_DEVELOPER_ACCOUNT | DJI 开发者中心的账号名 | masayuki-kono |
启动示例应用后,如果持续输出以下日志,即表示正常(处于等待绑定状态)。
[Error] dji_auth_sha256_rsa_verify.c:137 The DJI SDK CC has not binded. Please check the bind state of the DJI SDK CC and bind it.
Raspberry Pi 版示例代码似乎未得到维护,照此运行会输出如下错误,导致与认证芯片通信失败。
Connect DJI SDK CC device failed, errno: 0x30000002
向地址 0x2A 写入时 ioctl(I2C_RDWR) 返回 -1,原因是从机未返回 ACK。
在 HalI2c_ResetDevice() 中,将 GPIO4 复位为 LOW→25ms→HIGH 后,立即打开设备并进行写入。可能是因芯片尚未完成复位就进行了首次事务所致。似乎释放复位后,芯片响应 I²C 所需的时间不足,于是将释放复位后等待 50ms 后再进行 I²C 访问进行了修改,问题得到解决。
在我 fork 的 Payload SDK 仓库中已上传修正后的代码,供参考。还添加了调试日志输出,可以观察与芯片收发的数据,加深理解。
连接机体与载荷设备
#本次使用 Matrice 4E。
各设备的连接示意如下。
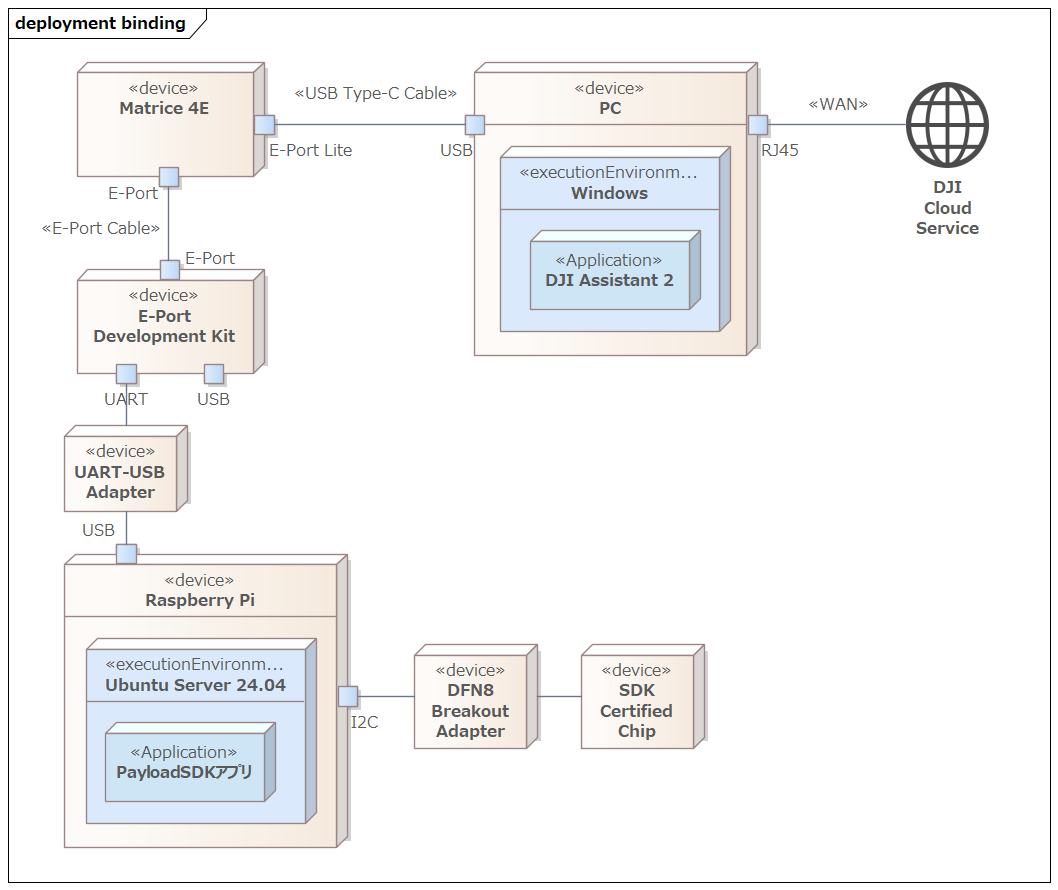
- Matrice 4E
用于 Application Binding 的机体 - PC
- DJI Assistant 2 的运行环境
- DJI Assistant 2 有不同版本,对 Matrice 4E 使用 Enterprise Series
- DJI Assistant 2 需连接互联网与 DJI 云服务通信
- E-Port Development Kit
用于连接机体与载荷设备的适配板 - UART-USB Adapter
- 本次使用 FTDI 的 UART-USB 转换适配器进行中继
- 如果直接连接到 Raspberry Pi 的 GPIO(UART 引脚),则无需使用该适配器
- Raspberry Pi
Payload SDK 应用的运行环境 - DFN8 Breakout Adapter
用于将 DFN8(2×3 mm)封装的表面贴装 IC 转换为 DIP8 兼容引脚排列的出脚适配器 - SDK 认证芯片
E-Port Development Kit
#开发套件的电路板上有名为 E-Port switch 的拨码开关,将其设为 ON 以启用 UART 输出。
USB ID switch(Device|Host) 拨码开关在通过 USB 使用 RNDIS 或 Bulk 传输时需设置为 Host。本次仅使用 UART,因此无需设置(任意即可)。
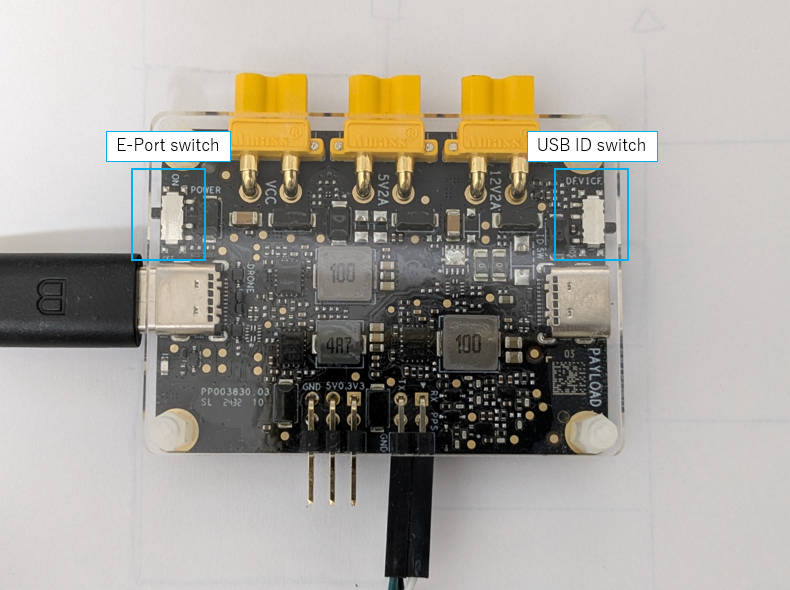
从硬件角度看,E-Port 接口是可翻转的,但在将机体的 E-Port 接口与开发套件连接时,对机体侧与开发套件侧的插头方向有要求。
以下摘自Connect Development Board to E-Port:
Note: The E-Port coaxial USB-C cable doesn't have a foolproof design, allowing A/B side to be reversibly connected.
Due to pin layout differences in the aircraft's USB-C, if the coaxial cable is reversed, the other end also needs to be flipped correspondingly.
If not flipped correspondingly, the E-Port Development Kit can not power up and communicate.
如下图所示,插头上标有 A/B,如果机体侧为 A,则开发套件侧需为 B;机体侧为 B,则开发套件侧需为 A。
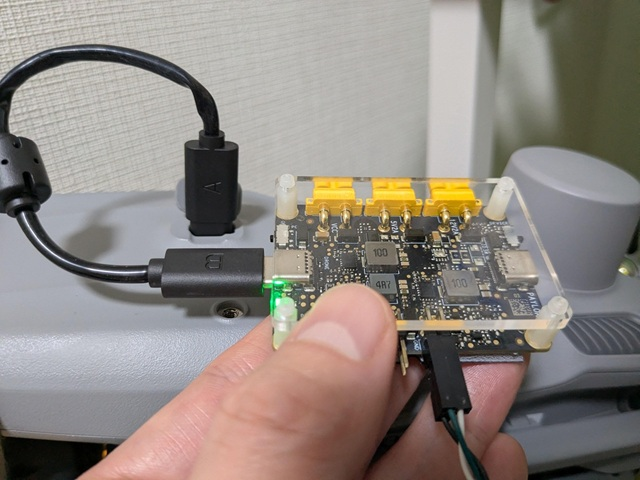
由于 DJI 页面说明无法明确判断哪种方向正确,因此最后尝试了两种方式,确认了能正常工作的方向(照片即为正常工作时的组合)。
执行 Application Binding
#使 Payload SDK 应用持续输出以下日志(等待绑定状态)。
[Error] dji_auth_sha256_rsa_verify.c:137 The DJI SDK CC has not binded. Please check the bind state of the DJI SDK CC and bind it.
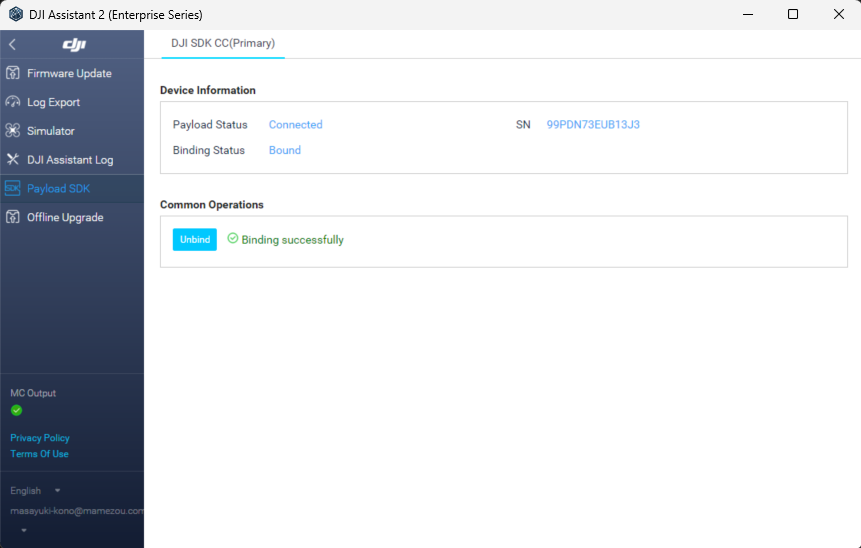
在此状态下,于通过 E-Port Lite 连接机体的 PC 上打开 DJI Assistant 2,可在 Payload SDK 菜单中看到以下内容。
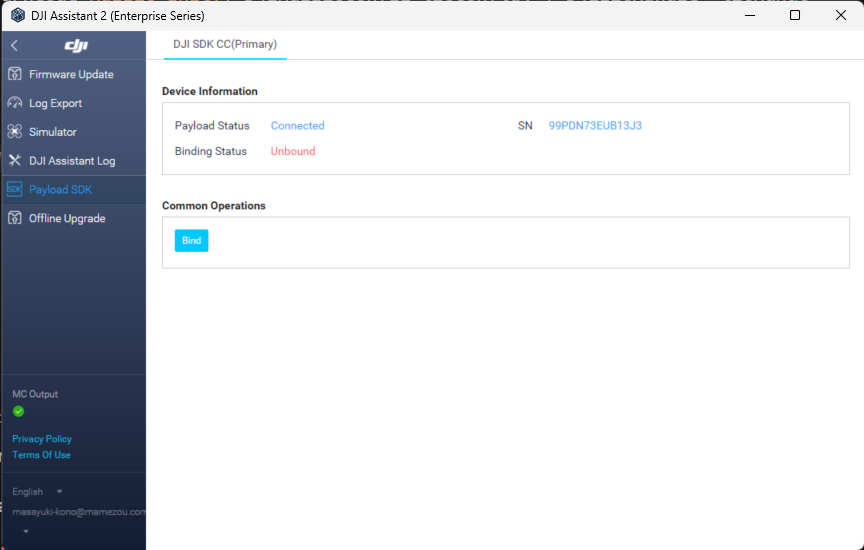
点击 Bind 按钮即可完成绑定。
绑定完成后,示例应用启动时的日志如下。
0.016	            core	[Info]	               dji_core.c:113  Payload SDK Version : V3.15.0-beta.0-build.2318 Dec 10 2025 17:27:05
1.075	         adapter	[Info]	     dji_access_adapter.c:351  Identify mount position type is Extension Port Type
1.075	         adapter	[Info]	     dji_access_adapter.c:371  Identify aircraft series is Matrice 4 Series
1.578	         adapter	[Info]	     dji_access_adapter.c:493  Identity uart0 baudrate is 921600 bps
1.582	            core	[Info]	    dji_identity_verify.c:627  Updating dji sdk policy file...
2.582	            core	[Info]	    dji_identity_verify.c:635  Update dji sdk policy file successfully
2.627	            core	[Info]	               dji_core.c:261  Identify AircraftType = Matrice 4E, MountPosition = Extension Port, SdkAdapterType = None
2.748	            auth	[Info]	        dji_sdk_cc_auth.c:86   Get DJI SDK CC serial num: 99PDN73EUB13J3
4.812	          linker	[Warn]	            dji_command.c:1025 <0xd5d0>Command async send retry: index = 0, retryTimes = 1, 0x0A06->0x0F01(0x002F) 0x3C13
5.945	          linker	[Warn]	            dji_command.c:910  Received invalid ack,<0xd5d0> 0x0F01(0x002F)->0x0A06(0x00CA) 0x3C13
6.322	         adapter	[Info]	    dji_identity_verify.c:257  the license level is basic
6.322	            core	[Info]	       dji_product_info.c:187  Set alias: PSDK_APPALIAS
6.942	            user	[Info]	            test_widget.c:141  widget file: /home/dev/DockingController/third_party/Payload-SDK/samples/sample_c/module_sample/widget/widget_file/en_big_screen
6.952	            user	[Info]	    test_widget_speaker.c:594  Set widget speaker volume: 60
6.952	            user	[Warn]	    test_widget_speaker.c:613  No audio device found, please add audio device and init speaker volume here!!!
12.455	            core	[Info]	               dji_core.c:328  Start dji sdk application
12.455	            user	[Info]	          application.cpp:372  Application start.

| Available commands:                                                                              |
| [0] Fc subscribe sample - subscribe quaternion and gps data                                      |
| [1] Flight controller sample - you can control flying by PSDK                                    |
| [2] Hms info manager sample - get health manger system info by language                          |
| [a] Gimbal manager sample - you can control gimbal by PSDK                                       |
| [c] Camera stream view sample - display the camera video stream                                  |
| [d] Stereo vision view sample - display the stereo image                                         |
| [e] Run camera manager sample - you can test camera's functions interactively                    |
| [f] Start rtk positioning sample - you can receive rtk rtcm data when rtk signal is ok           |
| [g] Request Lidar data sample - Request Lidar data and store the point cloud data as pcd files   |
| [h] Request Radar data sample - Request radar data                                               |
| [l] Run widget states manager sample, control widget states on other payload                     |
从对 hal_i2c.c 中 I²C 读写的通信数据进行日志输出可知,SDK 在初始化完成后仍会定期与认证芯片通信,每次收发的数据都不同。
由于官方协议规范未公开,以下为推测,可能是如下挑战-响应型认证流程:
- 机体 → 认证芯片:发送挑战数据(包括随机值或时间戳)
- 认证芯片 → 机体:返回签名后的响应(使用认证芯片特有的私钥)
- 机体端使用认证芯片的公钥验证签名
通过此方式,机体能够将第三方销售的载荷设备识别为正品,只有已绑定的设备才能使用 Payload SDK。
绑定完成后,在 DJI 开发者中心打开页面应可看到 1 Payloads,计数已增加。
总结
#Application Binding 是自 Matrice 4E/4T(2025年1月发布)起引入的较新规范。因此,即使查看 DJI 官方网站,也难以掌握整体流程,具体步骤较难理解。
本文介绍了:需要 Application Binding 的机型列表、SDK 认证芯片的连接方法(以 Raspberry Pi 为例)、在开发者中心注册应用。此外,介绍了连接机体、载荷和 PC 后,通过 DJI Assistant 2 进行绑定的完整流程。
Application Binding 很可能成为今后发布机型的标准流程。从事自定义载荷开发的读者,可参考本文进行尝试。