尝试将 Electron 应用移植到 Tauri 2.0 的 PoC
Back to Top为了覆盖更广泛的受众,这篇文章已从日语翻译而来。
您可以在这里找到原始版本。
这是is开发者站点 Advent Calendar 2025第1天的文章。
前言
#去年9月我体验了 Tauri 2.0 的 RC 并写了相关文章。
当时也是时隔约两年再次接触 Tauri,但自那时起又过去了一年多。时光飞逝啊。
Tauri 2.0 在去年10月正式发布,当前版本为 2.9.3。我认为现在它应该已经比较成熟了,于是萌生了从 Electron 进行移植 PoC 的想法。
要移植的应用
#到目前为止,我只做过一些简单的类 SPA 应用,所以想尝试一个更实用一些的应用。和往常一样,我将以我写的 Electron 独立 Cosense (Scrapbox) 应用作为案例。
下面是 sbe 的功能演示截图。它的特点是使用标签页 UI,可以在标签页中打开、显示和编辑 Cosense 的页面,也可以使用自定义的管理界面和项目页面列表等 UI。
虽然说是移植,但这个应用维护多年,代码基也相当庞大,功能也很多,所以我打算针对某些特定功能进行实现,切身体会与 Electron 的差异。
下面是此次 PoC 移植完成后的截图。
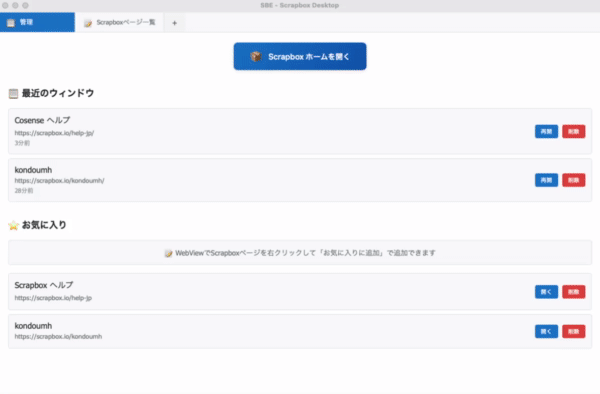
在第一个标签页中会显示打开页面的历史记录和收藏,点击第二个标签页会显示页面列表。在这里可以查看任意 Cosense 项目的页面列表。点击历史或收藏的链接会在独立窗口中打开页面。
如后文所述,由于无法在标签页内直接显示 Cosense 页面,PoC 中做了妥协,改为独立窗口显示。可以通过上下文菜单添加到收藏。
完整的代码量非常庞大,这里在文末给出仓库地址。希望通过文中的代码片段能让大家对整体有个大致了解。
使用的软件版本等
#本次 PoC 使用以下环境:
- Rust 1.19.1
- Tauri 2.9.3
- Vite 6.0.3
- Vue 3.5.13
sbe 原先使用了 Vuetify,但为了简化,仅使用 Vue 和 CSS。最初使用 vanilla 模板创建项目,然后再安装所需的依赖。
mkdir sbe-tauri-poc && cd sbe-tauri-poc
npm create tauri-app@latest . --template vanilla-ts
多视图与标签页 UI
#在 sbe 中,通过标签页 UI 同时显示多个 Cosense 页面或自定义页面。具体来说,使用 Electron 的 WebContentsView 展示 Scrapbox 页面,并用 Vue(Vuetify) 实现的标签页来切换多个 WebContentsView,如下所示:
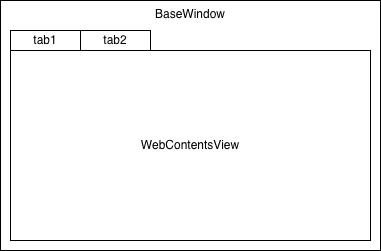
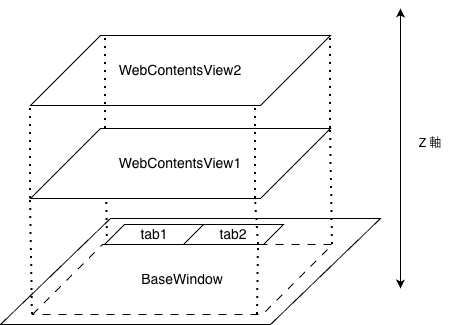
WebContentsView 嵌入在 BaseWindow 中。可以将多个 WebContentsView 重叠显示或平铺显示,也可以通过 API 来调整它们在 Z 轴上的顺序。渲染进程中,Vuetify 的标签点击事件会通知主进程,通过切换 WebContentsView 的 Z 顺序来实现标签切换。
我们在 GitHub 的 mamezou-tech 组织中公开了一个简单的 Electron WebContentsView 示例。
关于使用 WebContentsView 的应用结构,请参考以下文章。
实际上,sbe 并不是用 BaseWindow + WebContentsView 实现的,而是用 BrowserWindow + BrowserView 实现的。BrowserView 当前作为 WebContentsView 的 SIM 提供,因此实际上是由 WebContentsView 实现的。
另一方面,Tauri 的 WebView 不支持嵌入,只能以独立窗口的方式显示。要实现像 sbe 那样的 UI,可以考虑在单个 WebView 中使用 iframe 来显示网站。
当尝试用 iframe 显示 Cosense 站点时会出现如下错误。
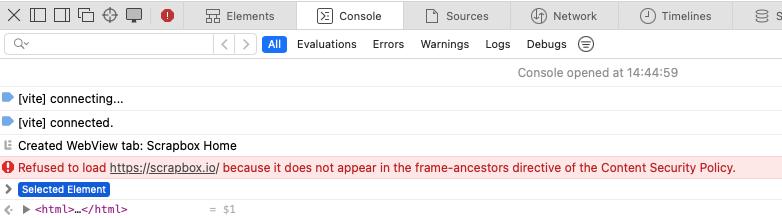
Refused to load https://scrapbox.io/ because it does not appear in the frame-ancestors directive of the Content Security Policy.
Cosense 似乎通过 Content Security Policy (CSP) 限制了在 iframe 内的显示。
于是放弃在标签页中直接显示 Cosense 本身,而改为为每个页面用 WebView 启动独立窗口。然而,sbe 中实现的管理界面和项目页面列表等 UI 仍在主 WebView 的标签页中显示。
在 Rust 端创建了一个将 WebView 以窗口形式显示的命令。
#[tauri::command]
async fn create_webview_window(app: tauri::AppHandle, url: String, label: String) -> Result<(), String> {
    let webview_url = WebviewUrl::External(url.parse().map_err(|e| format!("Invalid URL: {}", e))?);

    let window = WebviewWindowBuilder::new(&app, &label, webview_url)
        .title("Scrapbox")
        .inner_size(1200.0, 800.0)
        .min_inner_size(800.0, 600.0)
        .center()
        .resizable(true)
        .visible(false)
        .build()
        .map_err(|e| e.to_string())?;

    // Show window after it's fully initialized
    window.show().map_err(|e| e.to_string())?;

    Ok(())
}
在 Vue 的 UI 中通过 invoke 调用它。
const reopenWindow = async (window: RecentWindow) => {
  try {
    const windowId = `reopen-${Date.now()}`;
    await invoke('create_webview_window', {
      url: window.url,
      label: windowId
    });
    errorMessage.value = "";
  } catch (error) {
    console.error('Failed to reopen window:', error);
    errorMessage.value = `窗口重启失败: ${error}`;
  }
};
虽然桌面上会充满窗口,但多视图应用的基础已经搭建完成。
WebView 中导航检测及 Rust → 前端 通知
#在 sbe 中会记录浏览过的 Cosense 页面历史,这是通过捕捉 Electron 的 webContents 事件来实现的。在 Cosense 站点内的跳转可以通过 did-navigate-in-page 事件捕捉到。
function handleLinkEvent(view) {
  view.webContents.on('will-navigate', (e, url) => {
    // 打开链接的处理
  });
  view.webContents.on('did-start-navigation', async (e, url, isInPlace) => {
    const currentUrl = view.webContents.getURL();
    // 导航开始时的处理
  });
  view.webContents.on('did-navigate-in-page', async (e, url) => {
    // 站内导航的处理(例如保存到历史记录等)
  });
  view.webContents.on('update-target-url', (e, url) => {
    // 链接鼠标悬停时的处理
  });
}
Tauri 的 Rust API 提供了 on_navigation 和 on_page_load 等方法,可以捕捉网页的获取开始和加载完成。然而这些处理器似乎无法检测同一站点内的页面跳转。要实时捕捉 Cosense 站点内的页面跳转,需要在 WebView 中注入 JavaScript 来跟踪事件。因此在启动 WebView 时,通过 initialization_script 注入跟踪脚本。
#[tauri::command]
async fn create_webview_window(app: tauri::AppHandle, url: String, label: String) -> Result<(), String> {
    let webview_url = WebviewUrl::External(url.parse().map_err(|e| format!("Invalid URL: {}", e))?);
    let window = WebviewWindowBuilder::new(&app, &label, webview_url)
        .title("Scrapbox")
        .inner_size(1200.0, 800.0)
        .min_inner_size(800.0, 600.0)
        .center()
        .resizable(true)
        .visible(false)
        .initialization_script(include_str!("../scripts/navigation-tracker.js"))
        .build()
        .map_err(|e| e.to_string())?;

    window.show().map_err(|e| e.to_string())?;
    Ok(())
}
较短的脚本可以直接写在 initialization_script 中,但为了可读性和提升 IDE 的工作效率,还是放在单独文件中并加载更好。
下面的脚本中,定义了 trackNavigation 函数,检测到变化后通过 Tauri 的 invoke 命令发送到 Rust 端。它监听浏览器的前进/后退事件,并捕获 history.pushState / history.replaceState 来通知 SPA 的导航。同时使用 MutationObserver 检测标题变化。这样就可以跟踪像 Cosense 这样的现代 SPA 的页面跳转。
let currentUrl = window.location.href;
let currentTitle = document.title || window.location.hostname || 'Untitled';

// Function to track navigation
function trackNavigation(source = 'unknown') {
    const url = window.location.href;
    const title = document.title || window.location.hostname || 'Untitled';

    // Skip if no change
    if (url === currentUrl && title === currentTitle) return;

    console.log('Navigation tracked (' + source + '):', title, '→', url);

    // Update state
    currentUrl = url;
    currentTitle = title;

    // invoke Tauri command
    if (window.__TAURI__ && window.__TAURI__.core) {
        window.__TAURI__.core.invoke('track_navigation', {
            windowLabel: window.navigationTrackerLabel,
            url: url,
            title: title
        }).then(result => {
            console.log('Track navigation success:', result);
        }).catch(err => {
            console.error('Failed to track navigation:', err);
        });
    } else {
        console.error('Tauri API not available');
    }
}

// Track initial page load
trackNavigation('initialization');

// Listen for forward/back event
window.addEventListener('popstate', () => trackNavigation('popstate'));
window.addEventListener('hashchange', () => trackNavigation('hashchange'));

// Handle SPA navigation
const originalPushState = history.pushState;
const originalReplaceState = history.replaceState;

history.pushState = function(...args) {
    originalPushState.apply(this, args);
    trackNavigation('pushState');
};

history.replaceState = function(...args) {
    originalReplaceState.apply(this, args);
    trackNavigation('replaceState');
};

// Monitor title changes (for dynamic title updates)
let titleObserver;
if (document.querySelector('title')) {
    titleObserver = new MutationObserver(() => trackNavigation('titleChange'));
    titleObserver.observe(document.querySelector('title'), { childList: true });
}
在 WebView 中调用的 Rust 的 track_navigation 中,会向 Vue 端发送 add-to-recent 事件。
#[tauri::command]
async fn track_navigation(app: tauri::AppHandle, window_label: String, url: String, title: String) -> Result<(), String> {
    println!("Navigation tracked: {} -> {} ({})", window_label, url, title);

    // Emit event to main window for history tracking
    app.emit("add-to-recent", NavigationEvent {
        window_label,
        url,
        title,
    }).map_err(|e| e.to_string())?;

    Ok(())
}
在 Vue 端接收 add-to-recent 事件后会更新列表,去重并写入 localStorage。
  // Listen for navigation events from WebView windows
  navigationUnlisten = await listen('add-to-recent', (event: any) => {
    const { window_label, url, title } = event.payload;

    addToRecent({
      id: `${window_label}-${Date.now()}`,
      title: title || new URL(url).hostname,
      url,
      lastAccessed: new Date()
    });

    console.log(`Navigation tracked: ${title} (${url})`);
  });


// Recent windows functions
const addToRecent = (window: RecentWindow) => {
  recentWindows.value = recentWindows.value.filter(w => w.id !== window.id);
  recentWindows.value.unshift(window);
  saveToStorage();
};

// Data persistence
const saveToStorage = () => {
  localStorage.setItem('sbe-recent', JSON.stringify(recentWindows.value.map(w => ({
    ...w,
    lastAccessed: w.lastAccessed.toISOString()
  }))));
  localStorage.setItem('sbe-favorites', JSON.stringify(favorites.value));
};
这次是在前端使用 LocalStorage 保存,不过如果在 Rust 端实现成存储/加载 JSON 文件,就算更换机器也可以携带历史记录,可能会更方便。
由于 Electron 提供了页面内跳转的细粒度事件,Tauri 的方式显得相当麻烦。Electron 因为内置了 Chrome,所以开发者可以轻松捕捉各种事件;而 Tauri 使用操作系统已安装的 WebView,无法提供如此深入 WebView 实现的事件。因此需要使用比较 Hack 的手段注入 initialization_script 脚本。这是因为 Tauri 与 WebView 之间的松耦合,也正因如此,Tauri 应用才更加轻量、节省内存。
Cosense 页面列表界面的 API 调用和 JSON 解析
#在 Vue 中创建 Cosense 项目的页面列表并在标签页内显示。为此需要通过 Cosense API 获取对应项目的页面列表。在 sbe 中,大致是如下方式在主进程中使用 Cosense API 来获取页面列表:
async function fetchPageInfo(url) {
  const sid = await getSid();
  const res = await fetch(url, { headers: { cookie: sid } });
  const data = await res.json();
  return data;
}

async function getSid() {
  const cookies = await session.defaultSession.cookies.get({ name: 'connect.sid' });
  return cookies[0].value;
}
为了能从私有 Cosense 项目中获取数据,会从 session 中获取 Cookie 并嵌入请求头。
在 Tauri 中也推荐在 Rust 端进行数据获取。特别是 API 密钥等不应暴露在前端。
由于要在 Rust 端实现 API 调用,Electron 主进程(JavaScript)中可以轻松处理的响应在这里会稍显繁琐。解析 API 响应后,定义了如下类型信息:
// API Response
#[derive(Serialize, Deserialize)]
struct ScrapboxPagesResponse {
    #[serde(rename = "projectName")]
    project_name: String,
    skip: i32,
    limit: i32,
    count: i32,
    pages: Vec<ScrapboxPage>,
}

// Cosense page
#[derive(Serialize, Deserialize, Clone)]
struct ScrapboxPage {
    id: String,
    title: String,
    image: Option<String>,
    descriptions: Vec<String>,
    #[serde(rename = "lastUpdateUser")]
    last_update_user: Option<ScrapboxUser>,
    // 中略
    #[serde(rename = "charsCount")]
    chars_count: Option<i32>,
    helpfeels: Option<Vec<String>>,
}

// Cosense user
#[derive(Serialize, Deserialize, Clone)]
struct ScrapboxUser {
    id: String,
}
下面是调用 Cosense API 的 fetch_scrapbox_pages 命令。由于需要处理 Cosense API 的分页参数,代码显得有点冗长,但其中通过 cookies_for_url 方法从窗口获取 Cookie 并嵌入头部的流程与 Electron 相同。API 响应被存储在上面定义的 ScrapboxPagesResponse 中。
// Command to fetch Scrapbox pages with authentication (supports both public and private projects)
#[tauri::command]
async fn fetch_scrapbox_pages(
    app: tauri::AppHandle,
    project: String,
    skip: Option<i32>,
    limit: Option<i32>,
    sort: Option<String>
) -> Result<ScrapboxPagesResponse, String> {
    let skip = skip.unwrap_or(0);
    let limit = limit.unwrap_or(20);
    let sort = sort.unwrap_or_else(|| "updated".to_string());

    let api_url = format!(
        "https://scrapbox.io/api/pages/{}?skip={}&limit={}&sort={}",
        project, skip, limit, sort
    );

    let scrapbox_url = Url::parse("https://scrapbox.io").map_err(|e| format!("Invalid URL: {}", e))?;

    // Try to get cookies from main window's webview
    let cookies = if let Some(main_window) = app.get_webview_window("main") {
        main_window.cookies_for_url(scrapbox_url.clone())
            .map_err(|e| format!("Failed to get cookies: {}", e))?
    };

    let client = reqwest::Client::new();
    let mut request_builder = client.get(&api_url);

    // Add cookies if available
    if !cookies.is_empty() {
        let cookie_header = build_cookie_header(cookies);
        println!("Using cookies for authentication: {} cookies", cookie_header.matches(';').count() + 1);
        request_builder = request_builder.header("Cookie", cookie_header);
    }

    let response = request_builder
        .send()
        .await
        .map_err(|e| format!("Failed to fetch pages: {}", e))?;

    if !response.status().is_success() {
        return Err(format!("API request failed with status: {} - This might be a private project requiring authentication", response.status()));
    }

    let pages_data: ScrapboxPagesResponse = response
        .json()
        .await
        .map_err(|e| format!("Failed to parse JSON: {}", e))?;

    Ok(pages_data)
}
在 Vue 端使用 invoke 调用 Rust 的 fetch_scrapbox_pages 并显示获取的列表。
// Scrapbox pages functions
const fetchScrapboxPages = async () => {
  scrapboxLoading.value = true;
  scrapboxError.value = '';

  try {
    const result = await invoke('fetch_scrapbox_pages', {
      project: scrapboxProject.value,
      skip: scrapboxSkip.value,
      limit: scrapboxLimit.value,
      sort: scrapboxSort.value
    }) as { pages: ScrapboxPage[], count: number, skip: number };

    scrapboxPages.value = result.pages;
    console.log(`Fetched ${result.pages.length} pages from ${scrapboxProject.value}`);
  } catch (error) {
    console.error('Failed to fetch Scrapbox pages:', error);
    scrapboxError.value = `页面获取失败: ${error}`;
  } finally {
    scrapboxLoading.value = false;
  }
};
Electron 的主进程也可以用 JavaScript 编写,所以 JSON 处理很轻松。而 Tauri (Rust) 则在编译时就能捕捉错误,提供了类型安全的优势,TypeScript 同理。在大规模开发中,这些通常会交给代码生成器来完成。
上下文菜单处理
#接下来实现将 WebView 窗口中显示的 Cosense 页面添加到收藏的功能。在 WebView 上显示上下文菜单来进行添加会比较自然。
在之前的文章中,由于将 SPA 应用化,所以使用 Tauri 的 JavaScript API 简单实现了上下文菜单。而像这次在 WebView 中显示网站,则需要注入脚本来处理上下文菜单。当然也可以注入 Tauri API 的上下文菜单代码,但这次我通过 DOM 操作添加了上下文菜单。由于 Tauri API 添加的上下文菜单是 OS 原生的,如果想与 WebView 中显示的网站的外观风格更一致,通过 DOM 操作自己创建近似的菜单也是一种选择。
function showContextMenu(x, y) {
    // Remove existing context menu if any
    const existingMenu = document.getElementById('tauri-context-menu');
    if (existingMenu) {
        existingMenu.remove();
    }

    // Create context menu
    const menu = document.createElement('div');
    menu.id = 'tauri-context-menu';
    menu.style.cssText = `
        position: fixed;
        left: ${x}px;
        top: ${y}px;
        box-shadow: 0 2px 8px rgba(0,0,0,0.15);
        z-index: 10000;
        min-width: 180px;
        font-size: 14px;
    `;

    // Add menu item
    const menuItem = document.createElement('div');
    menuItem.textContent = '⭐ 添加到收藏';
    menuItem.style.cssText = `
        padding: 8px 16px;
        cursor: pointer;
        border-radius: 4px;
        transition: background-color 0.2s;
    `;

    menuItem.addEventListener('click', () => {
        addToFavorites();
        menu.remove();
    });

    menu.appendChild(menuItem);
    document.body.appendChild(menu);

    document.addEventListener('click', function removeMenu() {
        menu.remove();
        document.removeEventListener('click', removeMenu);
    });
}
将该脚本同 navigation-tracker.js 一样注入到 WebView 中。
点击上下文菜单时会调用 addToFavorites 函数,在其中会 invoke add_to_favorites_from_webview。Rust 端执行 add_to_favorites_from_webview 命令后,会向 Vue 端发送 add-to-favorites 事件。
// Command to add to favorites from WebView
#[tauri::command]
async fn add_to_favorites_from_webview(app: tauri::AppHandle, url: String, title: String) -> Result<(), String> {
    // Emit event to main window to add to favorites
    app.emit("add-to-favorites", FavoriteEvent {
        url,
        title,
    }).map_err(|e| e.to_string())?;

    Ok(())
}
在 Vue 端根据 Rust 发送的事件进行添加收藏的处理。
const addFavoriteFromWebView = async (url: string, title: string) => {
  try {
    // Check if already exists
    const existingFavorite = favorites.value.find(f => f.url === url);
    if (existingFavorite) {
      errorMessage.value = "已在收藏中";
      setTimeout(() => {
        errorMessage.value = "";
      }, 2000);
      return;
    }

    const favorite: Favorite = {
      id: `fav-${Date.now()}`,
      title,
      url
    };

    favorites.value.unshift(favorite);
    saveToStorage();
    errorMessage.value = `已添加到收藏: ${title}`;

    setTimeout(() => {
      errorMessage.value = "";
    }, 3000);
  } catch (error) {
    console.error('Failed to add favorite from WebView:', error);
    errorMessage.value = `添加收藏失败: ${error}`;
  }
};
使用 GitHub Actions 工作流生成各平台的安装程序
#功能完整的 Tauri 版 Cosense 应用已完成,下面尝试在 CI 中为 macOS 和 Windows 创建安装程序。
Tauri 使用操作系统的 WebView,因此无法进行交叉编译。需要为每个操作系统准备相应的构建环境。Electron 也因为要捆绑不同 OS 上的 Chrome,同样需要为各 OS 准备构建环境,所以在这点上没有区别。
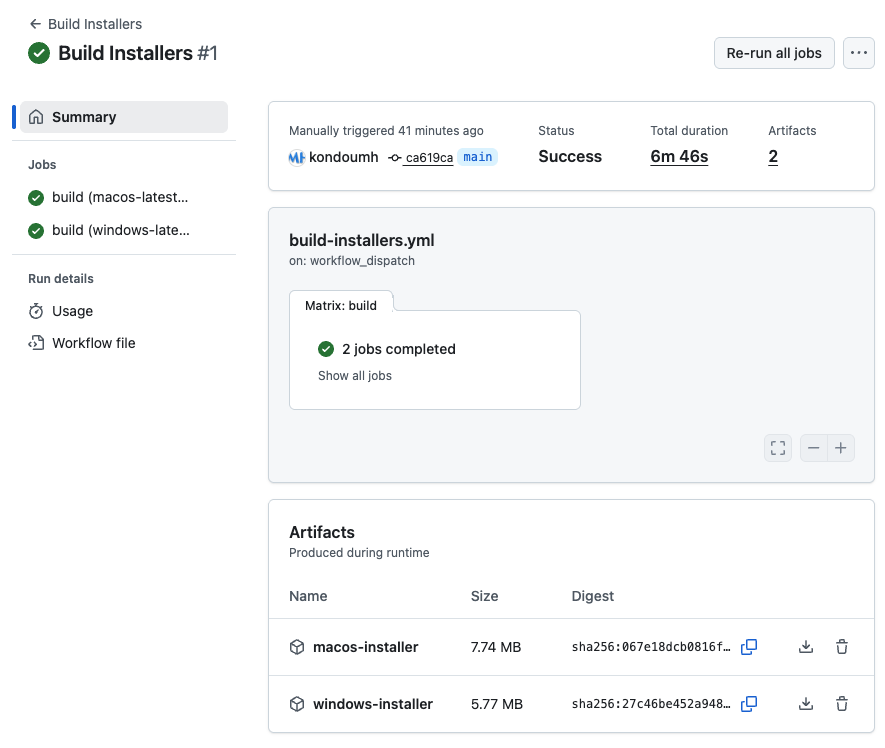
使用 GitHub Actions 的 Strategy Matrix 定义了一个工作流,创建 macOS 和 Windows 安装程序并作为工件保存。
name: Build Installers

on:
  workflow_dispatch:

jobs:
  build:
    strategy:
      matrix:
        include:
          - os: macos-latest
            name: macos-installer
            path: |
              src-tauri/target/release/bundle/dmg/*.dmg
              src-tauri/target/release/bundle/macos/*.app
          - os: windows-latest
            name: windows-installer
            path: |
              src-tauri/target/release/bundle/msi/*.msi
              src-tauri/target/release/bundle/nsis/*.exe

    runs-on: ${{ matrix.os }}

    steps:
    - name: Checkout repository
      uses: actions/checkout@v4

    - name: Setup Node.js
      uses: actions/setup-node@v4
      with:
        node-version: '20'
        cache: 'npm'

    - name: Setup Rust
      uses: dtolnay/rust-toolchain@stable

    - name: Install dependencies
      run: npm install

    - name: Build Tauri app
      run: npm run tauri build

    - name: Upload artifacts
      uses: actions/upload-artifact@v4
      with:
        name: ${{ matrix.name }}
        path: ${{ matrix.path }}
        retention-days: 30
执行该工作流后,生成的 Tauri 应用安装程序约为 5-7MB,安装后的二进制约为 3-4MB。
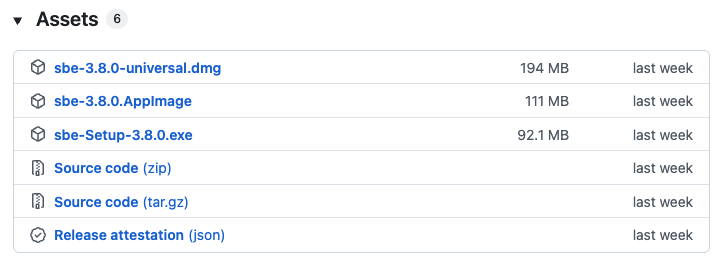
sbe 的安装程序约在 100MB 左右,macOS 通用安装程序接近 200MB。
Tauri 应用小巧的资源占用非常有吸引力。启动快且应用响应也很轻快。
源代码仓库
#本次 PoC 的成果放在以下仓库:
README 是让 Copilot 写的,所以表述可能有些夸张,请谅解😅。
最后
#以上就是将 Electron 应用移植到 Tauri 2.0 的 PoC 介绍。虽然在这个案例中更凸显了 Electron 的功能性和便利性,但能够生成轻量且高速的二进制,以及 Rust/Tauri 的生态系统和类型安全带来的开发体验,都非常具有吸引力。
Tauri 也支持 .NET 的 Blazor。
关于 Blazor,去年在 Advent Calendar 中已有介绍。
Tauri 2.0 使用了 OS 的 WebView,但有一个基于 Servo 的跨平台 WebView 项目 Verso 在开发中。
NLnet; Servo improvements for Tauri
借助 Verso 可以吸收各 OS WebView 之间的差异,为主要桌面及移动平台带来一致的体验。像这次觉得麻烦的导航 API 等也可能会变得更易用。
未来如果 Tauri 引入了 Verso 项目的成果,就会采用内置 WebView 的架构,因此二进制大小会增大。因此或许会提供一个在传统 OS WebView 与内置 WebView 之间切换的选项。