DJI Drone Development Tips - Introduction to Custom Widgets
Back to TopTo reach a broader audience, this article has been translated from Japanese.
You can find the original version here.
Introduction
#At Mamezou, we are working on the development of a solar panel cleaning robot system.
This system consists of a robot that cleans solar panels and a drone that transports it. In this article, we will introduce how to display custom widgets on the remote controller using the Payload SDK (https://developer.dji.com/doc/payload-sdk-tutorial/en/tutorial-map.html) used for drone-side development.
An overview of the Payload SDK is also introduced in the following article, so please refer to it as well.
What Is a Custom Widget?
#When using a payload device mounted on the aircraft, there are many situations in which the user wants to issue operation commands to the payload or check its status.
In the DJI drone system, the UI is provided by DJI-made remote controllers (running DJI Pilot 2) or applications developed with the Mobile SDK (https://developer.dji.com/mobile-sdk/).
Custom widgets are a mechanism for embedding your own widgets into these UIs.
The system configuration when using a remote controller is illustrated below.
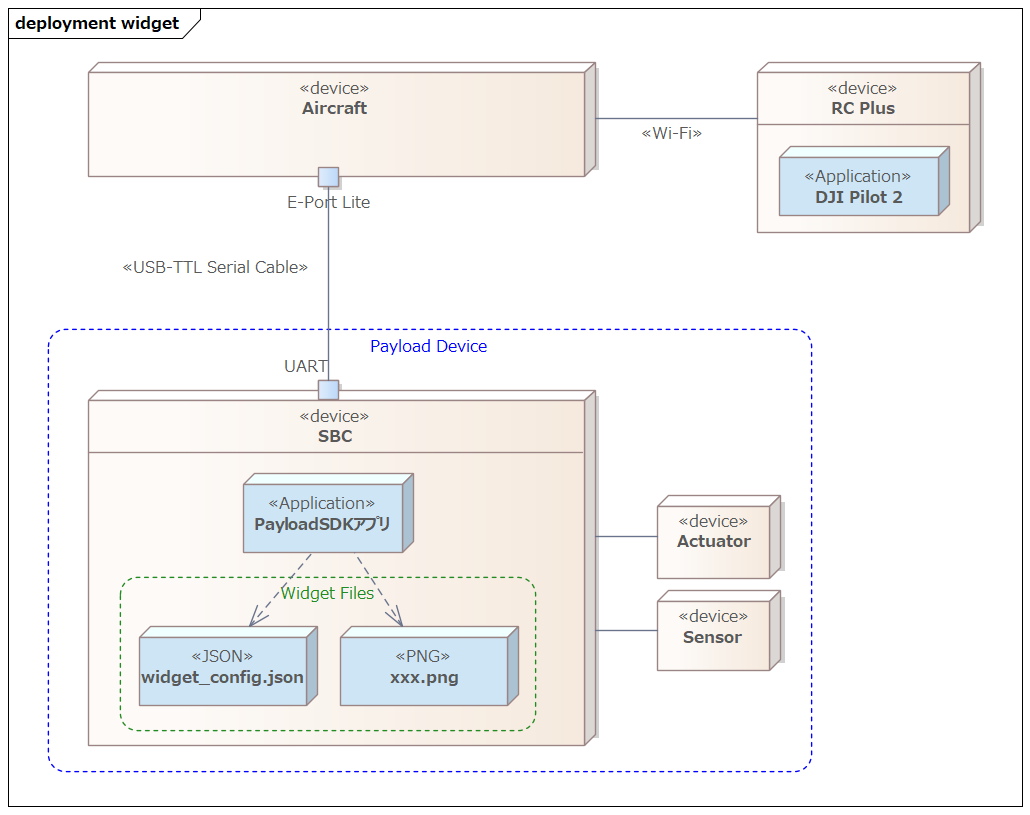
An application inside the SBC of a third-party payload device provides widget definitions to the aircraft via the Payload SDK. DJI Pilot 2 running on the remote controller automatically retrieves those widget definitions from the aircraft and displays them in the UI.
In this article, based on the DJI tutorial (https://developer.dji.com/doc/payload-sdk-tutorial/en/function-set/basic-function/custom-widget.html), we will introduce what you can do with custom widgets.
Demo with Sample Code for Custom Widgets
#The Payload SDK repository (https://github.com/dji-sdk/Payload-SDK) includes sample code for each SDK feature.
The sample code for custom widgets is located at:
- https://github.com/dji-sdk/Payload-SDK/blob/master/samples/sample_c/module_sample/widget/
Below is a demo video showing the sample code in action.
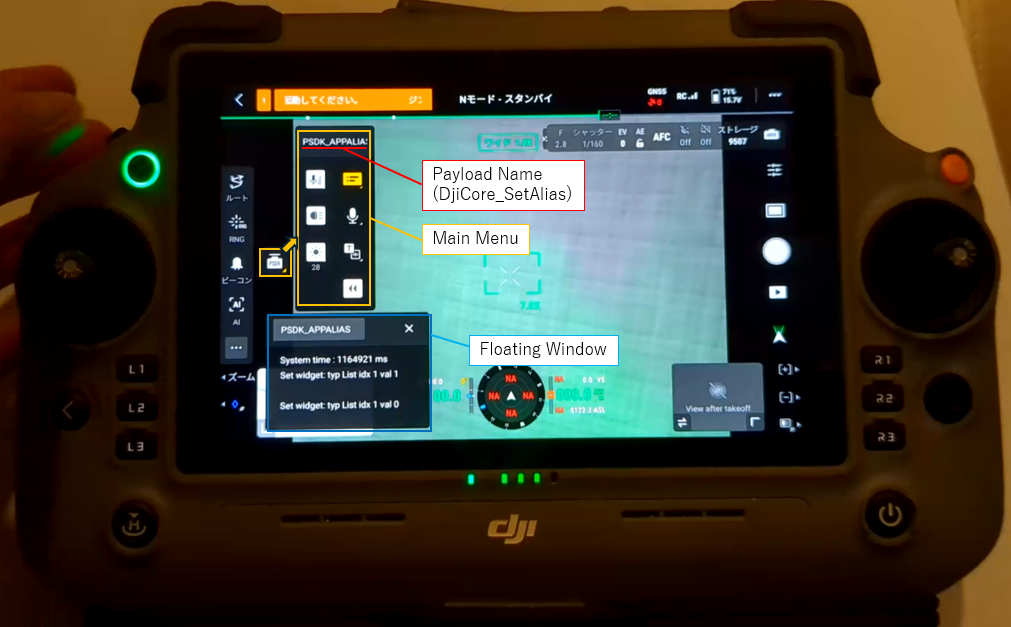
“PSDK” has been added to the main menu on the left side of the DJI Pilot 2 camera view.
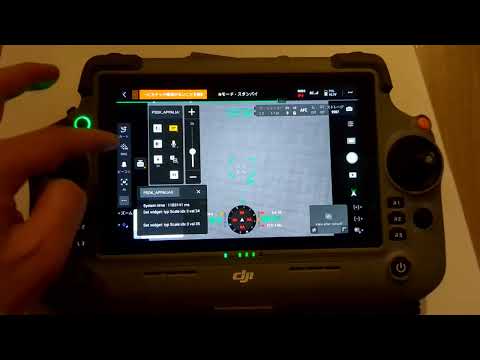
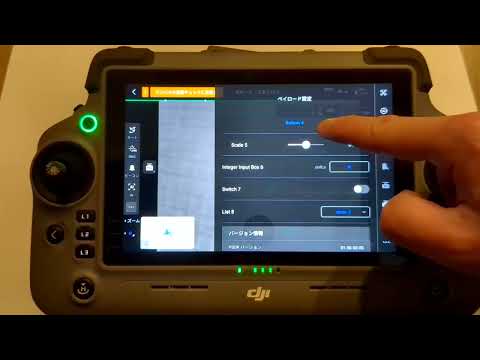
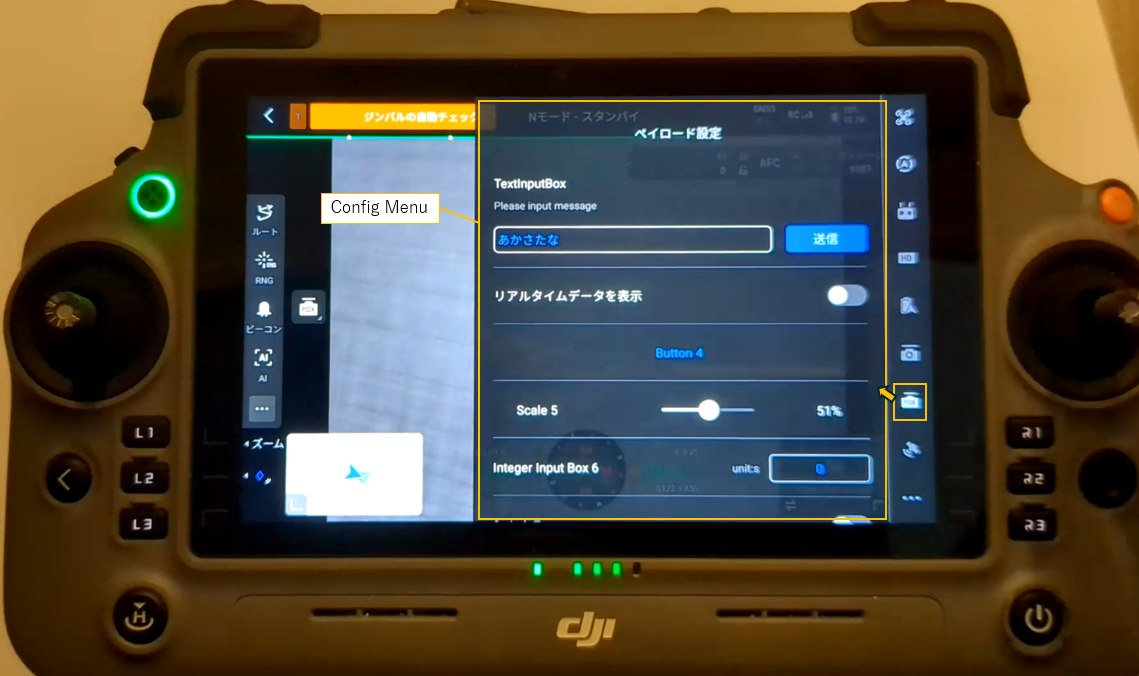
When you press the settings button at the top right, “PSDK” also appears in the settings menu on the right.
In this sample, the callbacks for widget operations are mock implementations, so there is no actual action when you press the buttons. However, it should give you a clear idea of how the UI can be extended.
File Structure of Custom Widgets
#The sample directory (https://github.com/dji-sdk/Payload-SDK/blob/master/samples/sample_c/module_sample/widget/) has the following structure:
├── test_widget.c
├── test_widget.h
└── widget_file
    ├── cn_big_screen
    │   ├── icon_button1.png
    │   ├── icon_button2.png
    │   ├── icon_list_item1.png
    │   ├── icon_list_item2.png
    │   ├── icon_scale.png
    │   ├── icon_switch_select.png
    │   ├── icon_switch_unselect.png
    │   └── widget_config.json
    └── en_big_screen
        ├── icon_button1.png
        ├── icon_button2.png
        ├── icon_list_item1.png
        ├── icon_list_item2.png
        ├── icon_scale.png
        ├── icon_switch_select.png
        ├── icon_switch_unselect.png
        └── widget_config.json
The widget_config.json file defines the custom widgets, and the PNG files are used as icons.
Directories are separated by UI language: cn_big_screen for Chinese, en_big_screen for English. The directory referenced switches according to the remote controller’s language setting.
You don’t need to define configurations for every language—you can specify a default directory. In this sample, en_big_screen is set as the default. In the demo above, because the remote controller was set to Japanese, it fell back to en_big_screen.
In test_widget.c, handlers for the SDK callbacks are implemented. In those handlers, you write the code for processing button presses and for returning values to display in the UI.
Initialization Flow of Custom Widgets
#When the sample application starts, a console menu for each feature appears. Custom widgets are automatically uploaded to the aircraft after startup and displayed in DJI Pilot 2.
0.016	            core	[Info]	               dji_core.c:113  Payload SDK Version : V3.15.0-beta.0-build.2318 Dec 10 2025 17:27:05
1.075	         adapter	[Info]	     dji_access_adapter.c:351  Identify mount position type is Extension Port Type
1.075	         adapter	[Info]	     dji_access_adapter.c:371  Identify aircraft series is Matrice 4 Series
1.578	         adapter	[Info]	     dji_access_adapter.c:493  Identity uart0 baudrate is 921600 bps
1.582	            core	[Info]	    dji_identity_verify.c:627  Updating dji sdk policy file...
...(omit)
12.455	            core	[Info]	               dji_core.c:328  Start dji sdk application
12.455	            user	[Info]	          application.cpp:372  Application start.

| Available commands:                                                                              |
| [0] Fc subscribe sample - subscribe quaternion and gps data                                      |
| [1] Flight controller sample - you can control flying by PSDK                                    |
| [2] Hms info manager sample - get health manger system info by language                          |
| [a] Gimbal manager sample - you can control gimbal by PSDK                                       |
| [c] Camera stream view sample - display the camera video stream                                  |
| [d] Stereo vision view sample - display the stereo image                                         |
| [e] Run camera manager sample - you can test camera's functions interactively                    |
| [f] Start rtk positioning sample - you can receive rtk rtcm data when rtk signal is ok           |
| [g] Request Lidar data sample - Request Lidar data and store the point cloud data as pcd files   |
| [h] Request Radar data sample - Request radar data                                               |
| [l] Run widget states manager sample, control widget states on other payload                     |
Below is an excerpt of the SDK initialization (from application.cpp).
https://github.com/dji-sdk/Payload-SDK/blob/326b8698dd98d5451fc14cfc952976795d37bd66/samples/sample_c%2B%2B/platform/linux/raspberry_pi/application/application.cpp#L330
void Application::DjiUser_ApplicationStart()
{
    ...(omit)

    returnCode = DjiCore_SetAlias("PSDK_APPALIAS");  // Payload name (for UI display)
    if (returnCode != DJI_ERROR_SYSTEM_MODULE_CODE_SUCCESS) {
        throw std::runtime_error("Set alias error.");
    }

    ...(omit)

    returnCode = DjiTest_WidgetStartService();  // Start widget service
    if (returnCode != DJI_ERROR_SYSTEM_MODULE_CODE_SUCCESS) {
        USER_LOG_ERROR("widget sample init error");
    }
The alias PSDK_APPALIAS set by DjiCore_SetAlias is displayed in the UI as the payload device name. DjiTest_WidgetStartService is the function defined in test_widget.c.
Below is an excerpt of DjiTest_WidgetStartService. It configures the SDK with the widget_file directory path, and registers handlers for widget operation callbacks and for returning display values. Entries 0–8 in s_widgetHandlerList correspond to widget_index values defined in widget_config.json.
https://github.com/dji-sdk/Payload-SDK/blob/e8041ad6ea468db3346379f771f78c0636994aa8/samples/sample_c/module_sample/widget/test_widget.c#L112
static const T_DjiWidgetHandlerListItem s_widgetHandlerList[] = {
    {0, DJI_WIDGET_TYPE_BUTTON,        DjiTestWidget_SetWidgetValue, DjiTestWidget_GetWidgetValue, NULL},
    {1, DJI_WIDGET_TYPE_LIST,          DjiTestWidget_SetWidgetValue, DjiTestWidget_GetWidgetValue, NULL},
    {2, DJI_WIDGET_TYPE_SWITCH,        DjiTestWidget_SetWidgetValue, DjiTestWidget_GetWidgetValue, NULL},
    {3, DJI_WIDGET_TYPE_SCALE,         DjiTestWidget_SetWidgetValue, DjiTestWidget_GetWidgetValue, NULL},
    {4, DJI_WIDGET_TYPE_BUTTON,        DjiTestWidget_SetWidgetValue, DjiTestWidget_GetWidgetValue, NULL},
    {5, DJI_WIDGET_TYPE_SCALE,         DjiTestWidget_SetWidgetValue, DjiTestWidget_GetWidgetValue, NULL},
    {6, DJI_WIDGET_TYPE_INT_INPUT_BOX, DjiTestWidget_SetWidgetValue, DjiTestWidget_GetWidgetValue, NULL},
    {7, DJI_WIDGET_TYPE_SWITCH,        DjiTestWidget_SetWidgetValue, DjiTestWidget_GetWidgetValue, NULL},
    {8, DJI_WIDGET_TYPE_LIST,          DjiTestWidget_SetWidgetValue, DjiTestWidget_GetWidgetValue, NULL},
};

...(omit)

T_DjiReturnCode DjiTest_WidgetStartService(void)
{
    T_DjiReturnCode djiStat;
    T_DjiOsalHandler *osalHandler = DjiPlatform_GetOsalHandler();

    // Step 1: Init DJI Widget
    djiStat = DjiWidget_Init();
    if (djiStat != DJI_ERROR_SYSTEM_MODULE_CODE_SUCCESS) {
        USER_LOG_ERROR("Dji test widget init error, stat = 0x%08llX", djiStat);
        return djiStat;
    }

    ...(omit)

    // Set default UI config path
    djiStat = DjiWidget_RegDefaultUiConfigByDirPath(tempPath);
    if (djiStat != DJI_ERROR_SYSTEM_MODULE_CODE_SUCCESS) {
        USER_LOG_ERROR("Add default widget UI config error, stat = 0x%08llX", djiStat);
        return djiStat;
    }

    // Set UI config for English language
    djiStat = DjiWidget_RegUiConfigByDirPath(DJI_MOBILE_APP_LANGUAGE_ENGLISH,
                                             DJI_MOBILE_APP_SCREEN_TYPE_BIG_SCREEN,
                                             tempPath);
    if (djiStat != DJI_ERROR_SYSTEM_MODULE_CODE_SUCCESS) {
        USER_LOG_ERROR("Add widget UI config error, stat = 0x%08llX", djiStat);
        return djiStat;
    }

    // Set UI config for Chinese language
    djiStat = DjiWidget_RegUiConfigByDirPath(DJI_MOBILE_APP_LANGUAGE_CHINESE,
                                                DJI_MOBILE_APP_SCREEN_TYPE_BIG_SCREEN,
                                                tempPath);
    if (djiStat != DJI_ERROR_SYSTEM_MODULE_CODE_SUCCESS) {
        USER_LOG_ERROR("Add widget UI config error, stat = 0x%08llX", djiStat);
        return djiStat;
    }

    // Step 3: Set widget handler list
    djiStat = DjiWidget_RegHandlerList(s_widgetHandlerList, s_widgetHandlerListCount);
    if (djiStat != DJI_ERROR_SYSTEM_MODULE_CODE_SUCCESS) {
        USER_LOG_ERROR("Set widget handler list error, stat = 0x%08llX", djiStat);
        return djiStat;
    }
Language identifiers (e.g., DJI_MOBILE_APP_LANGUAGE_ENGLISH) are defined in dji_typedef.h:
/**
 * @brief Mobile APP system language.
 */
typedef enum {
    DJI_MOBILE_APP_LANGUAGE_UNKNOWN             = 255, /*!< The system language of the mobile app is unknown */
    DJI_MOBILE_APP_LANGUAGE_ENGLISH             = 0, /*!< The system language of the mobile app is English */
    DJI_MOBILE_APP_LANGUAGE_CHINESE             = 1, /*!< The system language of the mobile app is Chinese */
    DJI_MOBILE_APP_LANGUAGE_JAPANESE            = 2, /*!< The system language of the mobile app is Japanese */
    DJI_MOBILE_APP_LANGUAGE_FRENCH              = 3, /*!< The system language of the mobile app is French */
} E_DjiMobileAppLanguage;
In this sample, a UI configuration for Japanese (DJI_MOBILE_APP_LANGUAGE_JAPANESE) is not registered. Therefore, when the remote controller is set to Japanese, the default configuration (en_big_screen) registered with DjiWidget_RegDefaultUiConfigByDirPath is used. This is the behavior of the “default directory” mentioned above.
Next, let’s look at the handler implementations.
static T_DjiReturnCode DjiTestWidget_SetWidgetValue(E_DjiWidgetType widgetType, uint32_t index, int32_t value,
                                                    void *userData)
{
    s_widgetValueList[index] = value;
    return DJI_ERROR_SYSTEM_MODULE_CODE_SUCCESS;
}

static T_DjiReturnCode DjiTestWidget_GetWidgetValue(E_DjiWidgetType widgetType, uint32_t index, int32_t *value,
                                                    void *userData)
{
    *value = s_widgetValueList[index];
    return DJI_ERROR_SYSTEM_MODULE_CODE_SUCCESS;
}
s_widgetValueList is an array indexed by widget index. When you interact with a widget in the UI, DjiTestWidget_SetWidgetValue is called and the operation value is passed in. DjiTestWidget_GetWidgetValue is called periodically to return the widget’s state via value.
In the sample, the value received by SetWidgetValue is stored and simply returned by GetWidgetValue. Therefore, when you toggle a switch, the display updates immediately.
For example, if you want to control external equipment with a switch ON operation but want the display to remain OFF until the equipment’s state actually changes, return the actual equipment state in GetWidgetValue.
The registration of widget files and handlers with DjiCore, and the flow of callbacks on widget operation and state retrieval (periodic calls), is as follows. On the application side, your development targets are the entry point and the widget handlers.
sequenceDiagram
  participant App as Entry Point
  participant Core as DjiCore
  participant Handler as Widget Handler

  Note over App,Handler: During Initialization
  App->>Core: DjiWidget_Init()
  App->>Core: DjiWidget_RegUiConfigByDirPath()<br/> (widget file registration)
  App->>Core: DjiWidget_RegHandlerList()<br/> (handler registration)
  Note over Core: Registration complete

  Note over Core,Handler: At runtime (on widget operation)
  Core->>Handler: SetWidgetValue callback<br/> (e.g.: DjiTestWidget_SetWidgetValue)
  Handler-->>Core: Result

  Note over Core,Handler: At runtime (state retrieval/periodic)
  Core->>Handler: GetWidgetValue callback<br/> (e.g.: DjiTestWidget_GetWidgetValue)
  Handler-->>Core: State value (value)
Explanation of widget_config.json
#In this section, using the sample app’s widget_config.json as an example, we explain the structure of the definition file. For details, see the Payload SDK Tutorial (Custom Widget) (https://developer.dji.com/doc/payload-sdk-tutorial/en/function-set/basic-function/custom-widget.html).
Top-level structure:
- version … Version of the configuration format (major/minor).
- ar_config … Not covered in the tutorial or API spec, so omitted here.
- main_interface … Definitions of widgets displayed in the main menu.
- config_interface … Definitions of widgets displayed in the settings menu.
main_interface:
This is the configuration for the main menu. In addition to floating_window (whether to display a floating window) and speaker (TTS/audio), widgets are listed in widget_list. In the sample, four widgets with widget_index 0–3 (Button, List, Switch, Scale) are defined.
The payload device name displayed at the top of the menu is the string set by DjiCore_SetAlias.
config_interface:
This is the configuration for the settings menu. It specifies a text_input_box (text input and placeholder) and widgets in widget_list. In the sample, five widgets with widget_index 4–8 (Button/Scale/Integer Input Box/Switch/List) are defined.
Elements of widget_list:
Each widget has at least the following properties:
| Property | Description |
|---|---|
| widget_index | Index of the widget. Corresponds to the index in s_widgetHandlerList and is used in callbacks to identify which widget is being referenced. |
| widget_type | Type of widget. One of button, list, switch, scale, int_input_box. |
| widget_name | Name displayed in the UI. |
Depending on the type, you can also specify:
| Widget Type | Additional Properties | Description |
|---|---|---|
| button | icon_file_set |
Specify PNG filenames via icon_file_name_selected and icon_file_name_unselected. Displays the selected icon when value = 1 and unselected when value = 0. |
| list | list_item |
Array specifying item_name for each entry. You can also specify icon_file_set for each list item. |
| switch | icon_file_set |
Same as button. |
| scale | icon_file_set, customize_rc_buttons_config |
Icon spec same as button. Use button_value_step_length to set the step size for remote controller button operations. |
| int_input_box | int_input_box_hint |
Hint string for units, etc. (e.g., "unit:s"). |
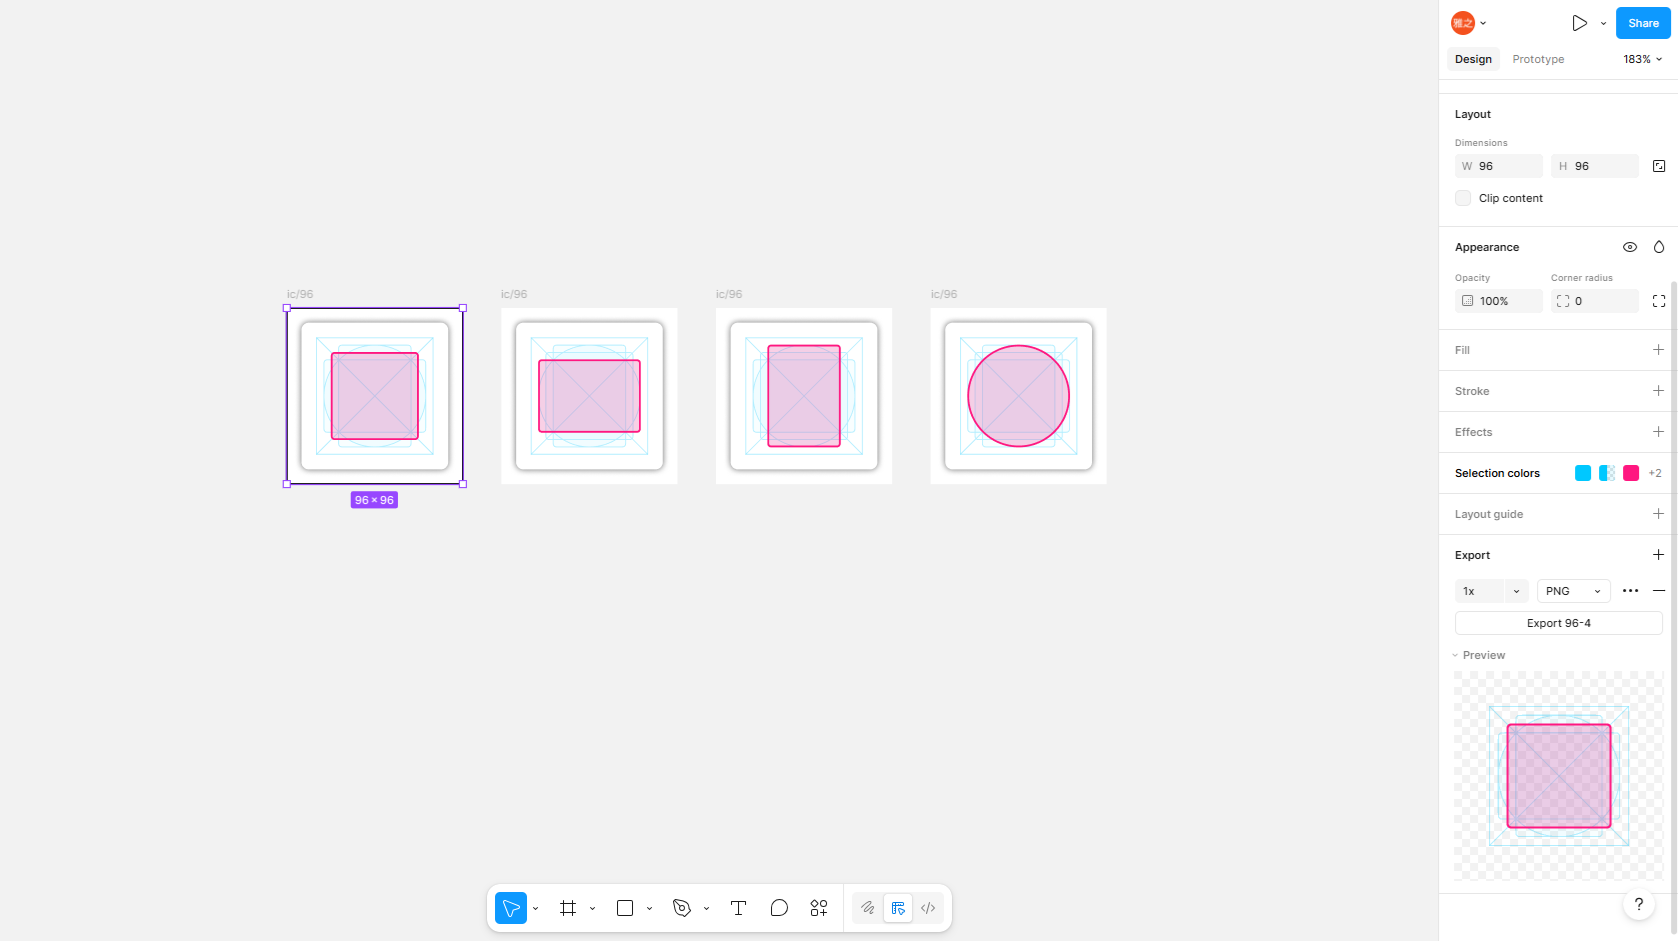
Icon Specifications
#For custom widgets in DJI Pilot, the following icon design specifications are recommended.
Size and frame:
| Item | Recommended Value |
|---|---|
| Standard icon size | 96px |
| Bottom frame (size) | 80px |
| Bottom frame (background color) | #000000 (black) |
| Bottom frame (opacity) | 0.6 (alpha; 0 = fully transparent, 1 = fully opaque; semi-transparent at about 60% opacity) |
| Bottom frame (blur) | 4 (blur strength; softens the frame’s edges) |
| Stroke width for circular elements | Approximately 4px |
The bottom frame is the display frame for icons as specified by DJI.
Display states and colors:
Icons should use the following colors to represent different states. They correspond to icon_file_name_selected/icon_file_name_unselected and the value returned by the GetWidgetValue callback.
| State | Color (HEX) | Description |
|---|---|---|
| Normal | #4E4E4E | When unselected (value = 0) |
| Active | #1FA3F6 | When selected (value = 1) |
| Disable | #BCBCBC | When disabled |
The above table is a general description of UI icon specifications. In custom widgets, only two icon files can be specified in widget_config.json: icon_file_name_selected and icon_file_name_unselected. There is no mechanism to pass a disable icon to the SDK. Preparing two icons—Normal and Active—is sufficient.
Format and layout:
- Use PNG format for icons.
- Example display area sizes: 48×48, 56×56, 40×56, 56×40, etc. Center the actual content and provide appropriate margins.
DJI provides a Sketch template (psdk_widget.sketch: https://terra-1-g.djicdn.com/71a7d383e71a4fb8887a310eb746b47f/psdk/psdk_widget.sketch). It is recommended to base your icon creation on this template.
Conclusion
#In this article, we introduced the custom widget mechanism for extending the remote controller UI for payload devices, and outlined the implementation flow using definition files (widget_config.json) and handler registration.
There are still few examples of custom payload development using the Payload SDK, and tutorials alone provide limited information, making it hard to understand “what kind of UI you can create.” We hope this article will serve as a reference for those planning to develop payload devices.