Development of OPC-UA Server Using Open62541
Back to TopTo reach a broader audience, this article has been translated from Japanese.
You can find the original version here.
Introduction
#Purpose of This Article
#In this article, we will explain the following:
- Overview of OPC-UA
- How to install Open62541
- Setting up the development environment in Visual Studio
- Creating a sample OPC-UA server
GitHub Link
#The code implemented in this article is available here.
What is OPC-UA?
#OPC-UA (official name: OPC Unified Architecture) was announced by the OPC Foundation in 2008 and later standardized internationally as "IEC 62541". It is one of the industrial communication standards used for data exchange between devices.
It is based on OPC (Object Linking and Embedding for Process Control) Classic, announced by Microsoft in 1996.
Features of OPC-UA include:
- Open standard
- Not dependent on specific vendors
- Rich data models
- Information model based on object orientation
- Representation through address space
- Security
- Data encryption using TLS
- Mutual authentication between client/server
- Certificate-based security
- Platform independence
- OPC Classic only supported Windows
- OPC-UA supports not only Windows but also Linux and embedded devices
- Communication methods
- Supports not only the traditional Client-Server method but also the Publish-Subscribe method
In addition to the above, the adoption of TSN (Time Sensitive Network) to enhance real-time performance is also progressing, making it a de facto standard for industrial communication standards.
For more detailed features, please refer to the official page of the OPC Foundation.
OPC-UA in Robot Development
#Although OPC-UA was established as a standard for industrial communication, it is also attracting attention in the robotics industry. The "OPC-UA for Robotics" specification, announced in 2019, aims to standardize interfaces for industrial robots and their peripherals.
Additionally, in the interface standard "umati (Universal Machine Technology Interface)"[1] for machine tools, OPC-UA is defined as the recommended standard.
Major robot manufacturers such as FANUC[2], ABB[3], Yaskawa Electric[4], and KUKA[5] are also advancing the support for OPC-UA in industrial robots.
As such, OPC-UA is being recommended in activities aimed at unifying interfaces across various fields.
What is Open62541?
#It is a library with a set of tools for implementing OPC-UA servers and clients. It supports operation on Windows/Linux/VxWorks/QNX/Android.
The library is written in C language and supports server/client implementation and Publish/Subscribe communication. In this article, we will use this to implement an OPC-UA server.
For detailed features, please refer to the official page, GitHub repository, or official documentation of Open62541.
Setting Up the Development Environment
#We will set up the development environment for OPC-UA using the aforementioned Open62541.
Required Libraries and Tools
#For development, we will use the following libraries and tools. If they are not installed, please install them.
- Visual Studio
- In this article, we use Visual Studio 2022 Community
- OpenSSL
- In this article, we use OpenSSL 3.0.7
- CMake
- In this article, we use CMake 3.25.0-rc2
- Python3
- In this article, we use Python 3.12.0
- UaExpert
- OPC-UA client tool
- The download page is here
- Membership registration is required during installation
Creating a Visual Studio Solution
#We will create a Visual Studio solution and prepare to create a project.
Start Visual Studio and select "Create a new project".
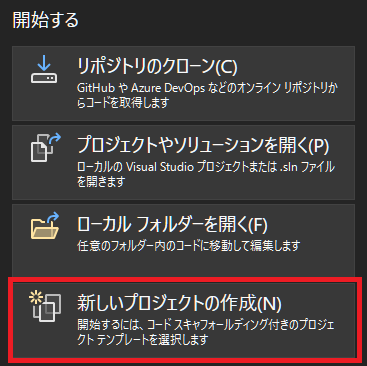
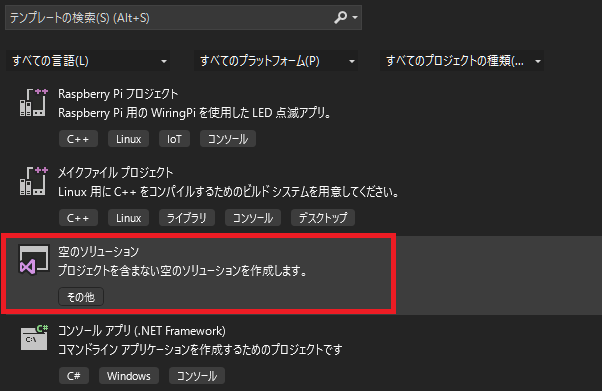
In the project template, select "Empty Solution".
Generate the solution in any location.
In this article, we set it as follows.
Solution folder creation directory: C:\Mamezou
Solution name: open62541_ws
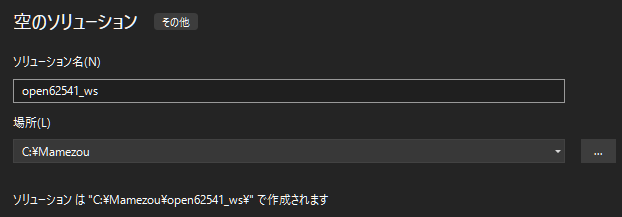
When you press the "OK" button, C:\Mamezou\open62541_ws\open62541_ws.sln will be generated.
From now on, we will refer to C:\Mamezou\open62541_ws as the solution directory.
If you choose a different directory from this article, please read accordingly.
This completes the creation of the solution.
Later, we will generate a project within the solution.
Installing Open62541
#Create a "deps" folder in the solution directory and clone the open62541 repository into it.
Specify the version as "v1.3.8", which is the latest as of 2023/10/15.
Also, since the repository contains submodules, add the --recursive option.
$ cd <solution directory>
$ mkdir deps
$ cd deps
$ git clone -b v1.3.8 --recursive git@github.com:open62541/open62541.git
Build and install Open62541 using CMake.
Move to the cloned repository and perform Configuration and Generate.
$ cd ./open62541
$ cmake -S . -B build_VS2022 -G "Visual Studio 17 2022" -DUA_ENABLE_PUBSUB=ON -DUA_ENABLE_SUBSCRIPTIONS=ON -DUA_ENABLE_ENCRYPTION=OPENSSL -DUA_ENABLE_PUBSUB_INFORMATIONMODEL=ON -DUA_ENABLE_PUBSUB_INFORMATIONMODEL_METHODS=ON -DBUILD_SHARED_LIBS=ON -DUA_BUILD_EXAMPLES=OFF -DCMAKE_BUILD_TYPE=Release
The options that can be added during CMake can be checked with the cmake-gui command.
For details other than the following, please refer to "3.2 Build Options" in the Open62541 documentation.
| Option Name | Setting Value in This Article | Description |
|---|---|---|
| BUILD_SHARED_LIBS | ON | Whether to generate shared libraries (.dll) |
| CMAKE_BUILD_TYPE | Release | Setting the build type 【Debug/Release/MinSizeRel/RelWithDebInfo】 |
| UA_BUILD_EXAMPLES | OFF | Whether to generate sample programs |
| UA_ENABLE_PUBSUB | ON | Enable/disable Publish/Subscribe |
| UA_ENABLE_SUBSCRIPTIONS | ON | Enable/disable Subscriptions |
| UA_ENABLE_ENCRYPTION | OPENSSL | Specify the backend to use for encryption 【OFF/MBEDTLS/OPENSSL/LIBRESSL】 |
| UA_ENABLE_PUBSUB_INFORMATIONMODEL | ON | Enable/disable information model representation of Publish/Subscribe settings |
| UA_ENABLE_PUBSUB_INFORMATIONMODEL_METHODS | ON | Enable/disable information model representation of methods in Publish/Subscribe settings |
Next, execute the following to build and install.
Set the installation destination to the solution directory created earlier.
$ cmake --build build_VS2022 --config Release
$ cmake --install build_VS2022 --prefix ../..
The "bin", "include", "lib", and "share" folders will be generated in the solution directory.
Also, "open62541.dll" will be generated in the "bin" folder, and "open62541.lib" will be generated in the "lib" folder.
This completes the installation of open62541.
Creating and Configuring the Project
#Creating a New Project
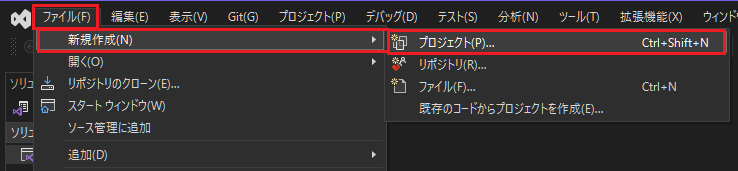
#Open Visual Studio and open the "open62541_ws" solution.
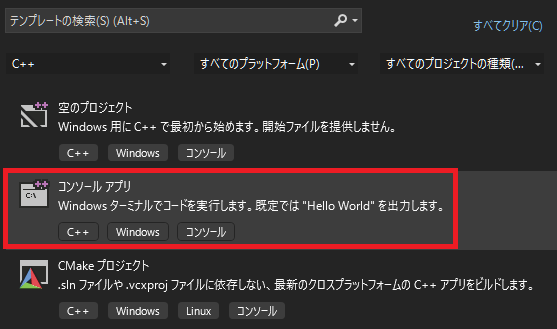
From the top left tab, select "File" → "New" → "Project".
Select "Console App" for C++.
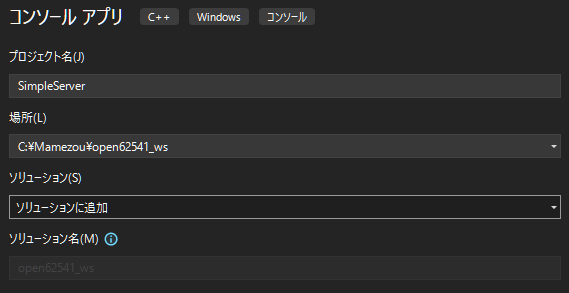
Configure the project settings.
Set it as follows.
We will create the project in the src folder.
Project name: SimpleServer
Location: <solution directory>/src
Solution: Add to solution
Configuring the Project
#To make development in Visual Studio easier, we will configure the project.
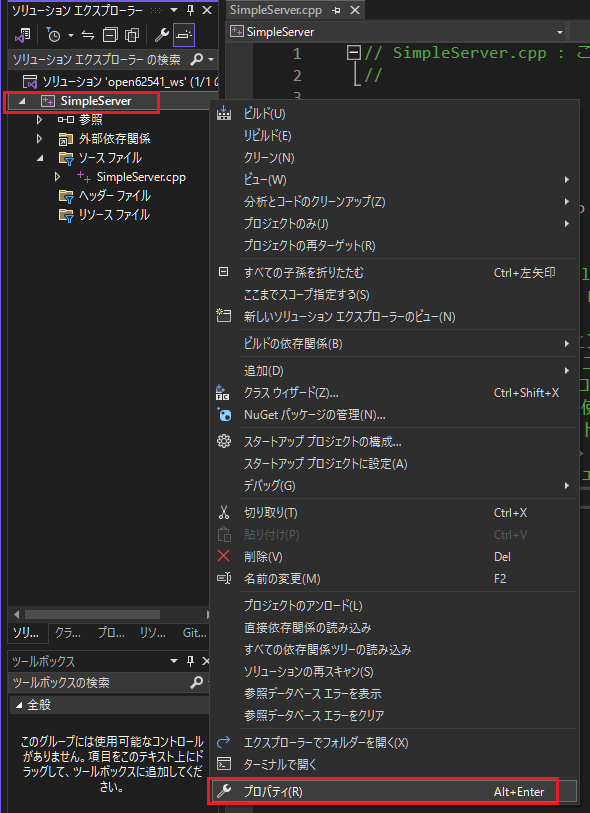
Right-click on "SimpleServer" in the Solution Explorer and select Properties.
Configure the project in this screen.
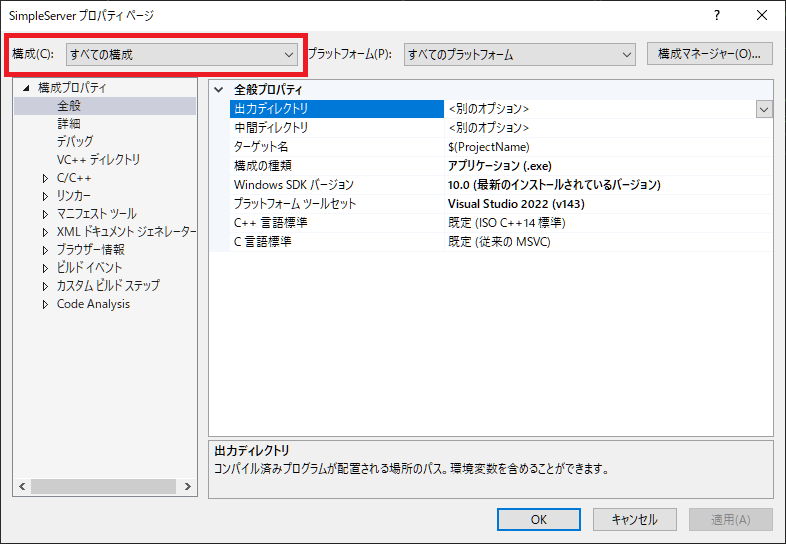
Set "Configuration" at the top of the SimpleServer property page to "All Configurations".
Include Settings
#From the left "Configuration Properties" section,
Select "Configuration Properties" → "C/C++" → "General".
In the right section, set "Additional Include Directories" to
$(SolutionDir)include
After setting, click "Apply" at the bottom right of the screen.
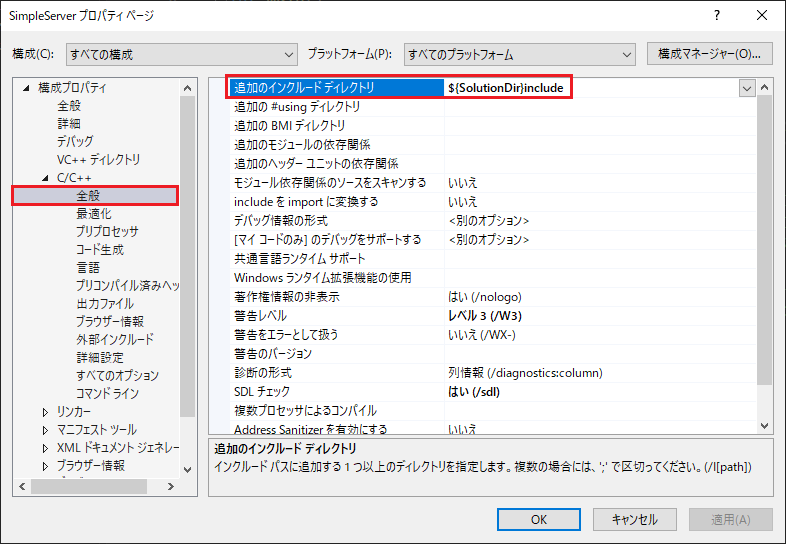
Convenient macros can be used in the settings.
For details, please refer here.
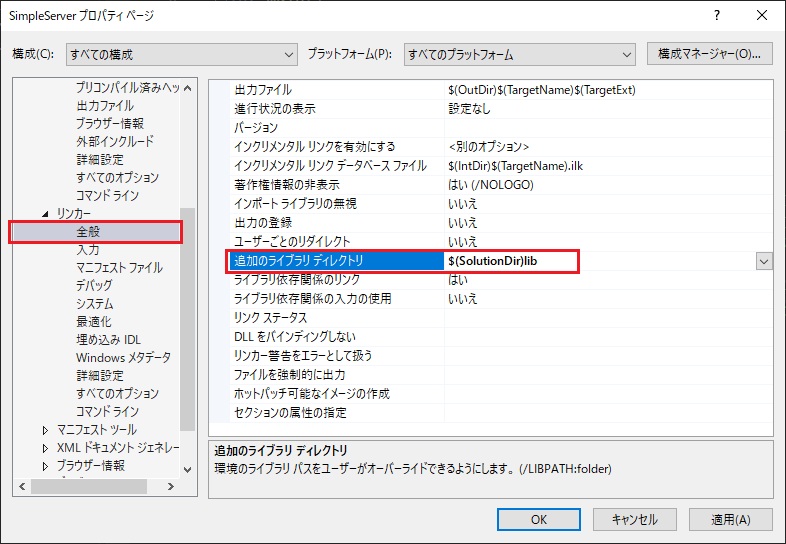
Library Directory Settings
#From the left section,
Select "Configuration Properties" → "Linker" → "General".
Set "Additional Library Directories" on the right to
$(SolutionDir)lib
After setting, click "Apply".
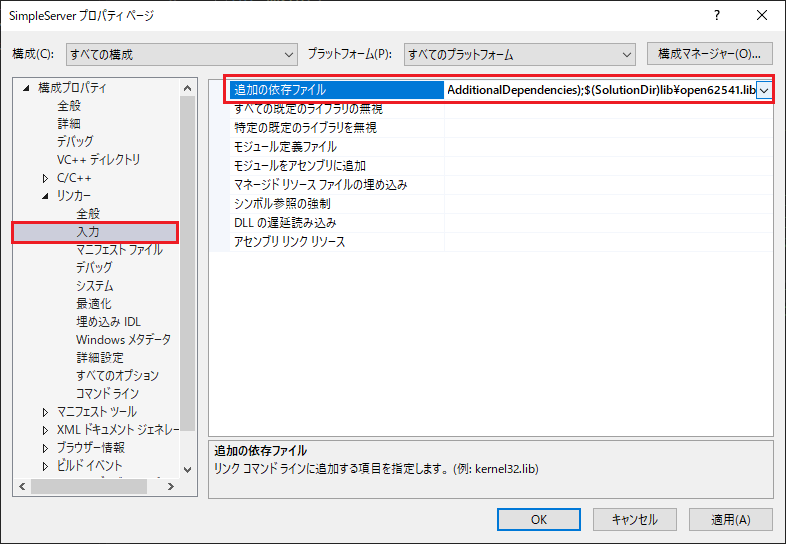
Dependent File Settings
#From the left section,
Select "Configuration Properties" → "Linker" → "Input".
Add the following to "Additional Dependencies" on the right.
$(SolutionDir)lib\open62541.lib
The separator for setting values is a semicolon.
After setting, click "Apply".
Output Directory Settings
#From the left section,
Select "Configuration Properties" → "General".
Click the triangle icon next to "Output Directory" on the right and click the "Edit..." button to open the edit screen.
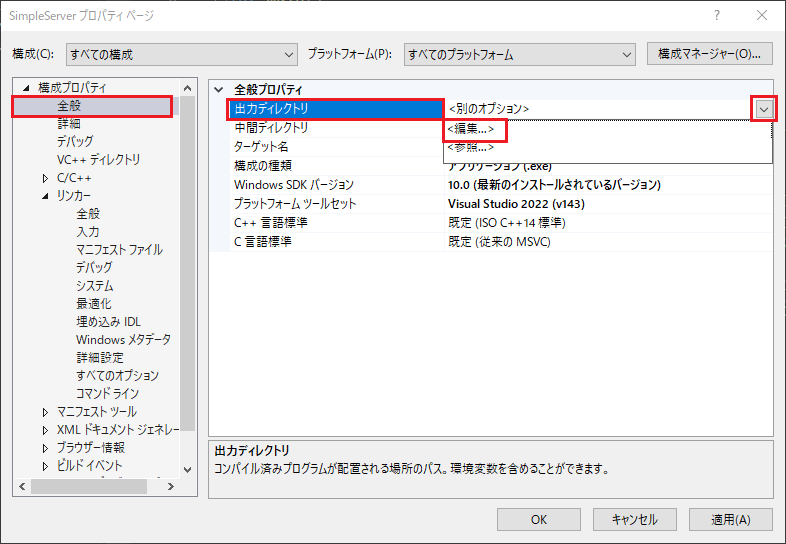
Set it as follows in the edit screen.
$(SolutionDir)bin\$(ProjectName)\$(Configuration)\
After setting, click "Apply".
DLL File Copy Settings
#When running the application after building the program, the open62541.dll needs to be linked at the time of application startup.
Here, we will configure the DLL file to be copied to the output directory after the build.
From the left section,
Select "Configuration Properties" → "Build Events" → "Post-Build Event".
Enter the following two lines in the "Command Line" on the right.
robocopy $(SolutionDir)bin\ $(TargetDir) open62541.dll
IF %ERRORLEVEL% LSS 8 EXIT 0
The second line is a command to suppress errors that occur when the robocopy command is successful in copying.
For details, please refer here.
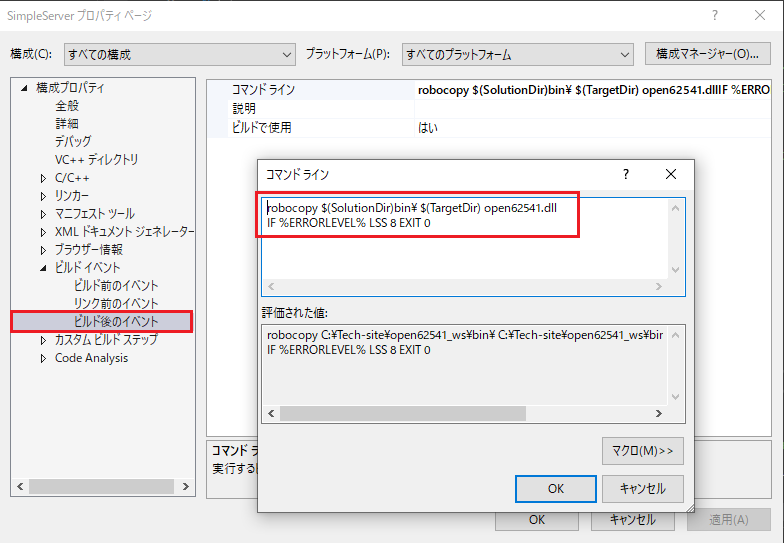
After setting, click the OK button to close the properties screen.
This completes the project settings.
Implementation Code
#Let's actually implement the OPC-UA server.
In this sample, we will implement a server as follows:
- Define an Int32 variable named "SampleVariable"
- Have a method that adds the specified number of arguments to the variable value
Write the following code in SimpleServer.cpp created.
The code implemented in this article is also available here.
#include <open62541/plugin/log_stdout.h>
#include <open62541/server.h>
#include <open62541/server_config_default.h>

#include <csignal>
#include <cstdlib>

/// <summary>
/// Add a variable to the OPC-UA server
/// </summary>
static void addSampleVariable(UA_Server* server) {
    /* Define attributes of the SampleVariable variable node */
    // Set default values for attributes
    UA_VariableAttributes attr = UA_VariableAttributes_default;
    // Set initial value
    UA_Int32 sampleVarInitValue = 42;
    // Set initial value to the variable
    UA_Variant_setScalar(&attr.value, &sampleVarInitValue, &UA_TYPES[UA_TYPES_INT32]);

    /* Set attribute values */
    // Variable description
    attr.description = UA_LOCALIZEDTEXT(
                        (char*)"en-US",
                        (char*)"Sample Variable for mamezou-tech");
    // Display name
    attr.displayName = UA_LOCALIZEDTEXT(
                        (char*)"en-US",
                        (char*)"Sample Variable");
    // Data type
    attr.dataType = UA_TYPES[UA_TYPES_INT32].typeId;
    // Access attributes
    attr.accessLevel = UA_ACCESSLEVELMASK_READ | UA_ACCESSLEVELMASK_WRITE;

    /* Add the defined Variable Node to the information model */
    // Define node ID
    UA_NodeId sampleVarNodeId = UA_NODEID_STRING(1, (char*)"SampleVarNodeId");
    // Define browser name
    UA_QualifiedName sampleVarName = UA_QUALIFIEDNAME(1, (char*)"SampleVar");
    // Parent node ID
    UA_NodeId parentNodeId = UA_NODEID_NUMERIC(0, UA_NS0ID_OBJECTSFOLDER);
    // Parent reference node ID
    UA_NodeId parentReferenceNodeId = UA_NODEID_NUMERIC(0, UA_NS0ID_ORGANIZES);

    /* Add the defined Variable Node to the Server */
    UA_Server_addVariableNode(server, sampleVarNodeId, parentNodeId,
        parentReferenceNodeId, sampleVarName,
        UA_NODEID_NUMERIC(0, UA_NS0ID_BASEDATAVARIABLETYPE), attr, NULL, NULL);

    // Free memory
    UA_VariableAttributes_delete(&attr);
    UA_NodeId_delete(&sampleVarNodeId);
    UA_NodeId_delete(&parentNodeId);
    UA_NodeId_delete(&parentReferenceNodeId);
    UA_QualifiedName_delete(&sampleVarName);
}

/// <summary>
/// Method callback function
/// Adds the specified number of arguments to the variable value
/// </summary>
static UA_StatusCode increaseVariableCallback(UA_Server* server,
    const UA_NodeId* sessionId, void* sessionContext,
    const UA_NodeId* methodId, void* methodContext,
    const UA_NodeId* objectId, void* objectContext,
    size_t inputSize, const UA_Variant* input,
    size_t outputSize, UA_Variant* output)
{
    // Get the value of the argument
    UA_Int32* delta = (UA_Int32*)input[0].data;

    // Get the value of the variable
    UA_Variant sampleVar;
    UA_NodeId sampleVarNodeId = UA_NODEID_STRING(1, (char*)"SampleVarNodeId");
    UA_Server_readValue(server, sampleVarNodeId, &sampleVar);
    UA_Int32 sampleVarValue = ((UA_Int32*)sampleVar.data)[0];

    // Add the value of the argument to the variable
    UA_Variant newVar;
    UA_Int32 newVarValue = sampleVarValue + *delta;
    UA_Variant_init(&newVar);
    UA_Variant_setScalar(&newVar, &newVarValue, &UA_TYPES[UA_TYPES_INT32]);

    // Write the value after addition to the Server
    UA_StatusCode retval = UA_Server_writeValue(server, sampleVarNodeId, newVar);

    // Free memory
    UA_Variant_delete(&sampleVar);
    UA_Variant_delete(&newVar);

    return retval;
}

/// <summary>
/// Add a new method to the OPC-UA server
/// </summary>
static void addIncreaseVariableMethod(UA_Server* server) {
    // Generate input arguments
    UA_Argument inputArg;

    /* Set arguments */
    UA_Argument_init(&inputArg);
    // Description
    inputArg.description = UA_LOCALIZEDTEXT(
                            (char*)"en-US",
                            (char*)"How much increase the number of the variable");
    // Name
    inputArg.name = UA_STRING((char*)"delta");
    // Data type
    inputArg.dataType = UA_TYPES[UA_TYPES_INT32].typeId;
    // Data format
    inputArg.valueRank = UA_VALUERANK_SCALAR;

    /* Add Method Node */
    // Method,```cpp
    // Method Attribute instance
    UA_MethodAttributes incAttr = UA_MethodAttributes_default;
    // Description
    incAttr.description = UA_LOCALIZEDTEXT(
                            (char*)"en-US",
                            (char*)"Increase the value of a variable by the number of arguments");
    // Display name
    incAttr.displayName = UA_LOCALIZEDTEXT(
                            (char*)"en-US",
                            (char*)"IncreaseVariable");
    incAttr.executable = true;
    incAttr.userExecutable = true;
    UA_Server_addMethodNode(server,
        UA_NODEID_STRING(1, (char*)"addIncreaseVarNodeId"),
        UA_NODEID_NUMERIC(0, UA_NS0ID_OBJECTSFOLDER),
        UA_NODEID_NUMERIC(0, UA_NS0ID_HASCOMPONENT),
        UA_QUALIFIEDNAME(1, (char*)"IncreaseVariable"),
        incAttr, &increaseVariableCallback,
        1, &inputArg, 0, NULL,
        NULL, NULL);

    // Free memory
    UA_Argument_delete(&inputArg);
    UA_MethodAttributes_delete(&incAttr);
}

static volatile UA_Boolean running = true;

/// <summary>
/// Stop signal handler
/// </summary>
static void stopHandler(int sign) {
    UA_LOG_INFO(UA_Log_Stdout, UA_LOGCATEGORY_SERVER, "received ctrl-c");
    running = false;
}

/// <summary>
/// Main function
/// </summary>
int main(void) {
    signal(SIGINT, stopHandler);
    signal(SIGTERM, stopHandler);

    // Create the server
    UA_Server* server = UA_Server_new();
    UA_ServerConfig_setDefault(UA_Server_getConfig(server));
    UA_ServerConfig* config = UA_Server_getConfig(server);
    config->verifyRequestTimestamp = UA_RULEHANDLING_ACCEPT;

    // Add the variable
    addSampleVariable(server);

    // Add the method to the server
    addIncreaseVariableMethod(server);

    // Run the server while running is true
    UA_StatusCode retval = UA_Server_run(server, &running);

    // Delete the server
    UA_Server_delete(server);

    return retval == UA_STATUSCODE_GOOD ? EXIT_SUCCESS : EXIT_FAILURE;
}
Code Details
#Here are the details of the code shown above.
Registering the Variable
#/// <summary>
/// Add a variable to the OPC-UA server
/// </summary>
static void addSampleVariable(UA_Server* server) {
/* Define attributes of the SampleVariable variable node */
// Set default values for attributes
UA_VariableAttributes attr = UA_VariableAttributes_default;
// Set initial value
UA_Int32 sampleVarInitValue = 42;
// Set initial value to the variable
UA_Variant_setScalar(&attr.value, &sampleVarInitValue, &UA_TYPES[UA_TYPES_INT32]);
/* Set attribute values */
// Variable description
attr.description = UA_LOCALIZEDTEXT(
(char*)"en-US",
(char*)"Sample Variable for mamezou-tech");
// Display name
attr.displayName = UA_LOCALIZEDTEXT(
(char*)"en-US",
(char*)"Sample Variable");
// Data type
attr.dataType = UA_TYPES[UA_TYPES_INT32].typeId;
// Access attributes
attr.accessLevel = UA_ACCESSLEVELMASK_READ | UA_ACCESSLEVELMASK_WRITE;
/* Add the defined Variable Node to the information model */
// Define node ID
UA_NodeId sampleVarNodeId = UA_NODEID_STRING(1, (char*)"SampleVarNodeId");
// Define browser name
UA_QualifiedName sampleVarName = UA_QUALIFIEDNAME(1, (char*)"SampleVar");
// Parent node ID
UA_NodeId parentNodeId = UA_NODEID_NUMERIC(0, UA_NS0ID_OBJECTSFOLDER);
// Parent reference node ID
UA_NodeId parentReferenceNodeId = UA_NODEID_NUMERIC(0, UA_NS0ID_ORGANIZES);
/* Add the defined Variable Node to the Server */
UA_Server_addVariableNode(server, sampleVarNodeId, parentNodeId,
parentReferenceNodeId, sampleVarName,
UA_NODEID_NUMERIC(0, UA_NS0ID_BASEDATAVARIABLETYPE), attr, NULL, NULL);
// Free memory
UA_VariableAttributes_delete(&attr);
UA_NodeId_delete(&sampleVarNodeId);
UA_NodeId_delete(&parentNodeId);
UA_NodeId_delete(&parentReferenceNodeId);
UA_QualifiedName_delete(&sampleVarName);
}
- Define the attributes of the variable using the
UA_VariableAttributestype. - When adding the variable, specify the parent node ID and reference node ID to clearly indicate the relationship with other nodes.
- Changing the parent node information will change the position of the registered node.
Defining the Method
#/// <summary>
/// Method callback function
/// Adds the specified number of arguments to the variable value
/// </summary>
static UA_StatusCode increaseVariableCallback(UA_Server* server,
const UA_NodeId* sessionId, void* sessionContext,
const UA_NodeId* methodId, void* methodContext,
const UA_NodeId* objectId, void* objectContext,
size_t inputSize, const UA_Variant* input,
size_t outputSize, UA_Variant* output)
{
// Get the value of the argument
UA_Int32* delta = (UA_Int32*)input[0].data;
// Get the value of the variable
UA_Variant sampleVar;
UA_NodeId sampleVarNodeId = UA_NODEID_STRING(1, (char*)"SampleVarNodeId");
UA_Server_readValue(server, sampleVarNodeId, &sampleVar);
UA_Int32 sampleVarValue = ((UA_Int32*)sampleVar.data)[0];
// Add the value of the argument to the variable
UA_Variant newVar;
UA_Int32 newVarValue = sampleVarValue + *delta;
UA_Variant_init(&newVar);
UA_Variant_setScalar(&newVar, &newVarValue, &UA_TYPES[UA_TYPES_INT32]);
// Write the value after addition to the Server
UA_StatusCode retval = UA_Server_writeValue(server, sampleVarNodeId, newVar);
// Free memory
UA_Variant_delete(&sampleVar);
UA_Variant_delete(&newVar);
return UA_STATUSCODE_GOOD;
}
- The method's arguments can be obtained from the function's
inputargument. - The method's return value is set in the function's
outputargument. - To get the value of a variable, specify the node ID of the target node in the
UA_Server_readValuefunction. - To set the value of a variable, use the
UA_Server_writeValuefunction.
Registering the Method
#/// <summary>
/// Add a new method to the OPC-UA server
/// </summary>
static void addIncreaseVariableMethod(UA_Server* server) {
// Generate input arguments
UA_Argument inputArg;
/* Set arguments */
UA_Argument_init(&inputArg);
// Description
inputArg.description = UA_LOCALIZEDTEXT(
(char*)"en-US",
(char*)"How much increase the number of the variable");
// Name
inputArg.name = UA_STRING((char*)"delta");
// Data type
inputArg.dataType = UA_TYPES[UA_TYPES_INT32].typeId;
// Data format
inputArg.valueRank = UA_VALUERANK_SCALAR;
/* Add Method Node */
// Method Attribute instance
UA_MethodAttributes incAttr = UA_MethodAttributes_default;
// Description
incAttr.description = UA_LOCALIZEDTEXT(
(char*)"en-US",
(char*)"Increase the value of a variable by the number of arguments");
// Display name
incAttr.displayName = UA_LOCALIZEDTEXT(
(char*)"en-US",
(char*)"IncreaseVariable");
incAttr.executable = true;
incAttr.userExecutable = true;
UA_Server_addMethodNode(server,
UA_NODEID_STRING(1, (char*)"addIncreaseVarNodeId"),
UA_NODEID_NUMERIC(0, UA_NS0ID_OBJECTSFOLDER),
UA_NODEID_NUMERIC(0, UA_NS0ID_HASCOMPONENT),
UA_QUALIFIEDNAME(1, (char*)"IncreaseVariable"),
incAttr, &increaseVariableCallback,
1, &inputArg, 0, NULL,
NULL, NULL);
// Free memory
UA_Argument_delete(&inputArg);
UA_MethodAttributes_delete(&incAttr);
}
- Use the
UA_Varianttype for the arguments and return values. - For the
UA_Server_addMethodNodefunction:- Specify the method node ID in the second argument.
- Specify the placement location of the method node in the third argument.
- Specify the method's attributes in the sixth argument.
- Specify the callback function to be executed when the method is called in the seventh argument.
- If defining arguments or return values, specify them in the eighth to eleventh arguments.
Main Function
#/// <summary>
/// Main function
/// </summary>
int main(void) {
signal(SIGINT, stopHandler);
signal(SIGTERM, stopHandler);
// Create the server
UA_Server* server = UA_Server_new();
UA_ServerConfig_setDefault(UA_Server_getConfig(server));
UA_ServerConfig* config = UA_Server_getConfig(server);
config->verifyRequestTimestamp = UA_RULEHANDLING_ACCEPT;
// Add the variable
addSampleVariable(server);
// Add the method to the server
addIncreaseVariableMethod(server);
// Run the server while running is true
UA_StatusCode retval = UA_Server_run(server, &running);
// Delete the server
UA_Server_delete(server);
return retval == UA_STATUSCODE_GOOD ? EXIT_SUCCESS : EXIT_FAILURE;
}
- Create and start the server.
- Define the variable and method as described above.
- The
UA_Server_runfunction runs the server while the second argumentrunningis true.
Operation Verification
#Connecting to the Server
#Build the project, and if the build is successful, try running it.
If the console output is as shown below, it is successful.

Once the server is running, start the OPC-UA client tool UaExpert.
After starting, click the "Add Server" button (a "+" icon) in the top left to display the server selection screen.
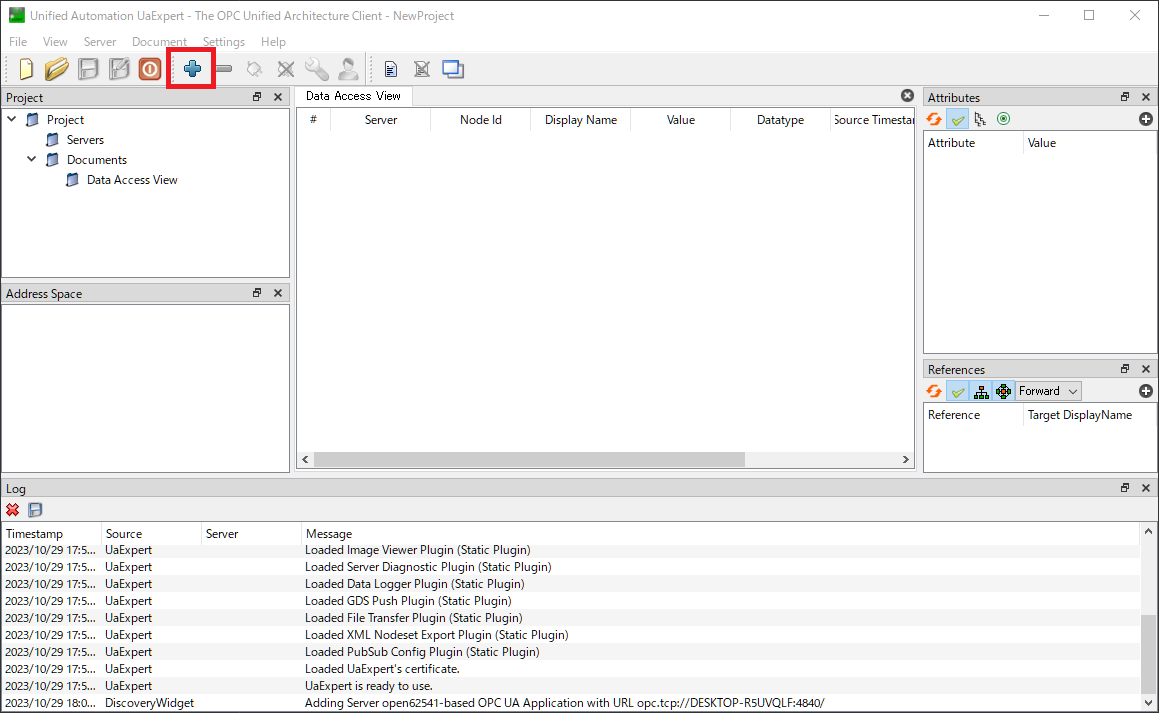
Since the server is running on the PC, "Local" → "open62541-based OPC UA Application" → "None" will be displayed.
Select this and press the OK button at the bottom right of the screen.
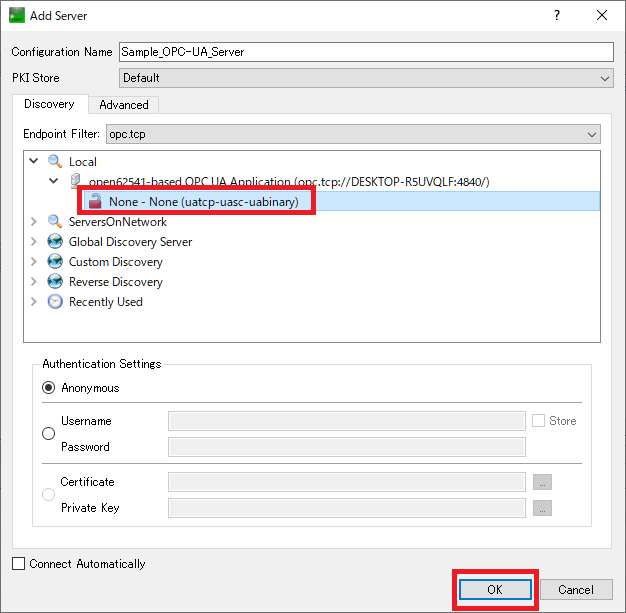
In this sample, since security is not considered, only "None" is selectable.
By adding security processing, more options will become available.
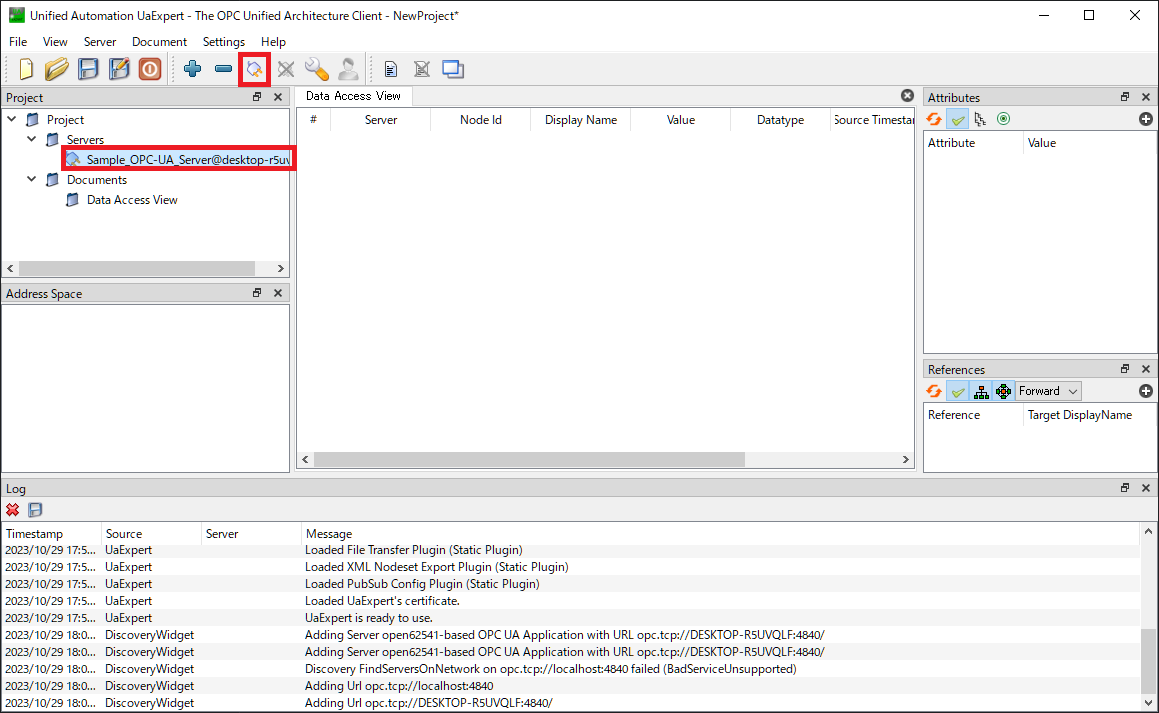
After adding the server, the selected server will be added to the "Servers" section in the bottom left Project pane.
Select the server and press the "Connect Server" button at the top of the screen to connect to the server.
Accessing the Variable
#Once connected to the server, the list of nodes owned by the server will be displayed in the "Address Space" section on the left side of the screen.
Select the "Sample Variable" node in the "Objects" folder and drag and drop it into the "Data Access View" section in the center of the screen.
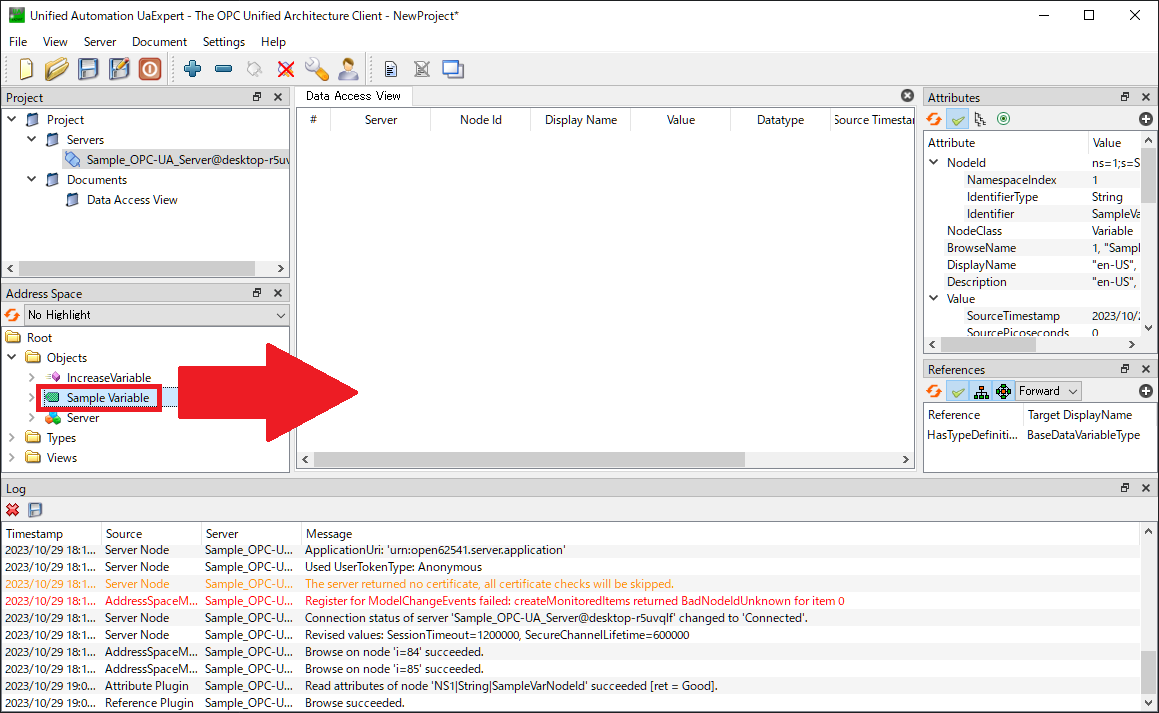
After dragging and dropping, the details of the SampleVariable will be displayed in the DataAccessView.
Looking at the value, the value 42 set in the code above should be set.

Double-clicking the number in the Value section allows you to freely change the value.
You can also view detailed information about the node in the Attributes section on the right side of the screen.
Accessing the Method
#Let's execute the method "IncreaseValue" defined in the code above.
Right-click on "IncreaseVariable" in the "Address Space" section and select Call.
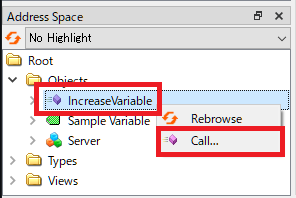
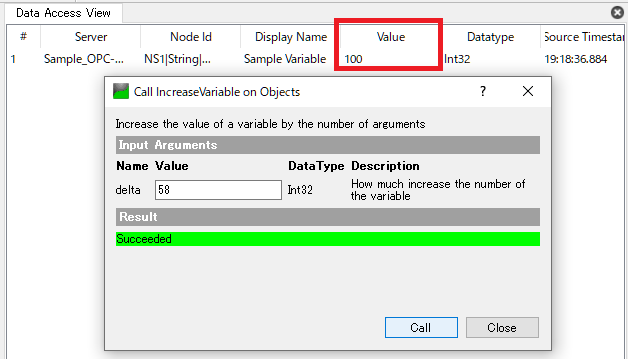
The argument input screen will be displayed, so enter any number in the argument and press the Call button at the bottom right.
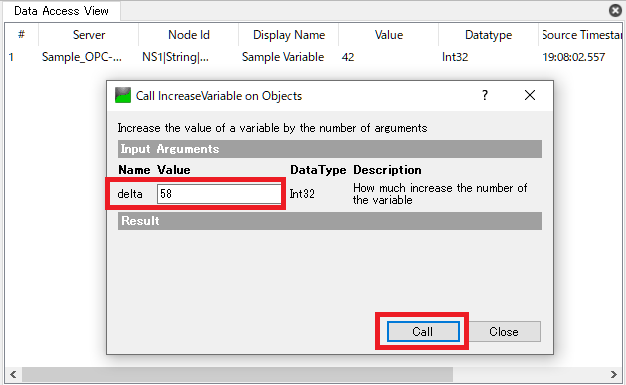
Since the method defined this time has no return value, the "Result" section at the bottom of the screen is blank.
If a return value is defined, the return value of the method will be displayed.
The method will be executed, and the value of SampleVariable will be increased by the specified amount.
Conclusion
#In this article, we explained the following:
- How to install Open62541
- Setting up the development environment in Visual Studio
- Creating a sample OPC-UA server
Next time, we will implement an OPC-UA client and communicate with the server created in this article.