Introduction to Nuxt3 (Part 2) - Creating a Simple Nuxt Application
Back to TopTo reach a broader audience, this article has been translated from Japanese.
You can find the original version here.
In the previous article, we explained the basic rendering modes of Nuxt. In this second installment, we will actually create a simple Nuxt application and take a look at the development flow of Nuxt3.
Preliminary Preparation
#First, execute npx nuxi create sample-app to create a Nuxt project. Then, add the following directories that we will use this time.
sample-app/
├── pages <- Added directory
├── layouts <- Added directory
├── components <- Added directory
├── composables <- Added directory
├── .gitignore
├── README.md
├── app.vue
├── nuxt.config.ts
├── package.json
└── tsconfig.json
Nuxt clearly defines the role of each directory. Basically, it is a rule of thumb to follow this[1].
Creating Page Components
#First, let's create some page components. Similar to Nuxt2, page files are placed in the pages directory as Vue components. We will create the following two page components. Each component has redundant descriptions, but we will improve them step by step later.
- index.vue
<script setup lang="ts">
const articles = ref<{ id: number, title: string }[]>([]);
articles.value = [{
  id: 1,
  title: "Introduction to Nuxt3",
}, {
  id: 2,
  title: "Re-introduction to Jest",
}];
</script>

<template>
  <div>
    <header>Nuxt3 Sample Application</header>
    <div class="container">
      <p>New Articles!!</p>
      <ul>
        <li v-for="article in articles" :key="article.id">
          <NuxtLink :to="{path: '/details', query: { id:article.id }}">{{ article.title }}</NuxtLink>
        </li>
      </ul>
    </div>
    <footer>
      © 2022 mamezou-tech
    </footer>
  </div>
</template>

<style scoped>
header {
  border-bottom-style: solid;
  padding: 1rem;
}
footer {
  margin-top: 2rem;
  background-color: #8080ee;
  padding: 1rem;
}
.container {
  margin: 2rem;
}
</style>
- details.vue
<script setup lang="ts">
const route = useRoute();
const { id } = route.query;
const articles = [{
  id: 1,
  title: "Introduction to Nuxt3",
  content: "Nuxt3 has been officially released. In addition to supporting Vue3, Nuxt3 has been improved in various ways, including Nitro and Vite."
}, {
  id: 2,
  title: "Re-introduction to Jest",
  content: "This time, we will organize information about Jest's mocks. Jest provides built-in matchers, supporting many use cases on its own."
}];
const article = ref<{id: number, title: string, content: string}>(null);
article.value = articles.find(article => +id === article.id)
</script>

<template>
  <div>
    <header>Nuxt3 Sample Application</header>
    <div class="container">
      <article v-if="article">
        <p>Title: {{ article.title }}</p>
        <hr />
        <div style="width: 500px">{{ article.content }}</div>
      </article>
      <NuxtLink to="/">Back</NuxtLink>
    </div>
    <footer>
      © 2022 mamezou-tech
    </footer>
  </div>
</template>

<style scoped>
header {
  border-bottom-style: solid;
  padding: 1rem;
}
footer {
  margin-top: 2rem;
  background-color: #8080ee;
  padding: 1rem;
}
.container {
  margin: 2rem;
}
</style>
The created pages are intended as the top page (index.vue) and detail page (details.vue) of a blog site. The top page displays a list of blogs, and clicking on a blog displays its content on the detail page.
At first glance, it is noticeable that the script is in the style of Vue3's Composition API. In Nuxt3, which is based on Vue3, the Composition API is available by default. Although the traditional Options API is also available, the Composition API has significant benefits in terms of code reuse, so it is advisable to adopt the Composition API when creating new components. The use of the Composition API itself is not the main topic here, so please refer to the Vue3 documentation for details.
Another point to notice is that import statements for ref(), useRoute(), etc., are not written above. This is because of Nuxt3's Auto Import mechanism. In Nuxt3, explicit import statements are not necessary for frequently used APIs from Nuxt itself or Vue, as well as for custom Vue components (components directory) and Composables (composables/utils directories)[2].
Note that from Vue3, Vue components can have multiple root elements, but files under the pages directory must have a single root. The following is an excerpt from the Nuxt3 documentation:
Pages must have a single root element to allow route transitions between pages. (HTML comments are considered elements as well.)
Commonizing Page Frameworks with Layout Files
#The code so far has many redundant parts between pages, which is not an ideal state. Especially, the header and footer of the page were redundantly described in each page. These parts that apply across all pages should be extracted and managed separately. Similar to Nuxt2, such layouts are created in the layouts directory as page-common framework layout files.
Here, we create default.vue in the layouts directory and extract the header and footer.
<template>
  <div>
    <header>Nuxt3 Sample Application</header>
    <div class="container">
      <slot />
    </div>
    <footer>
      © 2022 mamezou-tech
    </footer>
  </div>
</template>

<style scoped>
header {
  border-bottom-style: solid;
  padding: 1rem;
}
footer {
  margin-top: 2rem;
  background-color: #8080ee;
  padding: 1rem;
}
.container {
  margin: 2rem;
}
</style>
The part where the actual content of each page is inserted is <slot />. Note that it was <Nuxt /> in Nuxt2, so be careful not to make a mistake.
This allows us to remove the header and footer from the redundant page components.
- index.vue
<script setup lang="ts">
const articles = ref<{ id: number, title: string }[]>([]);
articles.value = [{
  id: 1,
  title: "Introduction to Nuxt3",
}, {
  id: 2,
  title: "Re-introduction to Jest",
}];
</script>

<template>
  <div>
    <p>New Articles!!</p>
    <ul>
      <li v-for="article in articles" :key="article.id">
        <NuxtLink :to="{path: '/details', query: { id:article.id }}">{{ article.title }}</NuxtLink>
      </li>
    </ul>
  </div>
</template>
- details.vue
<script setup lang="ts">
const route = useRoute();
const {id} = route.query;
const articles = [{
  id: 1,
  title: "Introduction to Nuxt3",
  content: "Nuxt3 has been officially released. In addition to supporting Vue3, Nuxt3 has been improved in various ways, including Nitro and Vite."
}, {
  id: 2,
  title: "Re-introduction to Jest",
  content: "This time, we will organize information about Jest's mocks. Jest provides built-in matchers, supporting many use cases on its own."
}];
const article = ref<{id: number, title: string, content: string}>(null);
article.value = articles.find(article => +id === article.id)
</script>

<template>
  <div>
    <article v-if="article">
      <p>Title: {{ article.title }}</p>
      <hr />
      <div style="width: 500px">{{ article.content }}</div>
    </article>
    <NuxtLink to="/">Back</NuxtLink>
  </div>
</template>
Compared to earlier, the header, footer, and style application have been removed, making it cleaner. Let's also adjust the entry point of the Nuxt app.
The content of app.vue at the root of the project is set to display the initial welcome page, so let's modify it.
<template>
  <NuxtLayout>
    <NuxtPage />
  </NuxtLayout>
</template>
The <NuxtLayout> part refers to files in the layouts directory, and the <NuxtPage> tag refers to files in the pages directory. For details on each tag, please refer to the official documentation.
The file name default.vue is the default for Nuxt, so there is no problem specifying only the tag here.
Creating Stateful Modules with the Composition API
#Next, let's try using the Composition API built into Vue3.
The blogs displayed this time are fixed, but of course, the final form would dynamically fetch them via API access. Here, we separate this blog fetching functionality into a module (Composable).
Place the following file (useArticles.ts) in the composables directory.
interface Article {
  id: number;
  title: string;
  content: string;
}

// Display as fixed values for now
const demoArticles = [
  {
    id: 1,
    title: "Introduction to Nuxt3",
    content:
      "Nuxt3 has been officially released. In addition to supporting Vue3, Nuxt3 has been improved in various ways, including Nitro and Vite.",
  },
  {
    id: 2,
    title: "Re-introduction to Jest",
    content:
      "This time, we will organize information about Jest's mocks. Jest provides built-in matchers, supporting many use cases on its own.",
  },
];

export function useArticles() {
  const articles = ref<Article[]>([]);
  const article = ref<Article | null>(null);

  // Future API access
  const fetchArticles = (): void => {
    articles.value = demoArticles;
  };
  const fetchArticle = (id: number): void => {
    article.value = demoArticles.find((article) => id === article.id) || null;
  };

  return {
    articles,
    article,
    fetchArticle,
    fetchArticles,
  };
}
Inside useArticles, we define the functions and variables that this module publishes.
The traditional Options API separated code by system aspects such as data/props/methods/computed, making it difficult to extract stateful logic into separate modules. The introduction of the Composition API has made it easy to extract even stateful logic into modules based on functional aspects.
Modify each page file to use this module (Composable).
- index.vue
<script setup lang="ts">
const { fetchArticles, articles } = useArticles();
fetchArticles();
</script>

<template>
  <div>
    <p>New Articles!!</p>
    <ul>
      <li v-for="article in articles" :key="article.id">
        <NuxtLink :to="{path: '/details', query: { id:article.id }}">{{ article.title }}</NuxtLink>
      </li>
    </ul>
  </div>
</template>
- details.vue
<script setup lang="ts">
const route = useRoute();
const { id } = route.query;
const { article, fetchArticle } = useArticles();
fetchArticle(+id);
</script>

<template>
  <div>
    <article v-if="article">
      <p>Title: {{ article.title }}</p>
      <hr />
      <div style="width: 500px">{{ article.content }}</div>
    </article>
    <NuxtLink to="/">Back</NuxtLink>
    <!-- Added -->
    <Advertisement />
  </div>
</template>
It has become much simpler.
The article fetching part uses the public functions and variables of the earlier Composable. Here again, Nuxt3's Auto Import is effective, so there is no need to write an import statement for useArticles.
Reusing UI Components with Components
#Finally, let's create reusable UI components with Vue components. This part is basically the same as in Nuxt2. Here, we create an advertisement display component and place advertisements on each page.
Vue components are created in the components directory, similar to Nuxt2. We created the following Advertisement.vue file.
<script setup lang="ts">
const ads = ref<{ id: number, title: string, url: string }[]>([]);
ads.value = [{
  id: 1,
  title: "Engineers Wanted",
  url: "https://wwwrecruit.mamezou.com/"
}, {
  id: 2,
  title: "Online Seminar Announcement",
  url: "https://mamezou.connpass.com/"
}];
</script>

<template>
  <hr />
  <p style="margin: 0.2em 0">Advertisement</p>
  <ul style="list-style-type:none;padding-left:0;">
    <li v-for="ad in ads" :key="ad.id"><a :href="ad.url">{{ ad.title }}</a></li>
  </ul>
</template>
It's a simple component that displays multiple fixed advertisement links. Insert this into each page.
- index.vue
<script setup lang="ts">
const { fetchArticles, articles } = useArticles();
fetchArticles();
</script>

<template>
  <div>
    <p>New Articles!!</p>
    <ul>
      <li v-for="article in articles" :key="article.id">
        <NuxtLink :to="{path: '/details', query: { id:article.id }}">{{ article.title }}</NuxtLink>
      </li>
    </ul>
    <!-- Added -->
    <Advertisement />
  </div>
</template>
- details.vue
<script setup lang="ts">
const route = useRoute();
const { id } = route.query;
const { article, fetchArticle } = useArticles();
fetchArticle(+id);
</script>

<template>
  <div v-if="article">
    <p>Title: {{ article.title }}</p>
    <hr />
    <div style="width: 500px">{{ article.content }}</div>
    <NuxtLink to="/">Back</NuxtLink>
    <!-- Added -->
    <Advertisement />
  </div>
</template>
There are no changes to the script. Only the earlier advertisement component is added to the template. Like Composables, components under the components directory also work with Nuxt3's Auto Import, so there is no need to write import statements for components.
By this point, the directory structure looks like this:
sample-app/
├── components
│ └── Advertisement.vue <- Advertisement display component
├── composables
│ └── useArticles.ts <- Blog fetching Composable
├── layouts
│ └── default.vue <- Common layout
├── pages
│ ├── index.vue   <- Top page
│ └── details.vue <- Detail page
├── app.vue <- Entry point
├── node_modules
├── nuxt.config.ts
├── package-lock.json
├── package.json
├── tsconfig.json
└── .gitignore
Running the Nuxt Application
#Let's run this app in a local environment. First, we check with hot module replacement (HMR) during code changes. Execute with the following command.
npm run dev
Compared to Nuxt2, it is quite fast. The app starts up immediately. Accessing http://localhost:3000/ in the browser, you can see the UI as follows.
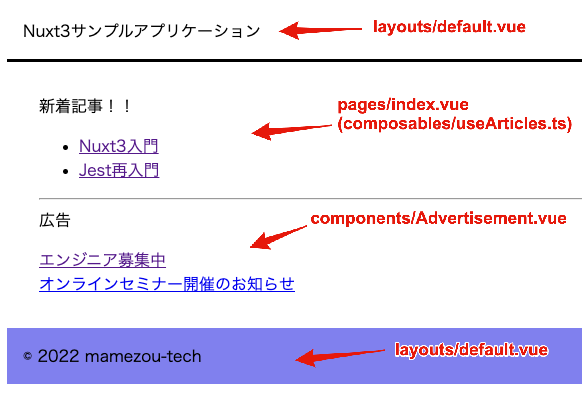
In this state, changes to the source code are immediately reflected. In normal local development work, you will work while checking the actual UI in this mode.
The method changes depending on the rendering mode when actually deploying.
# Default: Universal Rendering (Pre-rendering disabled: target->server)
npm run build
# Start Nitro server engine
node .output/server/index.mjs

# Universal Rendering (Pre-rendering enabled: target->static) or Client-Side Rendering (SPA)
npm run generate
# Hosting under dist
The UI displayed after deployment does not change regardless of the mode.
For details on rendering modes, please refer to the previous article.
Summary
#Nuxt3 has significantly improved DX (Developer Experience) with the introduction of Vue3's Composition API, Auto Import, and a faster platform. These improvements are expected to significantly contribute to development velocity and product quality.
In the next installment, we plan to look at Nuxt3's universal data fetching.