Copy-Paste to Get Started: AI-Driven Development with Amazon Q Developer × Spec Kit
Back to TopTo reach a broader audience, this article has been translated from Japanese.
You can find the original version here.
This article is a transcription of the presentation delivered at the following event:
From November 17, 2025, Q Developer CLI was officially renamed to “Kiro CLI.” In this article, we refer to it by its name at the time of writing, “Q Developer CLI,” but the commands and features remain the same. Future updates may change the q command to kiro.
Table of Contents
#- Introduction
- Background Knowledge: Why SDD+TDD?
- Environment Setup: Getting Started with Minimal Preparation
- Hands-On ①: Specification Definition - Iterating specify → clarify
- Hands-On ②: Implementation - Practicing the TDD Cycle
- Hands-On ③: Deployment - Building AWS Infrastructure Using Only Natural Language
- Frequently Asked Questions and Troubleshooting
- Conclusion and References
Introduction
#Target Audience
#This article is intended for:
- Developers interested in AI-driven development using generative AI
- Those who have struggled with “unintended implementations” in AI code generation
- Those who want to leverage AI while maintaining quality
- Those who want to try Amazon Q Developer (Kiro CLI) or Spec Kit
Prerequisites
#This article assumes basic knowledge of:
- Git and GitHub operations
- Docker and Docker Compose concepts
- Java/Spring Boot and React/TypeScript fundamentals (used in the sample project)
- AWS basics (for the deployment section)
What You Will Gain from This Article
#By reading this article, you will be able to:
- Understand the process from environment setup to deployment
- Obtain practical, copy-paste-ready prompt examples
- Learn methods for ensuring quality in AI-driven development
- Acquire a fully functional sample project
Background Knowledge: Why SDD+TDD?
#Current State of AI-Driven Development
#Since the emergence of ChatGPT at the end of 2022, AI-assisted development has rapidly spread. Today, many coding assistants are available, including GitHub Copilot, Cursor, Claude Code, Windsurf, Amazon Q Developer[1], Kiro, and more.
The evolution of AI is shifting from “model-centric (the GPT era)” to “agent-network-centric,” progressing from simple coding assistance to autonomous execution agents.
The "Shadows" of AI Code Generation
#However, in real development environments, you may encounter the following challenges:
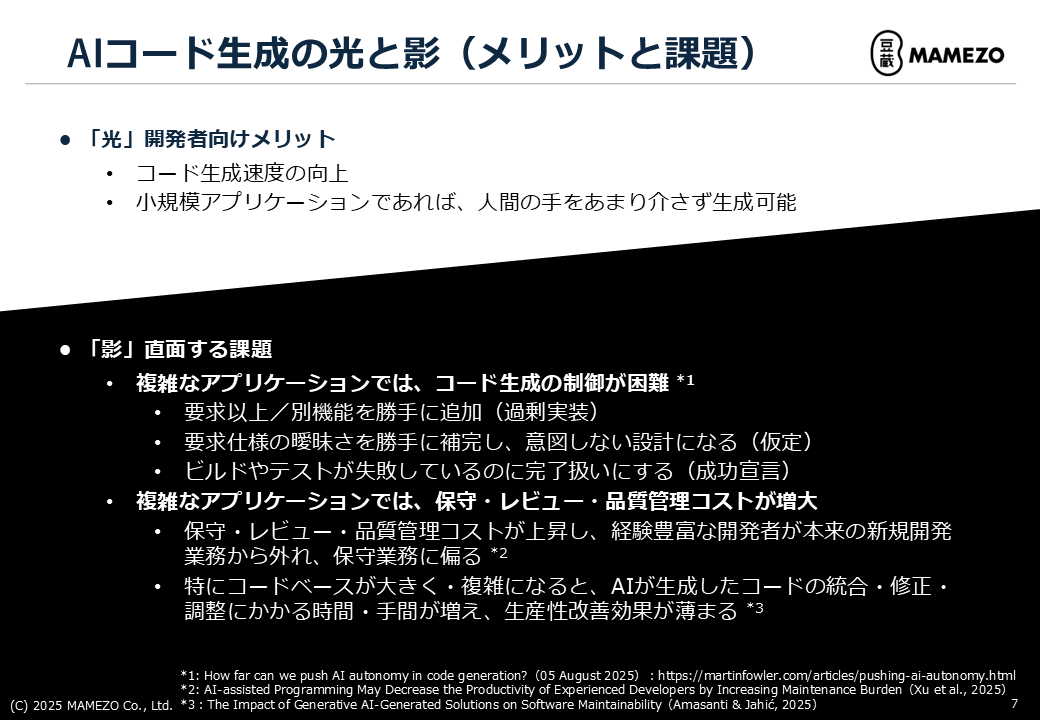
1. Over-Engineering
It adds features that were not requested.
Examples:
- Only the login feature was requested, but a password reset feature was also implemented
- A simple CRUD was requested, but search and sorting were added
2. Assumptions
It fills in ambiguous parts of the requirements on its own, leading to unintended designs.
Examples:
- “Save user information” → AI assumes an email address is required
- “Display data” → AI implements pagination of 10 items per page
3. Premature Success Declaration
It reports “completed” even when builds or tests fail.
Examples:
- “Implementation complete” despite compile errors
- “All tests passed” even though some tests failed
4. Increased Maintenance Costs
According to recent studies[2][3], while AI-assisted tools can increase development speed, maintenance, review, and quality management costs tend to rise. It is also observed that experienced developers shift from new development to maintenance tasks.
Solution Approach with SDD+TDD
#To address these challenges, we combine two methods:
SDD (Specification-Driven Development)
A method where expected behaviors, requirements, and constraints are clearly specified before writing code, and development proceeds based on these specifications.
Effect: With clear specifications, AI can generate accurate code without ambiguity[4].
TDD (Test-Driven Development)
A method of defining tests before writing code and iterating fixes and improvements starting from failing tests.
Effect: Introducing TDD into LLM-based code generation improves the success rate of generation[5]. By making tests explicit “specifications and constraints,” AI’s generation accuracy improves[6].
By solidifying specifications with SDD and standardizing correct behavior with TDD, we increase the controllability of AI.
Environment Setup: Getting Started with Minimal Preparation
#Prerequisites Checklist
#Ensure the following are installed:
- Windows + WSL2 (or Linux)
- Git
- VSCode
- Docker Desktop (or Docker Engine)
- AWS Builder ID or AWS IAM Identity Center account (for Q Developer)
Step 1: Clone the GitHub Repository
#Clone the public sample repository created for this presentation:
# Navigate to your working directory
cd ~/workspace

# Clone the repository
git clone https://github.com/mamezou-tech/aidd-demo.git

# Change directory
cd aidd-demo
Repository Contents:
- backend/: Spring Boot backend (Java 17, Spring Boot 3.x)
- frontend/: React frontend (React 18, TypeScript, Vite)
- specs/: Specification documents
- .devcontainer/: DevContainer configuration
- .amazonq/: Amazon Q Developer configuration
- docker-compose.yml: Development environment configuration
Step 2: Launch the DevContainer in VSCode
## Open in VSCode
code .
Once VSCode has launched, follow these steps:
- Click the green button in the lower left (Remote Explorer)
- Select “Reopen in Container”
- The first time may take several minutes (building the Docker image)
- A terminal inside the container will open automatically
DevContainer Includes:
- Node.js, Java 17, Gradle
- AWS CLI
- Q Developer CLI 1.19.7
- Various development tools
Step 3: Log in to Q Developer CLI (Kiro CLI)
#For the Free Plan (AWS Builder ID)
# Login command
q login

# A browser will open; log in with your AWS Builder ID
# After completing login, return to the terminal
For the Pro Plan (IAM Identity Center)[7]
# Login command
q login

# Follow the prompts to enter your IAM Identity Center information
# Start URL: https://[your-domain].awsapps.com/start
# Region: ap-northeast-1, etc.

# A browser will open; complete authentication
Start Interactive Mode:
q chat
After November 17, 2025, Q Developer CLI was officially renamed “Kiro CLI.” In this article, we use the old name “Q Developer CLI,” but functionality remains the same. Future updates may change the q command to kiro.
Step 4: Start the Application and Verify Operation
#1. Start the Database and Backend
In the DevContainer’s terminal, run:
docker compose up -d
This command will start:
- MySQL database (port 3306)
- Spring Boot application (port 8080)
Verify that the containers are running:
docker compose ps

# Expected output:
# mysqldb and app containers with STATUS Up (healthy)
2. Start the Frontend
cd frontend
npm run dev
Note: Dependencies are automatically installed when the DevContainer starts.
The frontend will be running at http://localhost:3000.
Verify Operation:
Access in a browser:
- Frontend: http://localhost:3000
- Backend API: http://localhost:8080/api/health
Troubleshooting (Environment Setup)
#Q1: DevContainer Does Not Start
Cause: Docker is not running or resources are insufficient.
Solution:
# Check if Docker is running
docker ps

# Check resource settings (Docker Desktop: Settings > Resources)
Q2: q Command Not Found
Cause: The DevContainer build is incomplete.
Solution:
# Rebuild the container
# In VSCode, press Ctrl+Shift+P → "Dev Containers: Rebuild Container"

# Or from the command line
docker compose down
docker compose up -d --build
Q3: Ports 3000 or 8080 Are Already in Use
Cause: Another application is using the port.
Solution:
# Check active processes
lsof -i :3000
lsof -i :8080

# Terminate the process or modify the ports in docker-compose.yml
# ports:
#   - "3001:3000"  # Change 3000 to 3001
Hands-On ①: Specification Definition - Iterating specify → clarify
#Spec Kit Command List
#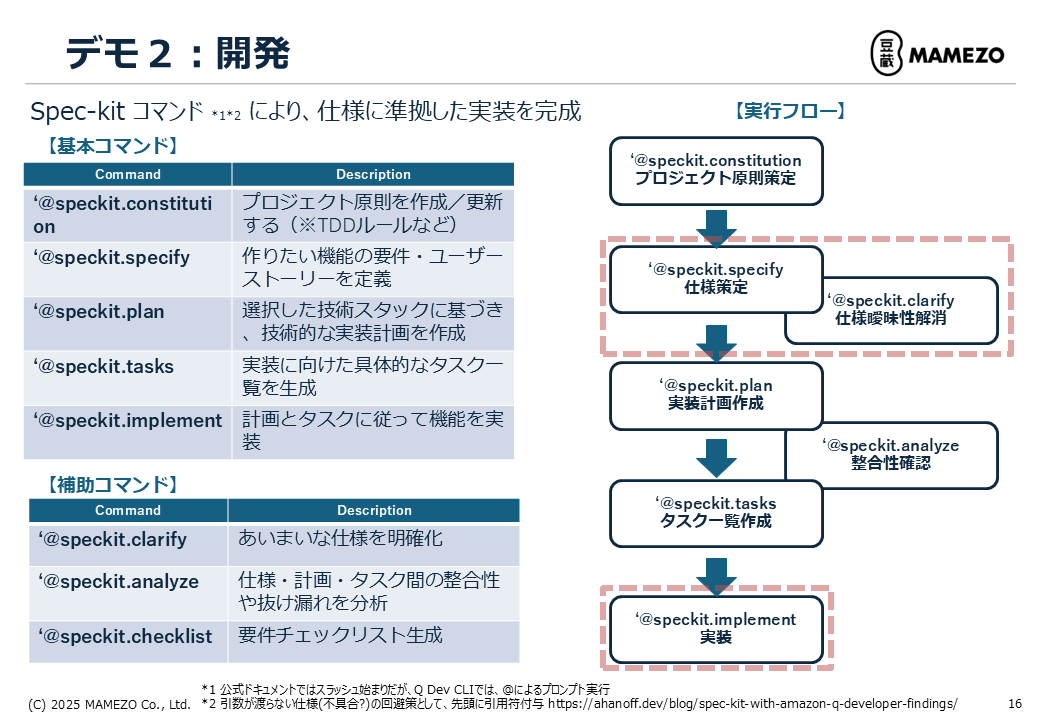
| Command | Description | Primary Use |
|---|---|---|
@speckit.constitution |
Create or update project principles | Define TDD rules, etc. |
@speckit.specify |
Define feature requirements and user stories | Create specifications |
@speckit.clarify |
Clarify ambiguous specifications | Refine specifications |
@speckit.plan |
Create a technical implementation plan | Architecture design |
@speckit.analyze |
Analyze consistency among specs, plans, tasks | Check for contradictions |
@speckit.tasks |
Generate a list of implementation tasks | Task decomposition |
@speckit.implement |
Implement according to plan and tasks | Code generation |
@speckit.checklist |
Generate a requirements checklist | Progress management |
In Q Developer CLI, prompts are invoked with the at sign (@) rather than a slash (/). To pass arguments correctly, prefix the command with a quotation mark (').[8]
Starting an Interactive Session
#First, start an interactive session in Q Developer CLI. All following commands are executed within this session.
q chat
When the session starts, you will see a prompt where you can enter commands.
Step 1: Review Project Principles
#Check whether principles such as TDD are defined for the project. If additions are needed, add them with the following command:
'@speckit.constitution <content you want to add to the project principles>'
Example:
# Project Constitution

## Test-First Imperative
Always write tests before code.
- Create unit tests first
- Confirm test failures (Red phase) before implementation
- Enforce this strictly as non-negotiable

## Library-First Principle
Implement all features as independent libraries.

## Simplicity Gate
Prevent over-engineering.
- Limit the initial implementation to a maximum of 3 projects
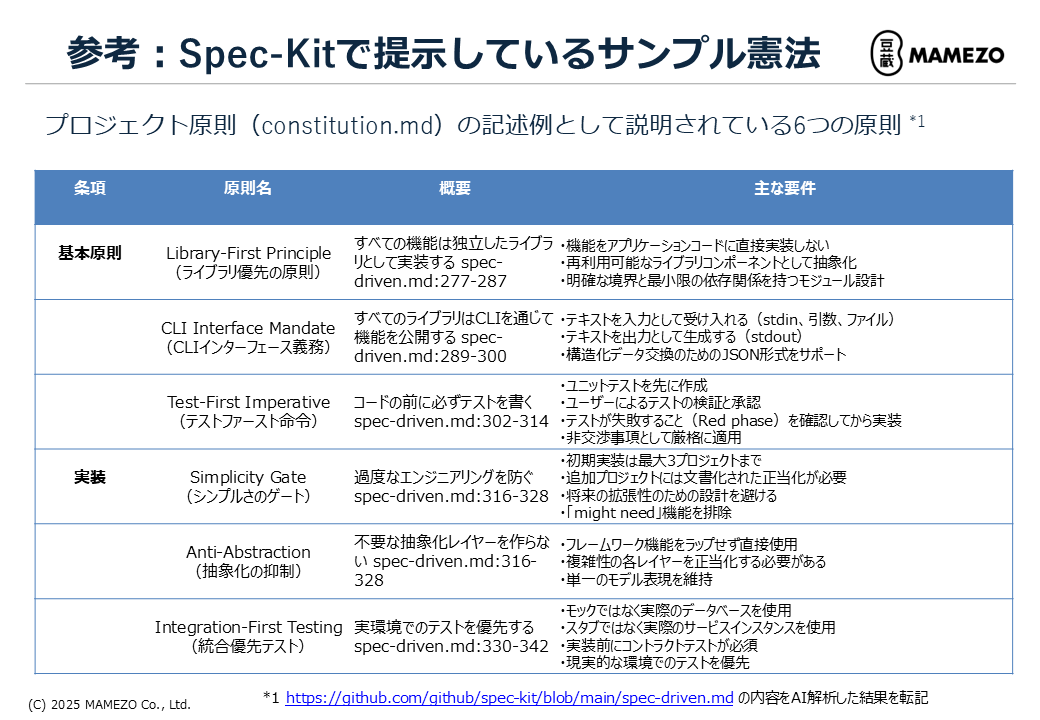
The public repository’s constitution.md documents the six principles presented by Spec Kit.
Step 2: Define Specifications (@speckit.specify)
#
Initial specify
Create the specification for the Employee Search System MVP.
Prompt Example:
'@speckit.specify
Create the specification for the Employee Search System (MVP).

【Purpose】
To centralize employee information management and enable HR to quickly understand "who has which skills and which organization they belong to."

【Primary Users】
- HR: Utilize an overview of all employees, skills, and organization information across the company to inform placement decisions and recruitment planning.

【Expected Use Cases】
- HR searches for employees with specific skills (e.g., Java, AWS) and creates a candidate list across departments.
- Ability to visually identify individuals via a list/detail view of employees with photos.

【Scope of Features to Provide in MVP】
- Login functionality (simple authentication)
- Employee information registration/view/search
  - Basic attributes (name, employee ID, organization, position, employment type)
  - Photo registration/display
- Skill information viewing
  - Manage skill master data
  - Associate possessed skills to each employee
- Organizational hierarchy management (simple tree structure with parent-child relationships only)

【Out of Scope for MVP】
- Detailed permission management
- Audit logs
- Advanced skill analysis
- History management for organizational restructuring
- External system integration

【Expected Output】
- List of use cases and simple flows
- Overview of screens and APIs
- Overview of the data model
- Non-functional requirements (minimum necessary for MVP)
- Clarification of out-of-scope features
'
Key Points:
- Clearly describe the purpose
- Define user personas
- Clarify the scope of the MVP (especially stating “Out of Scope”)
- Avoid ambiguous expressions
Output Example:
# Employee Search System MVP Specification

## 1. Overview
...

## 2. Use Cases
### UC-001: Login
- Actor: HR staff
- Precondition: User account is registered
- Basic flow:
  1. User enters username and password on the login screen
  2. System performs authentication
  3. On successful authentication, redirect to the home screen
...

## 3. Screen Design
### 3.1 Login Screen
- Input fields: Username, Password
- Button: Login
...

## 4. Data Model
### 4.1 Employee
- employee_id (PK): Employee ID
- name: Full name
- organization_id (FK): Affiliated organization
- photo_url: Photo URL
...
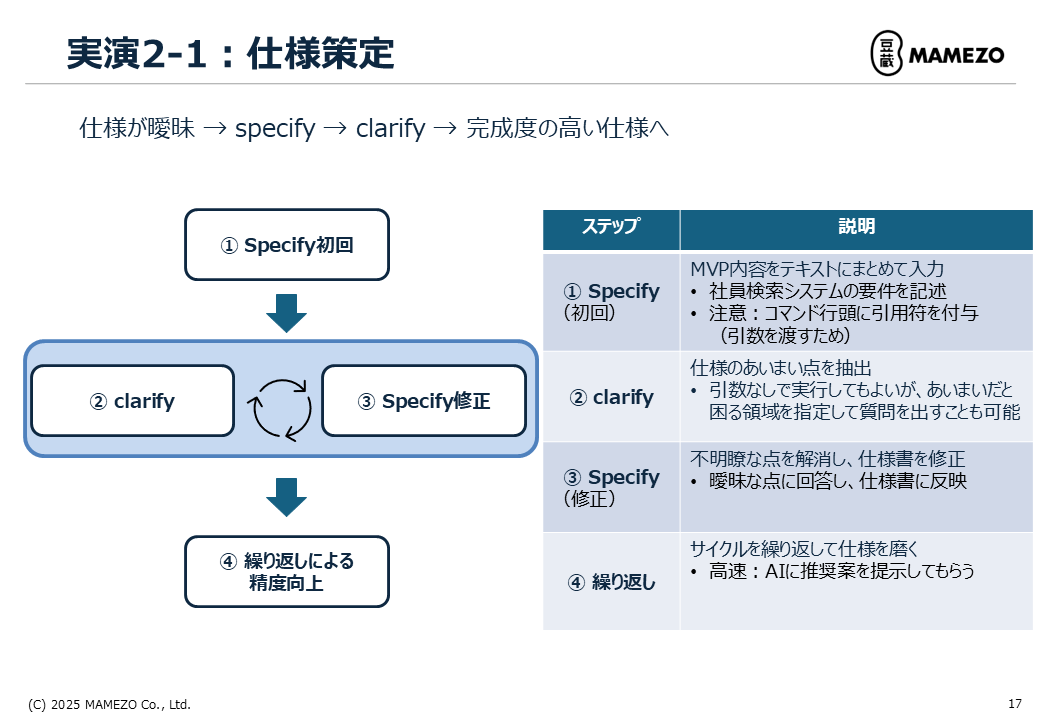
Step 3: Clarify Ambiguities (@speckit.clarify)
#The generated specification may still contain ambiguous points. Use the clarify command to refine them.
Prompt Example:
'@speckit.clarify
For the Employee Search System MVP specification, identify the following ambiguities and generate a list of questions:
- Login/authentication method (specific assumptions for the MVP)
- Skill search and display method
- Photo registration method
- Handling of paging/sorting in list views
'
Output Example:
# Questions Regarding Ambiguous Specifications

## Login/Authentication Method
Q1: What encryption method is used for passwords? (bcrypt, PBKDF2, etc.)
Q2: How is session management handled? (Cookie, JWT, server-side sessions, etc.)
Q3: Is logout functionality required?
Q4: Is password reset functionality included in the MVP?

## Skill Search and Display Method
Q5: Is skill search exact match or partial match?
Q6: Are AND/OR searches for multiple skills required?
Q7: How are skill levels (beginner/intermediate/advanced, etc.) handled?

## Photo Registration Method
Q8: What is the maximum file size for photos?
Q9: Which image formats are allowed? (JPEG, PNG, GIF, etc.)
Q10: If no photo is provided, should a default image be displayed?

## Paging/Sorting
Q11: How many items per page should be displayed in the list view?
Q12: Which fields can be used for sorting? (name, employee ID, organization, etc.)
Q13: What is the default sort order?
Step 4: Answer Questions and Update the Specification (@speckit.specify)
#Provide answers to the AI’s questions and update the specification accordingly.
Prompt Example:
'@speckit.specify
Update the Employee Search System MVP specification based on the following answers.

【Login/Authentication Method】
A1: Use bcrypt
A2: Store JWT tokens in cookies
A3: Logout functionality is required
A4: Password reset is out of scope for the MVP

【Skill Search and Display Method】
A5: Partial match (prefix match)
A6: AND search only for multiple skills
A7: Three levels of skill (beginner/intermediate/advanced)

【Photo Registration Method】
A8: Up to 5MB
A9: Only JPEG and PNG
A10: Display a default avatar image if none provided

【Paging/Sorting】
A11: 20 items per page
A12: Sortable by name, employee ID, organization
A13: Default sort order is ascending by name
'
Step 5: Iteration
#Repeat the cycle of specify → clarify → specify to reduce ambiguities.
Iteration Tips:
- Specify points where ambiguity causes issues for maximum effect
- Speed up by asking AI for recommended proposals
Example of Speeding Up:
'@speckit.clarify
For employee registration and update features, identify ambiguities and also provide your recommended solutions.
'
Deliverable: spec.md
#You will obtain a highly refined specification document that includes:
- Concrete use cases
- Clear screen items and API specifications
- Detailed data model definitions
- Resolved ambiguities
- Clearly stated out-of-scope features
Hands-On ②: Implementation - Practicing the TDD Cycle
#Step 1: Create an Implementation Plan (@speckit.plan)
#@speckit.plan
Output Example:
# Implementation Plan

## Technology Stack
- Backend: Java 17, Spring Boot 3.2.0, Spring Security, Spring Data JPA
- Frontend: React 18, TypeScript, Tailwind CSS
- Database: MySQL 8.0
- Test: JUnit 5, Testcontainers, Playwright

## Architecture
### Backend
- Layered architecture
  - Controller layer: REST API endpoints
  - Service layer: Business logic
  - Repository layer: Data access

### Frontend
- Component-based architecture
- React Router for SPA
- Context API for state management

## Security
- JWT authentication
- bcrypt for password hashing
- CORS configuration
This content is saved as plan.md.
Step 2: Generate Task List (@speckit.tasks)
#'@speckit.tasks
Please break down the Talent Management System MVP into implementation tasks at a granularity of 2–3 days.
'
Output Example:
# Implementation Task List

## Phase 1: Foundation Setup
- Task 1.1: Set up project structure
- Task 1.2: Create database schema

## Phase 2: Authentication Functionality
- Task 2.1: User entity and Repository
  - Red: Create UserRepositoryTest and confirm failure
  - Green: Implement User.java and UserRepository.java and ensure tests pass
  - Refactor: Clean up code
- Task 2.2: Implement JWT authentication
  - Red: Create JwtUtilTest and confirm failure
  - Green: Implement JwtUtil.java and JwtAuthenticationFilter.java
  - Refactor: Clean up code
- Task 2.3: Implement login API
  - Red: Create AuthControllerTest and confirm failure
  - Green: Implement AuthController.java and AuthService.java
  - Refactor: Clean up code

## Phase 3: Employee Management Functionality
- Task 3.1: Employee entity and Repository
- Task 3.2: Employee registration API
- Task 3.3: Employee search API
- Task 3.4: Employee detail API

...
This content is saved as tasks.md.
Step 3: Implementation (@speckit.implement)
#Now it’s time for implementation. Based on Spec Kit’s test-first principles, proceed with the TDD cycle.
Example Implementation for Task 2.1: User Entity and Repository
Prompt Example:
'@speckit.implement Task 2.1'
Example AI Workflow:
- First, generate tests (Red phase)
UserRepositoryTest.java:
package com.example.demo.repository;

import com.example.demo.entity.User;
import org.junit.jupiter.api.Test;
import org.springframework.beans.factory.annotation.Autowired;
import org.springframework.boot.test.autoconfigure.jdbc.AutoConfigureTestDatabase;
import org.springframework.boot.test.autoconfigure.orm.jpa.DataJpaTest;
import org.testcontainers.containers.MySQLContainer;
import org.testcontainers.junit.jupiter.Container;
import org.testcontainers.junit.jupiter.Testcontainers;

import java.util.Optional;

import static org.assertj.core.api.Assertions.assertThat;

@DataJpaTest
@Testcontainers
@AutoConfigureTestDatabase(replace = AutoConfigureTestDatabase.Replace.NONE)
class UserRepositoryTest {

    @Container
    static MySQLContainer<?> mysql = new MySQLContainer<>("mysql:8.0")
            .withDatabaseName("testdb");

    @Autowired
    private UserRepository userRepository;

    @Test
    void ユーザー名でユーザーを検索できる() {
        // Arrange
        User user = new User();
        user.setUsername("testuser");
        user.setPassword("hashedPassword");
        userRepository.save(user);

        // Act
        Optional<User> found = userRepository.findByUsername("testuser");

        // Assert
        assertThat(found).isPresent();
        assertThat(found.get().getUsername()).isEqualTo("testuser");
    }

    @Test
    void 存在しないユーザー名で検索すると空が返る() {
        // Act
        Optional<User> found = userRepository.findByUsername("nonexistent");

        // Assert
        assertThat(found).isEmpty();
    }
}
- Run the tests and confirm failure
# Automatically executed by AI
./gradlew test --tests UserRepositoryTest

# Result: FAILED (because User.java and UserRepository.java do not exist yet)
- Generate implementation (Green phase)
User.java:
package com.example.demo.entity;

import jakarta.persistence.*;
import lombok.Data;

@Entity
@Table(name = "users")
@Data
public class User {
    @Id
    @GeneratedValue(strategy = GenerationType.IDENTITY)
    private Long id;

    @Column(nullable = false, unique = true, length = 50)
    private String username;

    @Column(nullable = false)
    private String password;

    @Column(length = 100)
    private String email;
}
UserRepository.java:
package com.example.demo.repository;

import com.example.demo.entity.User;
import org.springframework.data.jpa.repository.JpaRepository;
import org.springframework.stereotype.Repository;

import java.util.Optional;

@Repository
public interface UserRepository extends JpaRepository<User, Long> {
    Optional<User> findByUsername(String username);
}
- Run the tests and confirm success
./gradlew test --tests UserRepositoryTest

# Result: PASSED
- Refactoring (Refactor phase)
With the tests passing, improve the code. The AI performs refactoring such as:
- Improve variable and method names
- Remove duplicate code
- Enhance readability
Refactor safely while ensuring the tests continue to pass.
TDD Cycle Iteration Points
#Red → Green → Refactor Cycle:
- Red (Write a failing test)
- Express expected behavior in a test
- The test fails because there is no implementation
- Green (Minimum implementation to pass the test)
- Write code to make the test pass
- Prioritize functionality over elegance at this stage
- Refactor (Refactoring)
- Improve the code with tests passing
- Remove duplication and enhance readability
Hands-On ③: Deployment - Building AWS Infrastructure Using Only Natural Language
#Prerequisites
#- AWS CLI installed (included in the DevContainer)
- AWS profile (credentials) configured
- IAM user/role with permissions to launch EC2 instances
Since this deployment is for testing purposes, the following is simplified:
- HTTP instead of HTTPS
- Single EC2 instance
- No load balancer
- Database inside a container
Step 1: Create the EC2 Instance
#Prompt Example:
Create an EC2 instance using Amazon Linux 2023 on instance type t3.small.
Set up a security group to allow port 22 (SSH) and port 3000 (application) only from your IP address.
Create a key pair named "aidd-demo-key".
Example AI Actions:
- Retrieve the current IP address
- Create a security group (SSH: 22, App: 3000)
- Create the key pair
- Launch the EC2 instance
- Output the instance ID and public IP
Step 2: Install Docker and Docker Compose
#Prompt Example:
SSH into the EC2 instance (PUBLIC_IP) and install Docker and Docker Compose.
Add the user to the docker group so it can be used without re-login.
Example AI Actions:
- SSH into the EC2 instance
- Update system packages
- Install, start, and enable Docker
- Add user to the docker group
- Install Docker Compose
- Confirm installation
Step 3: Transfer the Application to EC2
#Prompt Example:
Transfer the docker-compose.yml and the backend, frontend, and db directories
from the current directory to /home/ec2-user/aidd-demo on the EC2 instance (PUBLIC_IP).
Example AI Actions:
- Create the target directory on the EC2 instance
- Transfer docker-compose.yml, backend, frontend, and db directories via SCP
Step 4: Start the Application with Docker Compose
#Prompt Example:
On the EC2 instance, navigate to the transferred directory and run:
docker compose up -d
Ensure that all containers are Up (healthy).
Example AI Actions:
- SSH into the EC2 instance
- Navigate to the transferred directory
- Run
docker compose up -d - Check container statuses and report Up (healthy)
Step 5: Verify Application Operation
#Access in Browser:
http://(PUBLIC_IP):3000
Verify API Connectivity:
curl http://(PUBLIC_IP):8080/api/health

# Output example:
# {"status":"UP"}
Login Verification:
Use the following test user credentials on the login screen:
- ID: test@example.com
- PW: aiddTest
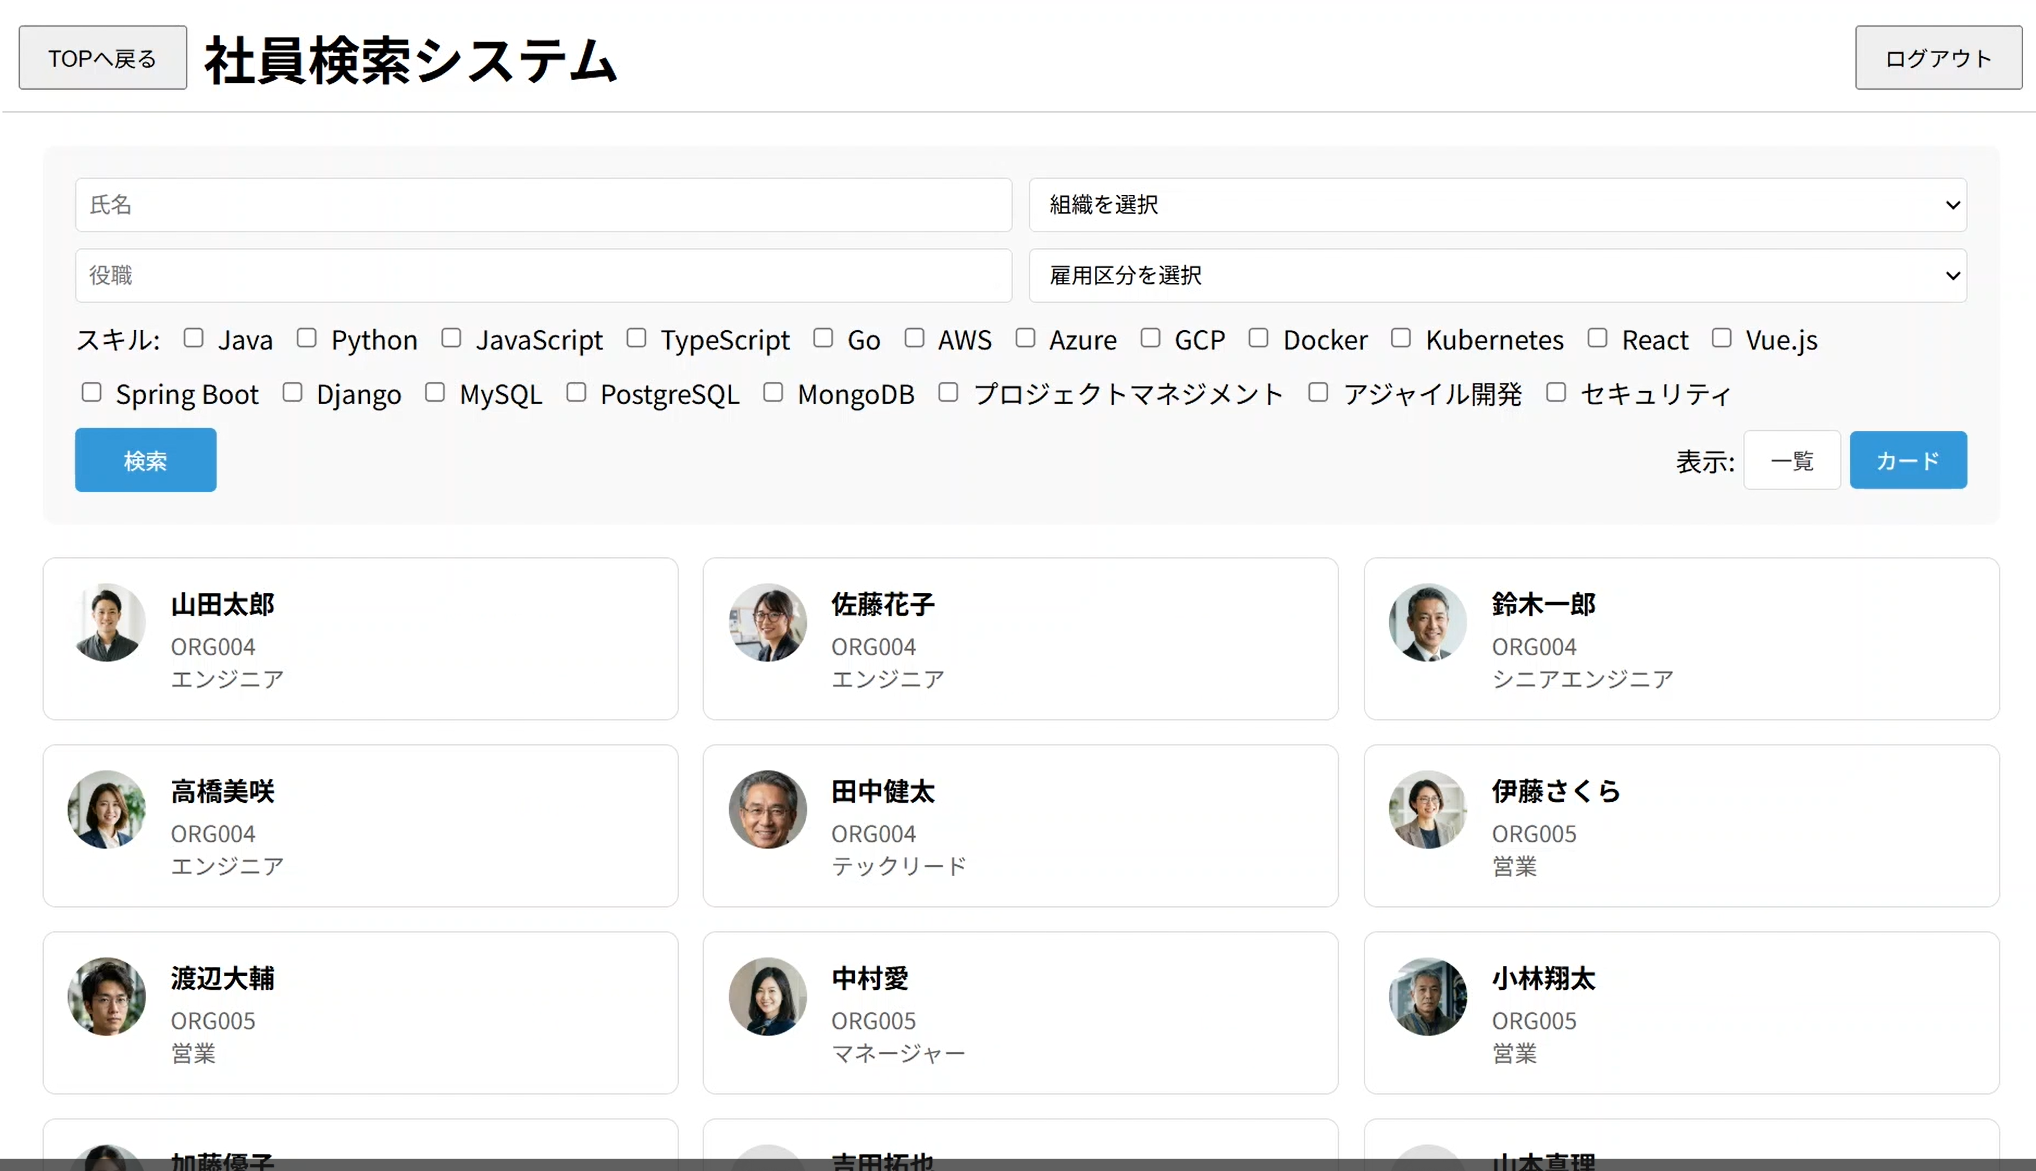
After logging in, the top screen will be displayed, from which you can navigate to the Employee Search System via the provided link.
Note: All registered data and photos are AI-generated.
Fixing CORS Issues (If Necessary)
#If you encounter a CORS error, perform the following:
Prompt Example:
Please modify the backend's CORS configuration to allow requests from the frontend origin (http://(PUBLIC_IP):3000).
After making changes, restart the application on EC2.
Conclusion and References
#Key Points of This Article
#This article explained the entire process of AI-driven development using Amazon Q Developer × Spec Kit.
Environment Setup:
- Clone a GitHub repository to get started
- Automatically resolve dependencies with DevContainer
Specification Definition:
- Refine specifications through specify → clarify iterations
- Eliminating ambiguity is key to leveraging AI
Implementation:
- Practicing the TDD cycle (Red → Green → Refactor)
- The test-first principle improves AI generation accuracy
Deployment:
- Build AWS resources using natural language
Key Learnings
#- The human role is indispensable: humans are responsible for upstream processes and quality assurance at this stage.
- Specifications and tests are assets: high-quality deliverables can be reused in subsequent AI-driven development.
Amazon Web Services. Amazon Q Developer. ↩︎
Xu et al. AI-assisted Programming and Maintenance Burden. arXiv, 2025. ↩︎
Amasanti & Jahić. The Impact of Generative AI-Generated Solutions on Software Maintainability. arXiv, 2025. ↩︎
GitHub. Spec-driven development with AI: Get started with a new open source toolkit. 2024. ↩︎
Mathews et al. Test-Driven Development for Code Generation. arXiv, 2024. ↩︎
Chen et al. TENET: Leveraging Tests Beyond Validation for Code Generation. arXiv, 2025. ↩︎
Classmethod. Amazon Q Developer Pro をメンバーアカウントでサブスクライブ利用してみた. 2024. ↩︎
Ahanoff. Amazon Q Developer を使用した Spec Kit:発見事項と癖. 2024. ↩︎