Teaching Methods for Industrial Robots and Their Applications
Back to TopTo reach a broader audience, this article has been translated from Japanese.
You can find the original version here.
This article is Day 9 of the 2025 Summer Relay series.
The author is currently engaged in system development using robots (robot SI). Developing programs to drive robots (robot languages) and programs that perform control in conjunction with robots (such as C#). This article introduces how to write programs for robots and how to interface with robots from a PC environment.
General Method for Creating Robot Programs
#Industrial robots generally use a teach pendant[1] to create robot programs.
FANUC's Teach Pendant
ABB's Teach Pendant
- Align the robot’s TCP[2] to the target position
- Align by moving the TCP along the X, Y, Z axes or by adjusting the angles of the robot’s joints
- Capture the current position as a teach point[3] and specify motion parameters (movement speed, interpolation[4] method, etc.)
- Press a button like “Add Move Instruction” to specify the motion method
- Issue other commands
- Issue special commands provided by the robot program (math functions, wait instructions, synchronization, coordinate transformations, etc.)
- When opening/closing hand grippers or interfacing with external devices, manipulate signals via I/O[5]
- Write flow commands (sequential execution, conditional branches, loops, etc.)
- Define variables and manage state
Using a teach pendant is similar to a software engineer editing code in an IDE.
The program taught via the teach pendant is executed on the robot controller[6] to which the robot is connected, reproducing the taught motion. This is called teaching-playback.
Because the program is created while actually moving the robot, it is also called online teaching.
For performing repetitive tasks with a robot, teaching-playback is used. The robot follows specified positions with very high accuracy (±0.1 mm or less). This is a common method on automated production lines.
On the other hand, since teach point data is written together with the robot program[7], modifying teach points or adding/removing teach positions requires modifying the robot program. Because a program must be created for each set of teach data, multiple robot programs may result, reducing maintainability.
Types of Teaching
#There are various types of teaching.
Online Teaching
#This teaching method uses the teach pendant to actually move the robot while creating the robot program.
Advantages
#- The basic method for teaching
- Online teaching is possible for any industrial robot
Disadvantages
#- You must go to a site where the robot is located, monopolize the robot, and create the program
- Production lines must be stopped
- Since you are using the actual machine, you must exercise extreme caution to avoid collisions
Offline Teaching
#Teaching is done using a simulator in an environment without a physical robot. The teach pendant software and robot are run in the simulator environment to perform robot program teaching.
Advantages
#- Robot programs can be created at a desk
- Safe because robot motion can be verified on the simulator
- If the simulator environment is set up on multiple PCs, multiple people can create robot programs simultaneously
- Robot programs themselves can be written in an editor and then imported into the simulator for verification
Disadvantages
#- You need to match the positions of the production line, robot, and end effector tools in the simulator
- When interfacing with external systems via I/O, you need to create stubs to simulate the external systems
- Simulator license fees can be expensive (the simulator itself may be free, but there are perpetual or annual subscription fees)
Direct Teaching
#Teach by physically moving the robot arm by hand to create the robot program. Since it is a type of online teaching, the advantages and disadvantages are the same as for online teaching. Many collaborative robots allow direct teaching.
Advantages
#- Intuitive operation
- If only setting teach points, teaching can be done without a teach pendant
Disadvantages
#- Since you move it by hand, the accuracy of the robot arm’s position and orientation depends on the operator
Teaching-less
#Recently, there are also teaching-less environments where AI automatically performs teaching.
Choosing the Right Teaching Method
#On production sites, operators generally use online teaching. On the other hand, for robot SI, development is often done using a simulator environment, so offline teaching is frequently used. Because our goal as software engineers is the development of automation systems that utilize robots rather than teaching itself, we are accustomed to writing robot programs in our familiar IDEs or editors. Therefore, compared to production site operators, we are not as proficient in teaching or using teach pendants 😅
Robot Program Execution Methods
#Robot programs created via teaching are interpreted and executed by the robot controller.
- Playback Method
- Reproduces the taught motions exactly
- The robot program is compiled into a binary format and directly executed by the robot controller
- The standard execution method for industrial robots
- Script Method
- A script (robot program) is interpreted and executed line by line by an interpreter
- Used in collaborative robots that require flexibility and ease of development
- Allows use cases such as automatically generating and executing script blocks by context
- Tend to have slower execution speeds compared to the playback method
You can think of the playback method as being like a compiled language such as C#, and the script method as being like a scripting language such as Python. Even though it is called compilation, it is done automatically and instantaneously, so there is no need to be overly conscious of it. However, both execution methods use proprietary languages of each robot vendor. I always wonder how convenient it would be if robot languages could be written in C# or Python, but there are reasons why this is not possible.
Robot programs may appear to execute each line sequentially from top to bottom, but that is not the case. To interpolate motion between teach points, the program needs to look ahead internally. For example, to move the robot arm from the current position → Point A → Point B → Point C, the settings would look like the table below.
| Program Line | Interpolation | Teach Point | Coordinates | Speed | Blend Distance |
|---|---|---|---|---|---|
| 1 | Linear | Point A | (0,0,0) | 10 mm/sec | 0 mm |
| 2 | Linear | Point B | (10,0,0) | 10 mm/sec | 10 mm |
| 3 | Linear | Point C | (10,-20,0) | 30 mm/sec | 0 mm |
The TCP trajectory is as shown below. The left figure shows the case where the blend distance at point B is 0 mm; the right figure shows the case where it is 10 mm. When the blend distance is 0 mm, the robot pauses at that teach point. By specifying a blend distance, the TCP trajectory becomes smoother and the speed smoothly accelerates from 10 mm/sec to 30 mm/sec. Additionally, the distance is shorter, reducing the cycle time.

General programming languages only execute the instruction on the current line and do not perform lookahead. In contrast, with robot programs, to execute line 2 (moving the TCP from point A to point B), you need not only information about A and B but also C. Information such as the distances and positional relationships between each teach point, movement speed, and blend distance is required, so to execute line 2 you must read line 3 in advance. Furthermore, while moving from A to B, the execution of line 2 continues until point B is reached. If you want to send a digital signal when 80 % of the way from A to B is reached, you would execute the digital signal transmission task asynchronously. This makes robot programs require complex descriptions, but to keep them simple enough for operators to understand (operators are not software engineers) and to allow teaching via a teach pendant, robot languages inevitably become proprietary.
Robot Control APIs
#There may be cases where you want to control a robot from a PC. For example:
“Capture images of a workpiece[8] with a camera connected to a PC, perform image analysis on the PC to calculate the workpiece’s position and orientation, transfer that information to the robot, and grasp it with the robot hand.”
In this case, you need to overwrite the position and orientation values of the teach data referenced by the robot program via the robot controller from the PC.
This is done using robot control APIs provided by each vendor. You reference and use the robot control API library from an application built on your PC.
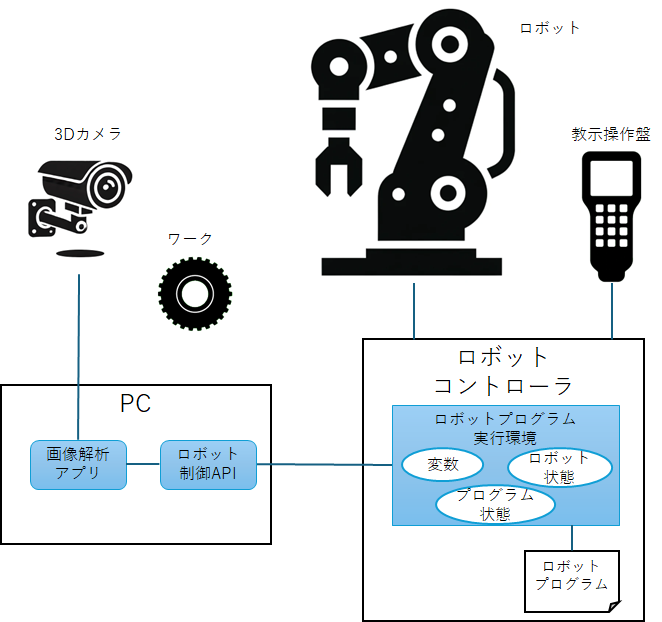
By using a robot control API, you can access the execution environment of the robot program. Variables, robot states, program states, etc., are managed here, allowing you to reference values or overwrite variables. The key point is that there is no need to modify the robot program. You program a template procedure in the robot program, such as “move the robot according to the position and orientation of the workpiece assigned to variables and stack the workpieces,” and at runtime you implement environment-specific control by overwriting variables via the robot control API.
Be aware that language specifications and mechanisms for controlling robots vary by vendor, so there are significant differences in how variables are handled and in the control units of the robot.
FANUC Robots
#FANUC is a leading Japanese industrial robot vendor, famous for its yellow corporate color.
Robot Language
#FANUC’s robot language uses the concept of registers. Position data, numbers, and strings are all managed in global memory as one-dimensional arrays of fixed sizes per data type. While it is convenient to be able to reference and update these from any robot program, caution is necessary because, as global variables, accidental data updates can cause errors in other programs. It is easy to control multiple robots separately or control multiple robots synchronously from a single robot program.
Robot Control API
#Called RobotInterface, it is provided as .NET and C++ libraries. It uses the concept of a DataTable to manage registers you want to use efficiently for data transfer. It’s a very simple and convenient library, but for some reason it is not documented in the product; you need to contact a sales representative directly.
ABB Robots
#Headquartered in Switzerland, ABB is a multinational company that provides a wide range of solutions in addition to industrial robots, such as power and heavy industry.
Robot Language
#Each robot is assigned one task (a robot program execution thread), and the robot program is loaded and executed in that task. To control two robots, you create a robot program for each robot and run each program in separate tasks. This allows for flexible robot control, but it seems more difficult to synchronize control between robots compared to FANUC.
In addition to local and global variables, you can also define task scope variables. Global variables and task variables can be persisted and used longer than the lifecycle of a robot program. Therefore, it is possible to define variables in a manner similar to FANUC’s registers when creating robot programs.
Robot Control API
#Called PC-SDK, it is provided as a .NET library. It can do more than FANUC’s RobotInterface and appears to be almost equivalent in functionality to what you can do with a teach pendant. However, despite the extensive class library, the manuals are less readable and there are fewer sample codes.
Universal Robots
#Universal Robots is a Denmark-based company famous for collaborative robots.
Robot Language
#Robot programs are written in a Python-like scripting language. Universal Robots publishes the robot control API specifications but apparently does not provide them as a library.
Robot Control API
#They use a method where a script written using the robot control API is transferred to the robot controller via socket communication, and the robot controller executes the script. Therefore, it can be executed easily, but since script transfer occurs each time, it is somewhat unsuited for processes that dynamically and frequently update and use data. However, there is a workaround: you can perform socket communication within the script to interface with the PC.
Conclusion
#Have you gotten an image of how to integrate robots using teaching methods and robot control APIs? In addition, ROS/ROS2[9] is often used for robot integration. Nowadays, systems that control robots using AI or integrate with the cloud are being built. It’s exciting to imagine that in the future, robot systems fused even more with AI will be utilized. 🤖👏
A tablet-like device used for teaching. Also called a teach pendant, teaching pendant, or simply pendant. ↩︎
Tool Center Point, the action point at the tip of the robot hand. ↩︎
A teach point represents variables that include three-dimensional coordinates (X, Y, Z), orientation (RX, RY, RZ or quaternion), robot configuration information (direction of joint axes), etc. ↩︎
Such as whether to move the TCP in a straight line from point A to point B, or to move the TCP in an arc via point B from point A to point C. ↩︎
Digital input (DI), digital output (DO), analog input (AI), analog output (AO), etc. ↩︎
Servo motors are attached to the robot's joints, and the robot controller calculates the appropriate positions and rotation speeds to drive the servo motors (joints). ↩︎
Movement commands and teach point data are recorded separately, and movement commands generally specify the index of the teach point data array. ↩︎
Refers to the object or workpiece on which the robot performs operations. Used as an abbreviation for the English term 'workpiece'. ↩︎
Not a robot OS, but an open-source framework that facilitates robot development, providing the tools and libraries necessary for software development. ↩︎