Build Your Own LLM Environment on AWS! A Hands-On Guide to Running AI with EC2 GPU Instances and Ollama
Back to TopTo reach a broader audience, this article has been translated from Japanese.
You can find the original version here.
Introduction
#"I want to easily rent a GPU in the cloud and try running the latest LLM (Large Language Model)!"
Motivated by that idea, I experimented with building an open-source LLM execution environment using AWS EC2 GPU instances and Ollama. In this article, I'll outline the steps I took and the insights I gained, also serving as a personal memo.
✔️ STEP 1: Selecting an EC2 Instance Type
#First, choose the EC2 instance that will serve as the "heart" for running the LLM smoothly.
With Ollama, you can run LLMs on the CPU alone, but having a GPU with sufficient VRAM (video memory) offers speed-up benefits.
This time, since I plan to run gpt-oss, which OpenAI recently released and is now available via Ollama, I'll choose an EC2 instance with at least 14 GB of VRAM for this 20 B-parameter model.
The EC2 instance types list screen accessible from the AWS Management Console makes it easy to compare the performance and pricing of available instance types by region.
If you set the filter to GPU >= 1, it will list all GPU-equipped instance types.
Sample display
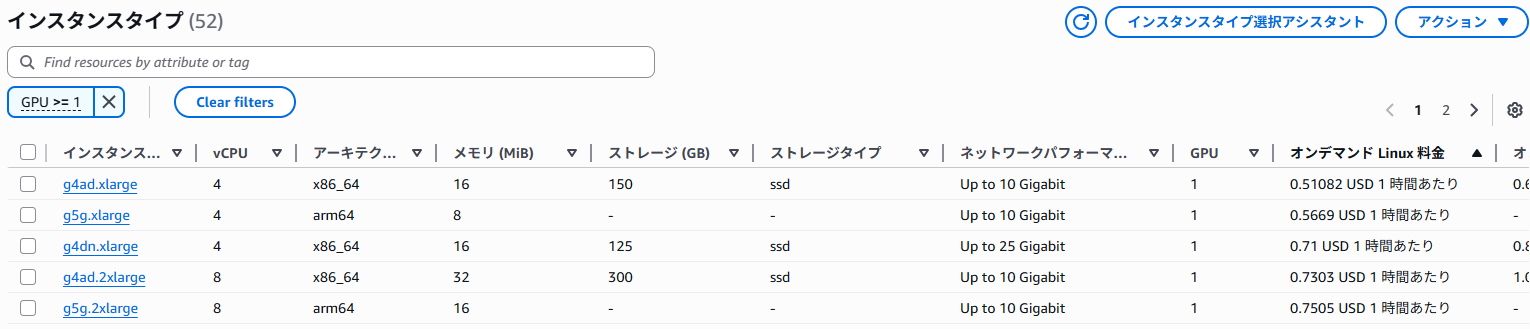
This time, I’ll use the g4dn.xlarge, which is the cheapest NVIDIA GPU-equipped Windows-compatible instance with sufficient VRAM for testing.
✔️ STEP 2: Setting Up the EC2 Instance
#Once you've chosen the instance type, you're ready to launch the EC2 instance.
⚠️ Preliminary Preparation: Increasing Service Quotas
#If this is your first time using a GPU instance, the vCPU quota for your AWS account might be set to 0. With the quota at 0, you won't be able to launch any instances, so go to the Service Quotas page and request an increase for Running On-Demand G and VT instances. In my case, the request was approved the next day.
If you have reached your quota, you'll see an error message like the following when trying to launch an EC2 instance, and the launch will fail.
You have requested more vCPU capacity than your current vCPU limit of 0 allows for the instance bucket that the specified instance type belongs to. Please visit http://aws.amazon.com/contact-us/ec2-request to request an adjustment to this limit.
Creating the Instance
#Launch the EC2 instance with the following settings:
- Name: Give it an easy-to-understand name like
gpu-demo. - AMI: Select Microsoft Windows Server 2025 Base.
I chose Windows for ease of testing this time, but you can of course use Linux. - Instance Type: Select g4dn.xlarge.
- Key Pair: Specify the key pair you will use to log in.
- Security Group:
- Add an inbound rule that allows RDP (port 3389) connections from an appropriate source.
- Storage: Set it to 60 GB, considering that you'll need space to download models.
Once the configuration is complete, launch the instance. After it starts, use the EC2 console to decrypt the Windows administrator password with your key pair, and connect via Remote Desktop. Since the OS language is set to English by default, install the Japanese language pack if you prefer Japanese.
✔️ STEP 3: Installing and Optimizing the GPU Driver
#Right after connecting to the Windows Server, the GPU isn't yet recognized by the OS. Install the official NVIDIA driver to configure the GPU so it can operate at peak performance.
Installing the Driver
#Follow the steps in the AWS documentation. There are several types of drivers, but this time we'll install the Tesla driver, which is optimized for numerical computing tasks.
-
Inside the EC2 instance, open a web browser and go to the NVIDIA Driver Download page.
-
The GPU in the
g4dninstance is a Tesla T4, so search with the following parameters:- Product Category: Data Center / Tesla
- Product Series: T-Series
- Product: Tesla T4
- Operating System: Windows Server 2025
Search screen

-
Download the latest driver from the search results.
-
Run the downloaded installer (e.g.,
580.88-data-center-tesla-desktop-winserver-2022-2025-dch-international.exe) and proceed with the “Express (Recommended)” option. -
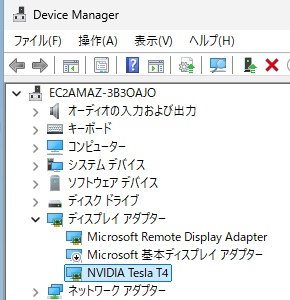
After installation, open Device Manager and verify that NVIDIA Tesla T4 appears under “Display adapters.”
-
Disable the original “Microsoft Basic Display Adapter.”
-
Reboot the instance.
Reference: Device Manager screen
Testing and Optimization
#Open PowerShell and run the nvidia-smi command to confirm that the GPU is recognized correctly.
PS C:\> nvidia-smi
Mon Aug 18 18:12:55 2025
+-----------------------------------------------------------------------------------------+
| NVIDIA-SMI 580.88                 Driver Version: 580.88         CUDA Version: 13.0     |
+-----------------------------------------+------------------------+----------------------+
| GPU  Name                  Driver-Model | Bus-Id          Disp.A | Volatile Uncorr. ECC |
| Fan  Temp   Perf          Pwr:Usage/Cap |           Memory-Usage | GPU-Util  Compute M. |
|                                         |                        |               MIG M. |
|=========================================+========================+======================|
|   0  Tesla T4                     TCC   |   00000000:00:1E.0 Off |                    0 |
| N/A   27C    P8             11W /   70W |       9MiB /  15360MiB |      0%      Default |
|                                         |                        |                  N/A |
+-----------------------------------------+------------------------+----------------------+

+-----------------------------------------------------------------------------------------+
| Processes:                                                                              |
|  GPU   GI   CI              PID   Type   Process name                        GPU Memory |
|        ID   ID                                                               Usage      |
|=========================================================================================|
|  No running processes found                                                             |
+-----------------------------------------------------------------------------------------+
If you see Tesla T4 displayed and the memory recognized as 15360MiB (about 15 GB), then you’re successful!
Next, follow the AWS documentation to optimize the GPU clock speeds. Set the maximum application clocks to the Tesla T4’s memory maximum clock of 5001 MHz and GPU maximum clock of 1590 MHz.
Reference: Tesla T4 Product Brief (PDF)
PS C:\> nvidia-smi -ac "5001,1590"
Applications clocks set to "(MEM 5001, SM 1590)" for GPU 00000000:00:1E.0
All done.
You might wish you could check GPU usage in the Task Manager’s Performance tab on Windows. However, the Tesla driver operates in TCC mode (Tesla Compute Cluster), which is optimized for numerical computing tasks, and Task Manager does not support monitoring GPUs in that mode. Task Manager only supports monitoring GPUs operating in WDDM mode, which is used for graphics rendering.
✔️ STEP 4: Setting Up Ollama and Running a Model
#Finally, let's set up the application Ollama for running the LLM.
- Download the Windows installer from the Ollama official site and install it.
- The Ollama GUI will open, but since we want to restart it with custom options, close the window, then click the Ollama icon in the task tray and select “Quit Ollama” to exit.
Configuring Ollama Startup
#To allow using Ollama from external machines via its REST API and to keep the model loaded in memory, set the following environment variables before starting it:
OLLAMA_HOST="0.0.0.0:11434": Binds the Ollama server to this address so it can accept external connections.OLLAMA_KEEP_ALIVE=-1: Keeps loaded models in memory indefinitely to speed up subsequent responses. (You can also specify a retention time like5m. The default is 5 minutes.)
Run the following commands in PowerShell:
$Env:OLLAMA_HOST="0.0.0.0:11434"
$Env:OLLAMA_KEEP_ALIVE=-1
ollama serve
This starts the Ollama server, which will listen for requests and output logs.
Running and Testing the Model
#Download the gpt-oss model. Open a separate PowerShell session and run:
ollama pull gpt-oss
Let's send a chat request to the LLM:
PS C:\> ollama run gpt-oss "Hello"
Thinking...
The user says "Hello". We respond appropriately, probably with something like "Hello there! How can I assist you today?".
...done thinking.

Hello!
Is there anything I can help you with? Feel free to ask.
On the first request after launch, loading the model into VRAM takes some time, so it took about a minute before the response started. From the second request onward, it responds very quickly.
Let's also test a request via the REST API:
PS C:\> curl.exe http://localhost:11434/api/chat -d '{
  ""model"": ""gpt-oss"",
  ""messages"": [
    { ""role"": ""user"", ""content"": ""Hello"" }
  ]
}'
{"model":"gpt-oss","created_at":"2025-08-19T02:10:00.5615556Z","message":{"role":"assistant","content":"","thinking":"The"},"done":false}
{"model":"gpt-oss","created_at":"2025-08-19T02:10:00.6037637Z","message":{"role":"assistant","content":"","thinking":" user"},"done":false}
{"model":"gpt-oss","created_at":"2025-08-19T02:10:00.6455317Z","message":{"role":"assistant","content":"","thinking":" says"},"done":false}
...snip...
{"model":"gpt-oss","created_at":"2025-08-19T02:10:03.2187345Z","message":{"role":"assistant","content":"Hello"},"done":false}
{"model":"gpt-oss","created_at":"2025-08-19T02:10:03.2632367Z","message":{"role":"assistant","content":"!"},"done":false}
{"model":"gpt-oss","created_at":"2025-08-19T02:10:03.3068154Z","message":{"role":"assistant","content":"Today"},"done":false}
This also returns responses quickly and without issues, achieving around 20 tokens per second.
After sending the chat request, if you check the GPU status with nvidia-smi, you'll see that the Ollama process is indeed using GPU memory. This time it consumed about 13.6 GB, showing that the GPU is being utilized effectively.
PS C:\> nvidia-smi
Wed Aug 20 15:01:18 2025
+-----------------------------------------------------------------------------------------+
| NVIDIA-SMI 580.88                 Driver Version: 580.88         CUDA Version: 13.0     |
+-----------------------------------------+------------------------+----------------------+
| GPU  Name                  Driver-Model | Bus-Id          Disp.A | Volatile Uncorr. ECC |
| Fan  Temp   Perf          Pwr:Usage/Cap |           Memory-Usage | GPU-Util  Compute M. |
|                                         |                        |               MIG M. |
|=========================================+========================+======================|
|   0  Tesla T4                     TCC   |   00000000:00:1E.0 Off |                    0 |
| N/A   32C    P0             26W /   70W |   13699MiB /  15360MiB |      0%      Default |
|                                         |                        |                  N/A |
+-----------------------------------------+----------------------+

+-----------------------------------------------------------------------------------------+
| Processes:                                                                              |
|  GPU   GI   CI              PID   Type   Process name                        GPU Memory |
|        ID   ID                                                               Usage      |
|=========================================================================================|
|    0   N/A  N/A            4400      C   ...al\Programs\Ollama\ollama.exe      13666MiB |
+-----------------------------------------------------------------------------------------+
✔️ STEP 5: Accessing the LLM from Your Local Machine
#Finally, let's access the LLM environment you set up from your local machine.
Server-Side Configuration
#Since you bound the Ollama server to 0.0.0.0:11434 during startup configuration, set up the network path to the server:
- EC2 Security Group: Add an inbound rule to allow access to the Custom TCP port
11434from your local machine’s IP address. - Windows Firewall: Inside the EC2 instance, open Windows Defender Firewall settings and add a new inbound rule to allow traffic on port
11434.
Client-Side Execution
#Use the curl command to send a request to the public IP address of your EC2 instance:
curl.exe http://EC2_PUBLIC_IP:11434/api/chat -d '{
  ""model"": ""gpt-oss"",
  ""messages"": [
    { ""role"": ""user"", ""content"": ""Hello"" }
  ]
}'
If you successfully receive a response, the setup is complete!
Conclusion
#In this article, we introduced the steps to build a custom LLM execution environment on Windows using an AWS EC2 g4dn.xlarge instance and Ollama.
- Choosing the right instance is crucial (g4dn offers excellent cost-performance).
- Manual installation of the GPU driver is necessary.
- With Ollama, managing models and providing APIs is very simple.
- Don't forget to configure security groups and the firewall.
Thanks to the GPU, we achieved very responsive answers. Although the initial model loading takes time, once it's loaded, it runs smoothly. I hope this article serves as a helpful reference for your LLM environment setup.