Evaluate Test Adequacy Using Mutation Testing Techniques
Back to TopTo reach a broader audience, this article has been translated from Japanese.
You can find the original version here.
This is the Day 3 article for the Mamezou Developer Site Advent Calendar 2024.
In a previous article, I briefly introduced mutation testing, but I didn’t delve into specific methods. This time, I’ll incorporate mutation testing into a Java development project using the “common sample app” I’ve used before[1].
For mutation testing tools in Java, there have been research-oriented tools like μJava in the past, but recently, PIT, also known as PiTest[2], seems to be actively developed, so I’ll use this tool.
The code samples for this article are available in the GitLab repository, so feel free to check them out if you’re interested.
Development Scenario Assumptions
#The “common sample app” from the other article faced a roadblock when seeking release approval. The quality assurance department raised concerns, saying, “If such flaky behavior has been identified, shouldn’t the adequacy of the tests be rigorously evaluated?”
Thus, I decided to evaluate whether the tests are robust enough to detect incorrect implementations. This involves a quantitative robustness evaluation using so-called “mutation coverage.”
What is Mutation Testing?
#Mutation testing is an approach that evaluates whether the tests being conducted are valid, rather than evaluating the target of the tests.
Consider testing the commonly used “FizzBuzz check[3]” in sample programs. How many patterns would you need to verify to say the tests are sufficient?
To confidently state that “it’s complete and problem-free under any assumption,” you would need to verify all possible input patterns, which is, of course, unrealistic. Instead, a theoretical approach is often taken, such as “confirming Fizz with 6 as a representative of multiples of 3 like 3, 6, 9...”[4].
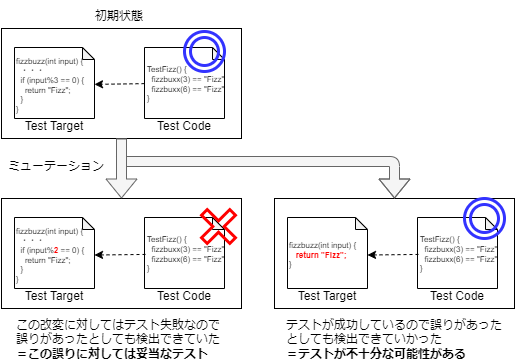
Mutation testing evaluates the adequacy of tests by assessing whether they can detect errors in the program. For example, if a program mistakenly divides by 2 instead of 3 and returns Fizz for divisible cases, then “6 would correctly return Fizz, but 9 would not,” indicating that the tests might be inadequate[5].
To induce “incorrect program behavior,” tools are used to mechanically alter the program’s behavior. If the tests fail when run on the altered program, it indicates that the tests could detect the error. By testing against various alterations, as shown in the diagram below (※), you can gather information on potential errors (alterations) that the tests might miss.
※: As you might expect, this is just a conceptual diagram, so the code in the diagram is pseudo-code and won’t work correctly.
Introducing PIT (PiTest)
#PiTest is available as a standalone command-line tool, but it also provides plugins[6] for build tools like Ant, Maven, and Gradle.
The “common sample app” I’m developing uses Gradle as its build tool, so I’ll use this plugin. The plugin handles basic settings, but if you’re using JUnit5 for your testing framework, you’ll need to configure the Gradle pitest task to use JUnit5.
If you’re not specifying detailed conditions, you can enable PiTest by simply adding the following plugin settings to your build.gradle:
plugins {
    id 'java-library'
    ...
    // Add PiTest plugin to Gradle settings
    id 'info.solidsoft.pitest' version '1.15.0'
}

pitest {
    // Specify JUnit5 plugin for the pitest task if using JUnit5 for test code
    junit5PluginVersion = '1.1.2'    // or 0.15 for PIT <1.9.0
    // Add additional settings as needed
}
With the Gradle plugin, a pitest task is added to Gradle. Running this task executes mutation testing according to the configuration and outputs the results in a report under the Gradle build output directory (build/reports/pitest).
PiTest claims to work well with popular mocking frameworks, and at least within the scope of this sample app, it seems compatible with other testing tools like Allure and Pact.
Evaluating Results and Strengthening Tests
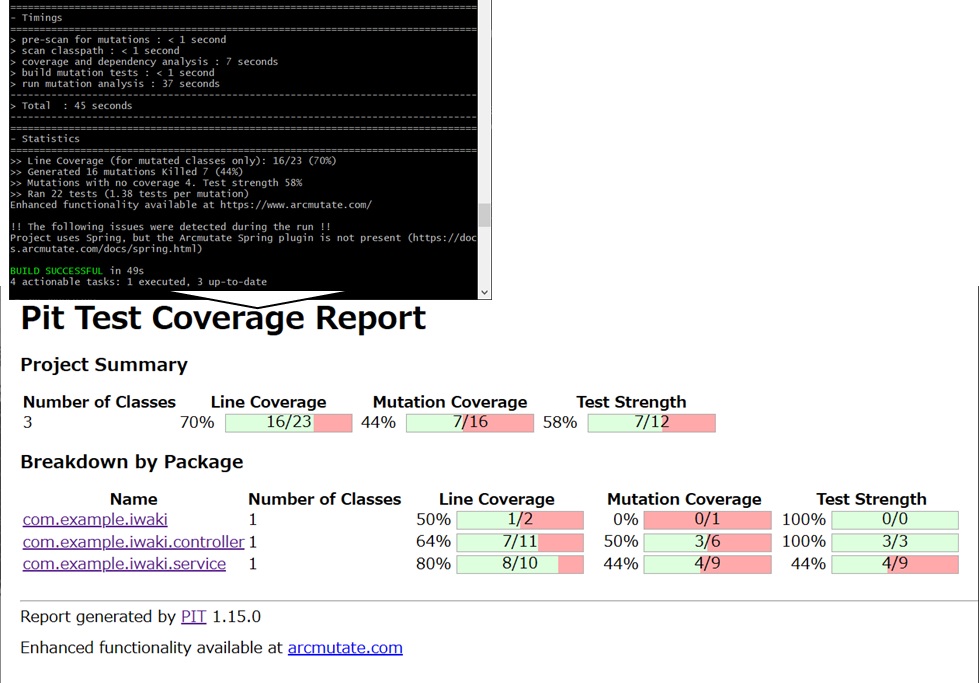
#The report provides a summary of the mutation testing results, and you can drill down into the details for each package/class under test.
Summary Information:
- Line Coverage: The extent to which conditions and branches in the code are covered by the tests (standard line coverage).
- Mutation Coverage: The extent to which the mutations (alterations) introduced by the tool were detected (KILLED) as test failures.
- Test Strength: The estimated ability of the executed tests to detect mutations[7].
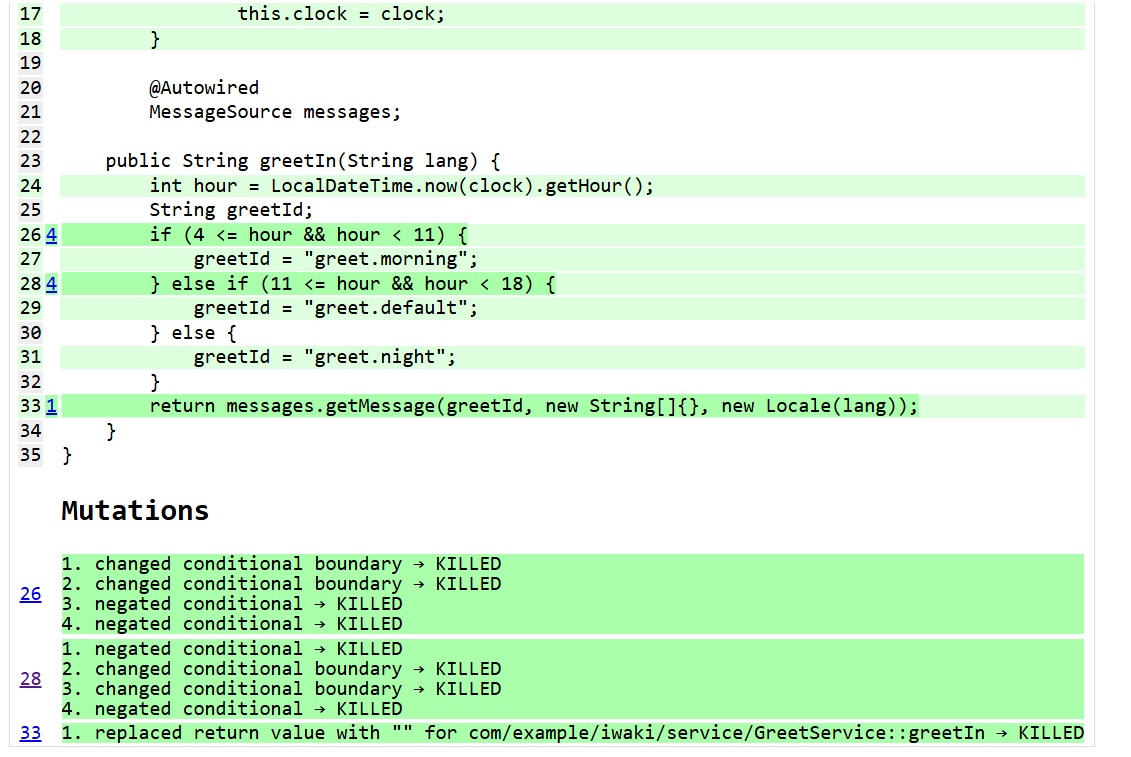
Detailed Information:
- Light green/red-highlighted code: Lines covered/not covered by tests (standard line coverage).
- Dark green/red-highlighted code: Lines where mutations were KILLED/not KILLED.
- Mutation Details: Information on the type of mutation and its result for each mutation point.
For example, the above results show that for the conditional branch on line 26 (if (4 <= hour && hour < 11)), 3 out of 4 mutants (boundary changes like 4 < hour or hour <= 11 and condition inversions like 4 > hour or hour >= 11) were not detected. This suggests that the related tests are inadequate to detect errors if they occur.
Checking the corresponding test code confirms that only one case of a normal greeting is tested. In this state, there’s a risk of missing errors in the future, so it would be better to strengthen the tests near the boundaries of the conditions.
By focusing on boundary values for these mutations and strengthening the tests, mutation coverage improves. Coincidentally, this example highlights areas where “equivalence partitioning” and “boundary value analysis” were insufficient, leading to their identification and improvement. This should make it easier to confidently tell the quality assurance team, “The tests are adequate!!”
Conclusion
#I’ve briefly introduced the concept of mutation testing and how to use the testing tool PIT (PiTest). Despite its relatively low introduction cost, it provides valuable insights into test quality. Isn’t it a promising technology?
I hope to introduce effective ways to integrate it into development in the future.
Yes, I apologize. Initially, I planned to write this article after another one, but I got caught up in being busy and ended up talking about how “mutation testing is useful” in a separate article without properly following up. I’d like to address it properly now instead of leaving it hanging forever. ↩︎
When spoken aloud, the name might make you wonder, “Why use that for Java?” It seems to have coincidentally ended up with a name similar to PyTest but is unrelated. According to its origin story, it started as a project aimed at running JUnit tests in parallel and isolated (Parallel isolated Test), and the naming reflects its expansion into other technologies requiring parallel execution (such as mutation testing). Since it’s an acronym, it might even be pronounced as “Pit Test.” ↩︎
Just to clarify, the assumption here is a program that takes a numerical input and returns Fizz if divisible by 3, Buzz if divisible by 5, FizzBuzz if divisible by both, and the input number otherwise. FizzBuzz is said to be a word game played for fun in English-speaking countries, but I’ve never played it myself, so I can’t say whether it’s entertaining. ↩︎
This is the approach of demonstrating test adequacy by showing that the tests are designed appropriately. Personally, I love this method, but sometimes I find it challenging to ensure the other party fully understands the design to validate its adequacy. (That discussion, however, can improve the quality of the tests, so it’s a positive thing.) ↩︎
Please note that this doesn’t mean you should test with both 6 and 9. The idea is to evaluate whether the tests as a whole can detect errors when they occur, thereby assessing their adequacy. ↩︎
According to the official documentation, only the Gradle plugin is provided by a third party. While its recent update frequency seems a bit slow, there don’t appear to be significant changes in PiTest itself, so it should be usable without major issues. There’s also a paid version called arcmutate with additional features, but I’ll set that aside for now. ↩︎
Based on my research, I couldn’t find an exact definition in the official documentation, but analyzing the results suggests that it represents “number of mutations KILLED by tests” / “number of mutations tested.” The difference from Mutation Coverage seems to be that the latter includes cases where mutations are not covered by tests at all, making Test Strength more focused on evaluating the executed tests. ↩︎


