Introducing the NewSQL Distributed Database TiDB with Hands-on
Back to TopTo reach a broader audience, this article has been translated from Japanese.
You can find the original version here.
This article is the 8th day of the Summer Relay Series 2024.
Introduction
#Hello, I'm Yamashita from the Business Solutions Division.
When you hear the term distributed database, you might think it sounds difficult, cumbersome to manage, or impressive. In this article, I aim to dispel all those images except the last one by introducing TiDB, a NewSQL distributed database system. By the way, Ti is pronounced "Tai."
What is TiDB?
#TiDB is an open-source database management system developed by PingCAP as a distributed NewSQL. It is almost entirely compatible with the MySQL SQL protocol, balancing scalability and consistency.
PingCAP's Github page is here.
The repositories related to tools are under the Apache License 2.0 (as of August 1, 2024, some are under the MIT License).
TiDB itself is a collection of multiple services, so it is not in a single repository[1].
The implementation is written in Go and Rust.
Features of TiDB
#The features of TiDB often include the following:
-
Strong Consistency:
Supports distributed transactions, allowing for complex transaction processing. -
Horizontal Scalability:
Easily scales out by adding nodes and supports write scale-out. -
Availability:
Adopts a high-availability architecture, allowing continuous service provision even in the event of a failure. It can also recover with minimal downtime without requiring complex operations. -
Support for Analytical Processing:
Includes columnar storage, allowing efficient analytical processing. It can perform analytical processing (OLAP) in parallel with transaction processing (OLTP). -
MySQL Compatibility:
TiDB is compatible with the MySQL protocol and can communicate with MySQL clients. Therefore, if you are using MySQL in your existing database, you can migrate almost as is.
Introduction to TiDB Architecture
#Here, I will explain the architecture of the entire distributed system.
Below is the TiDB architecture diagram[2].
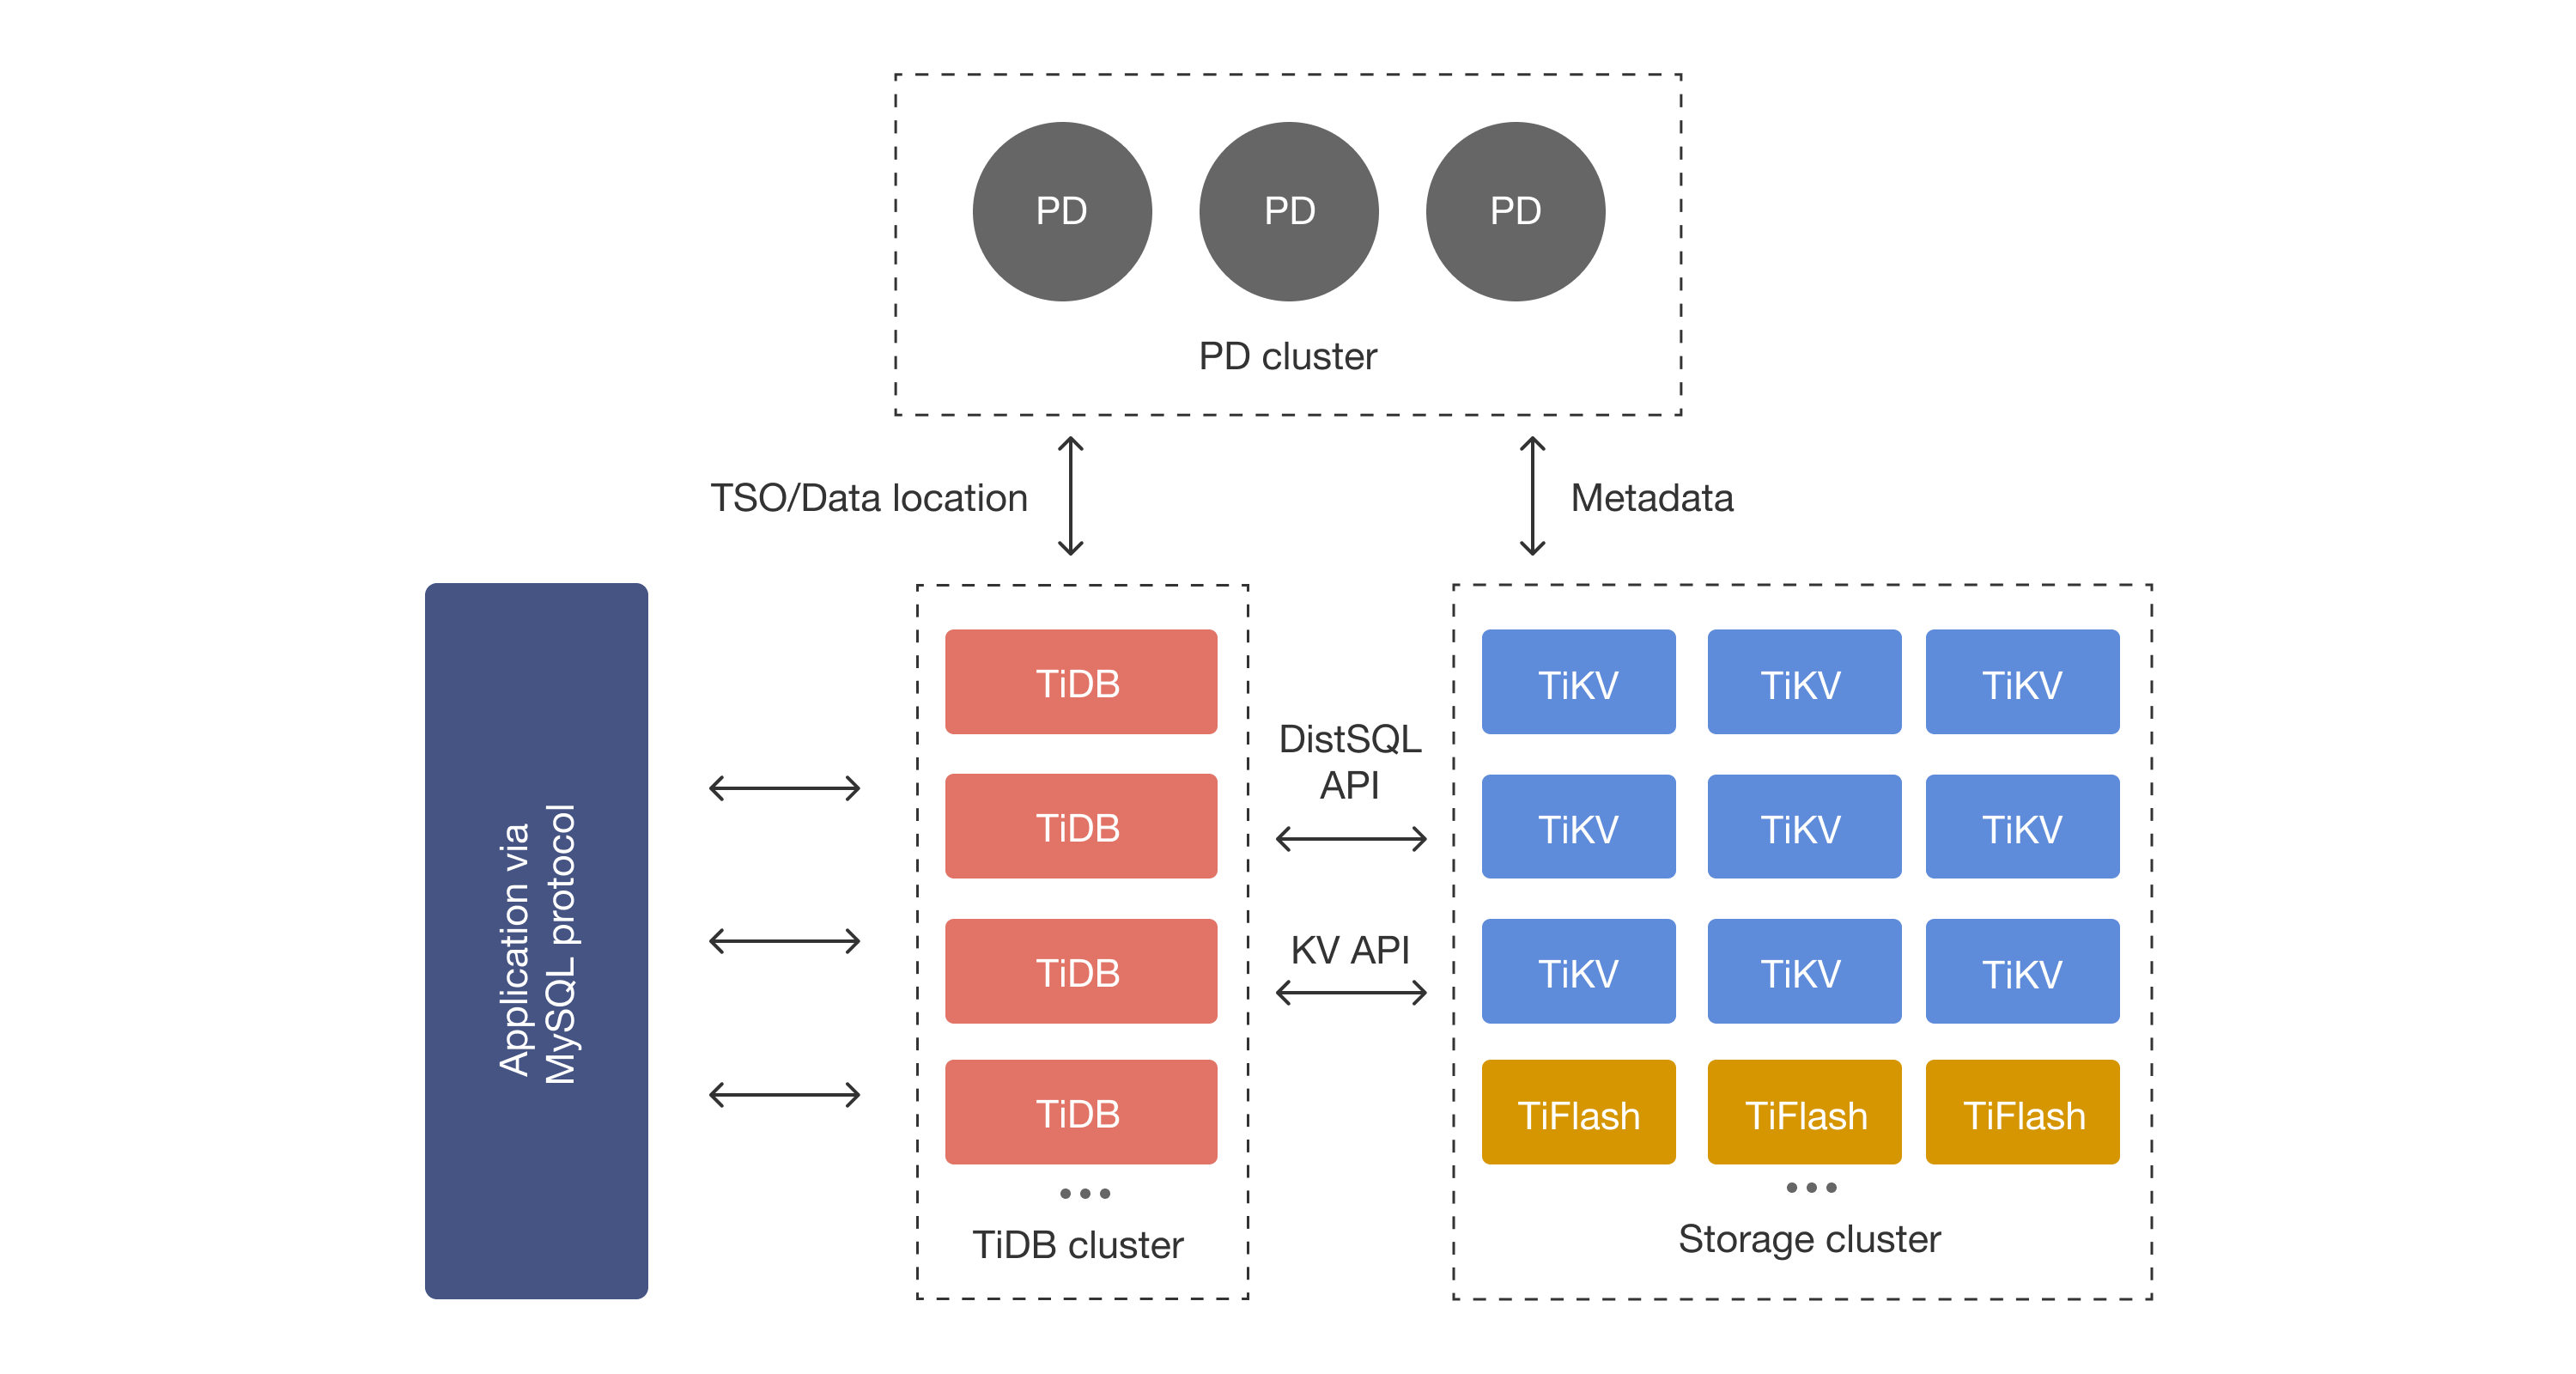
The configuration of TiDB is very simple, as follows:
- TiDB Cluster (Cluster that interacts directly with MySQL clients)
- Storage Cluster
- Placement Driver Cluster
As long as you have the above basics in mind, you can execute the hands-on without any issues. If you want to try it as soon as possible, feel free to skip to the Hands-on.
1. TiDB Cluster
#The TiDB Cluster is a cluster that accepts SQL from client services.
1.1. TiDB
#The TiDB Cluster includes TiDB nodes. TiDB nodes serve as the gateway, accepting SQL requests from clients.
The actual storage layer of TiDB is essentially a large key-value map. TiDB nodes accept SQL from clients and convert it into queries against the key-value map.
The SQL Parser used in TiDB is also open-source. Although TiDB claims MySQL compatibility, if you want to know which functions are supported, please check the following repository (the parser itself is parser.y).
Like other DBMSs, TiDB parses SQL statements and converts them into physical execution plans, referring to statistical information. As of August 2024, execution plans are determined based on what is known as the System R model.
For more details, please check the following links.
2. Storage Cluster
#Nodes belonging to the Storage Cluster include TiKV and TiFlash.
2.1. TiKV
#TiKV functions as a distributed key-value store, serving as a large map storage. TiKV nodes synchronize data using a distributed consensus algorithm called the Raft algorithm.
The Raft algorithm has the concept of Leader and Follower, where the Follower follows the Leader's values. It is a type of distributed consensus algorithm, where the Leader and Follower dynamically switch roles based on the situation, synchronizing the information held by each node.
Here are some reference pages:
TiKV does not store Key Value data directly in storage. It manages data using a storage engine called RocksDB, which is based on an LSM tree.
Not only the data itself but also information related to Raft control is stored in RocksDB. Combined with the aforementioned Raft algorithm, it enables synchronization processes that support both read and write scale-out.
2.2. TiFlash
#While TiKV had a row-oriented storage format, the TiFlash Server has a columnar storage format. The ability to perform transaction processing and analytical processing simultaneously is considered a strength of TiDB according to PingCAP, and this analytical processing is realized by TiFlash.
TiFlash is not independent of the Raft that synchronizes TiKV; it is properly integrated into the Raft algorithm ecosystem. Specifically, it is referred to as a Raft learner.
3. Placement Driver Cluster
#The Placement Driver is a cluster that manages KV nodes.
3.1. PD Server
#Placement Driver (PD) nodes play a central role in cluster management in a distributed system and are crucial in TiDB.
PD nodes manage the TiKV cluster through the following two main processes:
- Collecting information from the cluster
- Controlling TiKV nodes (including relocation)
The Raft algorithm has Crash-Recovery tolerance but not Byzantine tolerance, as shown in the previous Qiita article.
In other words, it cannot handle situations where a node starts behaving erratically, such as removing itself from the schedule. Therefore, a mechanism to strictly manage the behavior of KV nodes is necessary.
Here are some reference links:
Let's Experience TiDB
#1. About tiup playground
#There is a suite of software called tiup for deploying these TiDB clusters on computing resources. The tiup playground included in this toolset is a demo app that allows you to deploy TiDB locally easily. Although there are differences from production behavior, we will use this for the demo this time.
The environment used by the author for verification is as follows:
- MacBook Air (Apple M2)
- OS: macOS Ventura ver13.5
- Memory: 16GB
2. Installing tiup
#As of August 2024, you can install tiup with the following command.
curl --proto '=https' --tlsv1.2 -sSf https://tiup-mirrors.pingcap.com/install.sh | sh
At this time, please also add tiup to the PATH.
3. Setting Up the Database
#After confirming that tiup is installed, execute the following command to start the cluster.
tiup playground v6.5.1 --tag demo --db 2 --pd 3 --kv 3 --tiflash 1
If successful, you can start the test cluster.
> tiup playground v6.5.1 --tag demo --db 2 --pd 3  --kv 3 --tiflash 1
Start pd instance:v6.5.1
Start pd instance:v6.5.1
Start pd instance:v6.5.1
Start tikv instance:v6.5.1
Start tikv instance:v6.5.1
Start tikv instance:v6.5.1
Start tidb instance:v6.5.1
Start tidb instance:v6.5.1
Waiting for tidb instances ready
127.0.0.1:58012 ... Done
127.0.0.1:58014 ... Done
Start tiflash instance:v6.5.1
Waiting for tiflash instances ready
127.0.0.1:3930 ... Done

🎉 TiDB Playground Cluster is started, enjoy!

Connect TiDB:    mysql --comments --host 127.0.0.1 --port 58014 -u root
Connect TiDB:    mysql --comments --host 127.0.0.1 --port 58012 -u root
TiDB Dashboard:  http://127.0.0.1:58007/dashboard
Grafana:         http://127.0.0.1:59401
Prepare another terminal separate from the one where you started tiup playground, and if you can access the output ports (in this case, 58012 or 58014), the cluster start is successful.
> mysql -u root -P 58014 -h 127.0.0.1
Welcome to the MySQL monitor.  Commands end with ; or \g.
Your MySQL connection id is 415
Server version: 5.7.25-TiDB-v6.5.1 TiDB Server (Apache License 2.0) Community Edition, MySQL 5.7 compatible

Copyright (c) 2000, 2024, Oracle and/or its affiliates.

Oracle is a registered trademark of Oracle Corporation and/or its
affiliates. Other names may be trademarks of their respective
owners.

Type 'help;' or '\h' for help. Type '\c' to clear the current input statement.

mysql>
Depending on the machine's state (such as the port usage), the cluster startup may fail.
Start tidb instance:v6.5.1
Waiting for tidb instances ready
127.0.0.1:58731 ... Error
127.0.0.1:58733 ... Error
In that case, completely delete the test cluster with the following command, and then execute the startup command again.
tiup clean demo
4. Creating a Test Table
#Let's create a table using your MySQL client.
The DDL is as follows:
-- User privilege settings
CREATE USER IF NOT EXISTS 'newuser'@'%' IDENTIFIED BY 'newpassword';
GRANT ALL PRIVILEGES ON *.* TO 'newuser'@'%';
FLUSH PRIVILEGES;

-- Creating a database
CREATE DATABASE IF NOT EXISTS test;
USE test;

-- Drop the users table if it exists
DROP TABLE IF EXISTS users;

-- Creating the users table
CREATE TABLE users (
    id INT AUTO_INCREMENT PRIMARY KEY,
    name VARCHAR(255) NOT NULL,
    birthday DATE,
    created_at DATETIME NOT NULL DEFAULT CURRENT_TIMESTAMP,
    updated_at DATETIME NOT NULL DEFAULT CURRENT_TIMESTAMP ON UPDATE CURRENT_TIMESTAMP
);
Execute the above SQL in an appropriate manner[3].
mysql -u root -P 58014 -h 127.0.0.1 < sample_ddl.sql
If you can confirm that you can access with the test user and that the database and table have been created, it's OK.
> mysql -u newuser -p  -P 58014 -h 127.0.0.1
Enter password: (Enter "newpassword")
Welcome to the MySQL monitor.  Commands end with ; or \g.
Your MySQL connection id is 419
Server version: 5.7.25-TiDB-v6.5.1 TiDB Server (Apache License 2.0) Community Edition, MySQL 5.7 compatible

Copyright (c) 2000, 2024, Oracle and/or its affiliates.

Oracle is a registered trademark of Oracle Corporation and/or its
affiliates. Other names may be trademarks of their respective
owners.

Type 'help;' or '\h' for help. Type '\c' to clear the current input statement.

mysql> SHOW DATABASES;
+--------------------+
| Database           |
+--------------------+
| INFORMATION_SCHEMA |
| METRICS_SCHEMA     |
| PERFORMANCE_SCHEMA |
| mysql              |
| test               |
+--------------------+
5 rows in set (0.00 sec)
mysql> SHOW TABLES in test;
+----------------+
| Tables_in_test |
+----------------+
| users          |
+----------------+
1 row in set (0.00 sec)
5. Preparing and Executing the Client
#Next, prepare a script to insert data into the table. This time, we have prepared a Python script that automatically inserts data.
The Python version is 3.12.0, and the library versions are as follows:
# requirements.txt
mysql-connector==2.2.9
numpy==2.0.1
python-dotenv==1.0.1
Then, install the libraries[4].
Next, prepare a file with environment variables (the file name is .env) and a Python script[5] (save them in the same hierarchy).
Also, you need to rewrite TIDB_PORT and TIDB_PORT2 in .env to the ones displayed in the output when the cluster is started.
The .env file is as follows:
#.env
TIDB_HOST="localhost"
TIDB_PORT=58014 # Modify as appropriate for your environment
TIDB_PORT2=58012 # Modify as appropriate for your environment
TIDB_PORT3=4002 # dummy
TIDB_USER="newuser"
TIDB_NAME="test"
TIDB_PASSWORD="newpassword"
TIDB_N_PORT= 2
The Python code is as follows:
# tidb_test_client.py
from dotenv import load_dotenv
import uuid
import numpy as np
from mysql.connector import pooling, conversion, Error
import random
from datetime import datetime, timedelta
import time
import os

# Load the .env file
load_dotenv()

# Get environment variables from the .env file
HOST = os.environ.get("TIDB_HOST")
PORT = os.environ.get("TIDB_PORT")
PORT2 = os.environ.get("TIDB_PORT2")
PORT3 = os.environ.get("TIDB_PORT3")
USER = os.environ.get("TIDB_USER")
DB_NAME = os.environ.get("TIDB_NAME")
PASSWORD = os.environ.get("TIDB_PASSWORD")
N_PORT = int(os.environ.get("TIDB_N_PORT"))

NUM_RECORDS = 1_000
CHUNK_SIZE = 100

num_chunks = int(np.ceil(NUM_RECORDS / CHUNK_SIZE))

START_DATE = datetime(1980, 1, 1)
END_DATE = datetime(2024, 1, 1)
WAIT_TIME = 0.1

# Generate a random birthday
def get_random_birthday():
    random_days = random.randint(0, (END_DATE - START_DATE).days)
    birthday = START_DATE + timedelta(days=random_days)
    return birthday

# Create data to insert into SQL
# Generate usernames using random numbers and birthdays using the get_random_birthday function
values = [[str(uuid.uuid4()), get_random_birthday()] for _ in range(NUM_RECORDS)]

# Create database connection settings with port as an argument
def makeDBConfig (port):
    return {
        "host": HOST,
        "port": port,
        "user": USER,
        "database": DB_NAME,
        "password":PASSWORD
    }

# Create a list of connection ports according to N_PORT
DB_PORTS = [PORT, PORT2, PORT3][:N_PORT]

# Create database connection settings for each port
configs = [makeDBConfig(port) for port in DB_PORTS]

# Class to convert Datetime64 type to MySQL DATETIME type
class Datetime64Converter(conversion.MySQLConverter):
    def _timestamp_to_mysql(self, value):
        return value.strftime('%Y-%m-%d %H:%M:%S').encode('utf-8')

# Get a database connection from the config object
def get_connection(config):
    db_pool = pooling.MySQLConnectionPool(**config)
    conn = db_pool.get_connection()
    conn.set_converter_class(Datetime64Converter)
    return conn

# Split the data into chunks and insert each chunk into,```py
# Split the data into chunks and insert each chunk into a randomly selected port
for i, chunk in enumerate(np.array_split(values, num_chunks)):
    data = [tuple(x) for x in chunk]
    while True:
        # Randomly select an integer from 0 to len(configs) - 1
        i_config = random.randint(0, len(configs) - 1)

        # Get the configuration for the randomly selected port
        config = configs[i_config]
        print("----------------------------------")
        print("ACCESSING PORT: ", config["port"])

        try:
            # Connect to the database
            conn = get_connection(config)

            # Insert data into the database
            cursor = conn.cursor()
            sql = "INSERT INTO users (name, birthday) VALUES (%s, %s)"
            cursor.executemany(sql, data)

            # Commit to the database
            conn.commit()

            # Get and display the number of records inserted into the database
            cursor.execute("SELECT COUNT(*) FROM users")
            count = cursor.fetchone()[0]
            print(f"The number of records in the 'users' table: {count}")

            # Close the database connection
            conn.close()
            time.sleep(WAIT_TIME)

            # If the database connection is successful, proceed to the next chunk
            break

        # If an error occurs, try connecting to the next port
        except Error as err:
            print(f"Something went wrong: {err}")
After appropriately modifying the .env file, try running the Python script. If you see output like the following, there should be no issues.
> python tidb_test_client.py
----------------------------------
ACCESSING PORT:  58014
The number of records in the 'users' table: 100
----------------------------------
ACCESSING PORT:  58012
The number of records in the 'users' table: 200
----------------------------------
ACCESSING PORT:  58012
The number of records in the 'users' table: 300

(omitted)

ACCESSING PORT:  58014
The number of records in the 'users' table: 1000
In general, the process is as follows:
- Prepare connection settings and insertion data
- Perform the actual data insertion process
Additionally, the actual data insertion process is handled as follows:
- Randomly specify the TiDB node (actually a port) to connect to
- Execute queries to insert data and retrieve the number of records
- If the connection fails, reselect the connection port
Currently, localhost ports are pseudo-assigned to nodes. Accessing a port associated with TiDB = accessing a TiDB node.
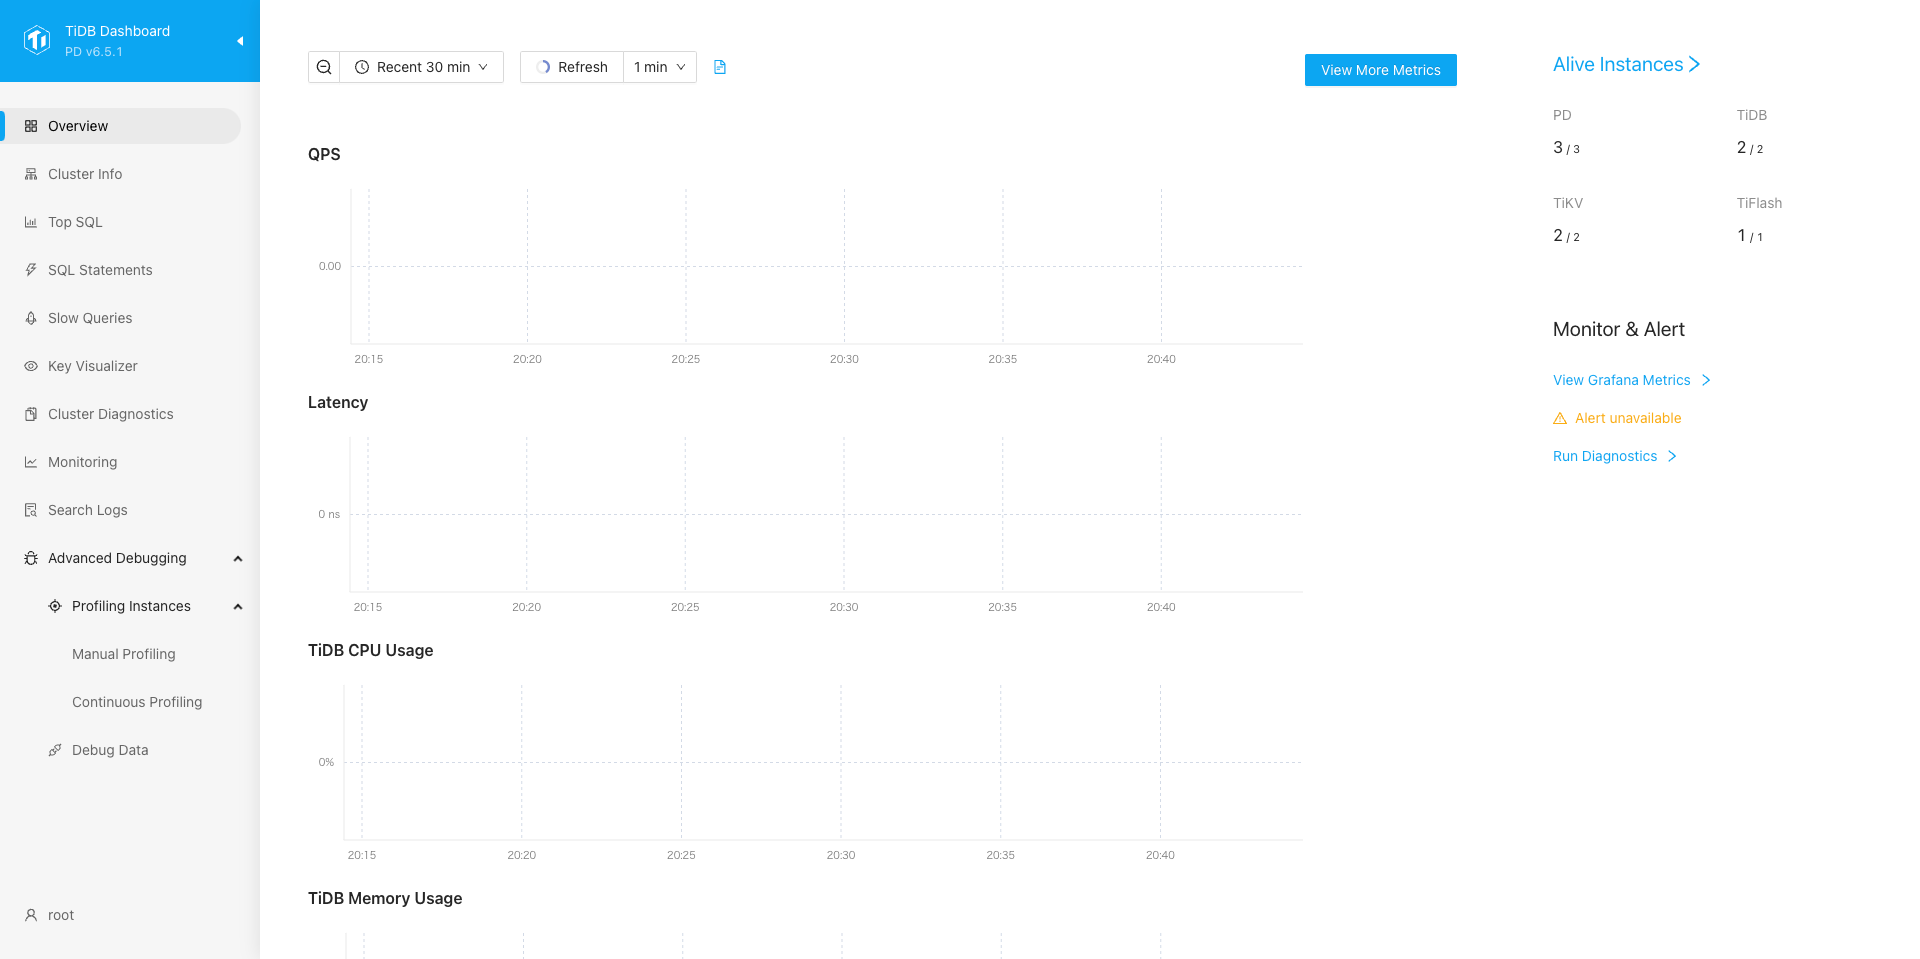
6. Checking the Dashboard
#Here, I will introduce the dashboard feature included in TiDB. When you check the console output where you started tiup playground, you will see a URL for the dashboard like this:
🎉 TiDB Playground Cluster is started, enjoy!

Connect TiDB:    mysql --comments --host 127.0.0.1 --port 58014 -u root
Connect TiDB:    mysql --comments --host 127.0.0.1 --port 58012 -u root
TiDB Dashboard:  http://127.0.0.1:58007/dashboard ← Here!!!!!!!!!!!!!!!
Grafana:         http://127.0.0.1:59401
You can access the dashboard app from the link on this console. You can log in with the username root and no password. The TiDB dashboard allows you to check metrics on the cluster and information such as query history.
7. Scaling TiDB Nodes
#In tiup playground, you can scale nodes with command operations. Please open another terminal again.
Let's try scaling out a TiDB node in the storage cluster.
tiup playground scale-out --db 1
If the creation of the DB node is successful, you will see standard output like the following, and you can confirm the port information of the new DB cluster.
> tiup playground scale-out --db 1
To connect new added TiDB: mysql --comments --host 127.0.0.1 --port 56139 -u root -p (no password)
Check the output result of the tiup playground command to confirm that the DB node has increased.
> tiup playground display
Pid    Role     Uptime
---    ----     ------
43104  pd       45m16.224283625s
43105  pd       45m16.21012975s
43106  pd       45m16.197087458s
43107  tikv     45m16.186158792s
43108  tikv     45m16.172459416s
43109  tikv     45m16.160307916s
43110  tidb     45m16.149157s
43111  tidb     45m16.139087333s
80169  tidb     1m50.744301584s ← Here!!!!!!!!!!!!!!!
43322  tiflash  45m1.901124666s
Next, go back to the .env file and change TIDB_PORT3 to the port number of the new TiDB node and TIDB_N_PORT from 2 to 3.
#.env
TIDB_HOST="localhost"
TIDB_PORT=58014
TIDB_PORT2=58012
TIDB_PORT3=56139 #4002 ← Here!!!!!!!!!!!!!!!
TIDB_N_PORT=3 #2 ← Here!!!!!!!!!!!!!!!
TIDB_USER="newuser"
TIDB_NAME="test"
TIDB_PASSWORD="newpassword"
Now, try running the Python script again, and you should see that you can access the new port.
----------------------------------
ACCESSING PORT:  58012
The number of records in the 'users' table: 1100
----------------------------------
(omitted)
----------------------------------
ACCESSING PORT:  56139
The number of records in the 'users' table: 1700
----------------------------------
(omitted)
In this way, we were able to increase the nodes that interact with the client.
8. Scaling TiKV Nodes
#Now, let's control the TiKV cluster as well.
Similarly, let's scale out a TiKV node in the storage cluster.
tiup playground scale-out --kv 1
Next, scale in the KV cluster. Looking at the output result of tiup playground display, you can see the process ID on the left. Specify the process ID with Role tikv and execute the following command.
tiup playground scale-in --pid 43107
Looking at the output result of tiup playground display, you can see that one cluster (process) has disappeared.
> tiup playground display
Pid    Role     Uptime
---    ----     ------
43104  pd       1h3m11.156905s
43105  pd       1h3m11.142751291s
43106  pd       1h3m11.129707333s ↓ Pid 43107 has disappeared
43108  tikv     1h3m11.105076833s
43109  tikv     1h3m11.092921208s
80382  tikv     11m14.4069426845s
43110  tidb     1h3m11.081761667s
43111  tidb     1h3m11.071691958s
80169  tidb     19m45.676906459s
43322  tiflash  1h2m56.833724875s
Even if you run the previous script, data is inserted without any problems. This confirms that even if you scale in one storage node, you can still interact with the client.
However, due to the nature of the Raft algorithm that synchronizes TiKV, please prepare at least two TiKV nodes. Even with one TiKV node, communication with the client and data persistence is possible (in tiup playground). However, it loses the meaning of distributed storage, so it is not a desirable state.
9. Ending tiup playground
#When you're done, execute the following cleanup command.
tiup clean demo
Since test data is persisted in storage, executing this command will prevent unnecessary storage consumption.
A. Cheat Sheet for tiup playground
#Here is a cheat sheet of the commands that have appeared so far. Note that it assumes that you can start the tiup command with "tiup."
Starting a TiDB Cluster
#tiup playground ${version} --tag ${tag_name} --db ${number_of_DBs} --pd ${number_of_PDs} --kv ${number_of_KVs} --tiflash ${number_of_TiFlashes}
The command executed in this example is as follows:
tiup playground v6.5.1 --tag demo --db 2 --pd 3 --kv 3 --tiflash 1
Displaying Cluster Information
#tiup playground display
Scaling Out the KV Cluster
#tiup playground scale-out --kv 1
Scaling Out the DB Cluster
#tiup playground scale-out --db 1
Scaling In the Cluster
#tiup playground scale-in --pid ${ps_id}
※ Check the process ID with tiup playground display.
Ending the Deployed TiDB Cluster
#tiup clean ${tag_name_used_at_start}
TiDB Execution Environment
#Finally, I will list links to various references on how to deploy clusters more practically.
Using Your Own Machine or VM as a Cluster
#→ Deploy a TiDB Cluster Using TiUP
You can deploy a cluster using a tool called tiup cluster instead of tiup playground.
Using a Kubernetes Execution Environment for Testing
#→ Get Started with TiDB on Kubernetes
TiDB can build a cluster on Kubernetes. The link introduces the procedure when using kind, which can build a test Kubernetes cluster.
Using a Kubernetes Execution Environment on Various Cloud Services
#→ Deploy TiDB on AWS EKS
→ Deploy TiDB on Google Cloud GKE
→ Deploy TiDB on Azure AKS
Using Managed Services
#PingCAP, the developer of TiDB, offers a managed service (DBaaS) called TiDB Cloud. There are two types of TiDB Cloud: a fully managed one that automatically scales and one where you can manage the cluster settings yourself.
If you want to use only what you need without being aware of management:
→ TiDB Serverless
If you don't want to build or manage a cluster environment, but want to decide on cluster settings:
→ TiDB Dedicated
Summary
#This concludes the introduction to the distributed database system TiDB. If you want to know more, please check the official documentation.
There is a repository with the obvious name TiDB, but it is the repository for the TiDB node (in the narrow sense of TiDB) that will be introduced later. ↩︎
Quoted from TiDB Architecture (PingCAP official site) ↩︎
For detailed options, refer to the documentation. ↩︎
There are several ways to install Python libraries. The simplest method is to save the list of libraries in a file called
requirements.txtand install them using the pip command. For details, please check the link. ↩︎As you can see from the code, it is the same as accessing a normal MySQL database engine. ↩︎