I Made a Media Player Because My Wife Said, 'I Want Something That Makes a Warning Sound Since I Had a Scary Experience Leaving the Gas Stove On'
Back to TopTo reach a broader audience, this article has been translated from Japanese.
You can find the original version here.
This article is the second day of the Summer Relay Series 2024.
One day after the Golden Week in May had passed
Me: "I want to go to Akizuki[1] to buy some parts."
Wife: "Ugh, again?"
Me: "Don't you think it would be convenient to turn USB devices on and off from a smartphone using a WIFI module[2]? Don't you have anything you want to do?"
Wife: "Hmm... Oh, speaking of which, I had a scary experience the other day."
Wife: "While cooking, I remembered something else and got distracted, and I forgot that I had turned on the gas stove..."
Me: "What? That's dangerous."
Wife: "I had a scary experience leaving the gas stove on, so I want something that makes a warning sound."
Me: "Isn't that something you can find at a 100 yen shop? Can't a kitchen timer work?"
Wife: "There's nothing like what I have in mind."
Me: "Ah (laughs), you're looking for something with design appeal."
Thus, MY project began.
Although it was mentioned in the conversation, the MY project does not utilize a WIFI module.
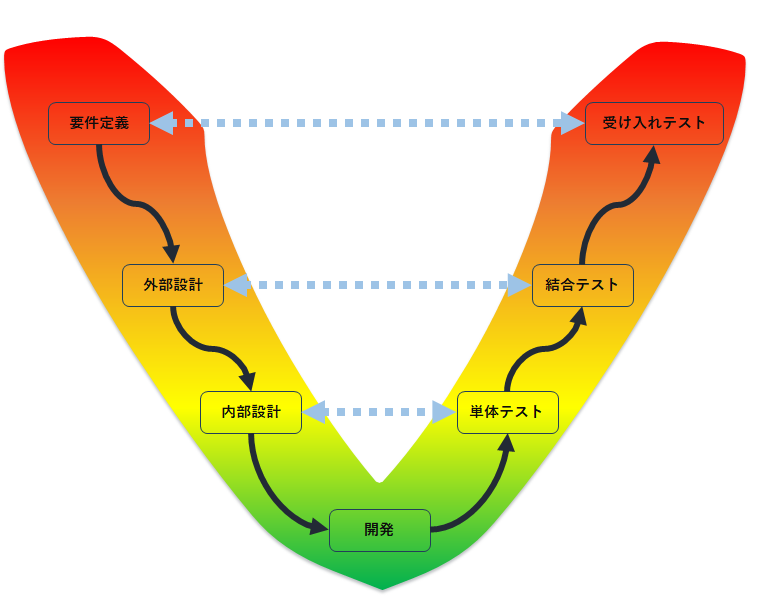
Development Method Using the V-Model
#For MY project, I adopted the V-Model, a method of IT product development. The priority was not to create what I wanted but to understand and create what my wife desired.
| V-Model Tasks | MY Project Tasks |
|---|---|
| Requirement Definition (Demand Analysis) | Hearing requests |
| External Design (Basic Design) | Design concerning exterior and operation |
| Internal Design (Detailed Design) | Design of internal electronic circuits |
| Development (Implementation & Coding) | Fun crafting time |
| Unit Testing | Operation verification and adjustments for each circuit |
| Integration Testing | Overall operation verification and adjustments |
| Acceptance Testing | Getting feedback by having it actually used |
Well, to be honest, the V-Model is a retrospective fit, but this is generally how the process flows when making things. Once work begins, we somehow manage to tackle the next task. Each test confirms and verifies the contents from the requirement definition and design phases.
Hearing Requests
#I started by understanding what kind of device was desired. After asking various questions, I discovered the following requests. The thoughts in parentheses are my inner voice.
- Portable size (of course)
- The sound playback should be turned on/off manually (Isn't it a timer!?)
- Only one song should play (It's a waste to have just one song)
- I want a cute-sounding tone (Okay)
- It would be nice to adjust the volume (I think so too)
- I want to adjust the volume with my left hand (That's quite a preference)
- I won't open it (Does that mean I have to do battery replacements and maintenance?)
- About 1000 yen would be fine (I'm the one paying for it...)
- I prefer an aluminum case instead of plastic (There's no way that can be done for 1000 yen)
- I want something nostalgic and retro (Sounds good)
- Since it will be used in the kitchen, it would be nice if it were waterproof (Probably impossible)
- It should be able to stand vertically or horizontally (Huh?)
- It would be nice to have a ring-shaped hole to hang it with a string (Aren't you going to place it down?)
- I want to try hanging it around my neck like a necklace when going out (laughs)
It seems she is considering various ways to use it. There were a few unexpected requests, but we could somehow share a vision of completion. It seems she is imagining something like a boombox (Sony WALKMAN?).
Design Concerning Exterior and Operation
#Based on the hearing, it seems that a switch to turn the sound ON/OFF and a volume adjustment component would be sufficient. Additionally, a ring for attaching a string is needed.
Consideration of Parts
#The ON/OFF switch will be a toggle switch with an analog feel, and the volume adjustment will also have an analog feel with a knob that allows for continuous volume adjustment.
For music playback, I will use an MP3 module that is compatible with the one I created earlier for the <Christmas Illumination>.
I decided to use a leftover speaker that came with the music playback module. The speaker can be embedded by making a hole in the case, but I was worried about how to embed it.
To hang it with a string, I thought a bolt with a ring-shaped hole would suffice, and I could simply screw it into the case. This would later become a significant challenge.
To keep the power supply as light as possible, I decided to use a single AA battery (1.5V) and boost it from 1.5V to 3.3V (the minimum operating voltage of the MP3 module) using a DC-DC boost converter.
I have gathered basic components such as a circuit board, resistors, capacitors, wiring, spacers, and screws. The case will be a compact aluminum case that can easily be opened and closed.
Additionally, based on previous <reflections>, I decided to connect the case mounting components (ON/OFF switch and speaker) and the circuit board with XH connectors so that the wiring can be detached when opening and closing the case.
Purchase of Parts
#Off to Akizuki. The store is always crowded, and it takes time to find the parts in the cases, so I prepare a parts list in advance. However, I end up buying about half the parts that are different or additional series items.
Parts Purchased at Akizuki
#- AA Battery Holder
- Waterproof Toggle Switch (for Panel)
- ON/OFF Label for Toggle Switch
- Rubber Hood for Toggle Switch (Green)
- 500Ω Small Volume Control with Linear Characteristics (for Panel)
- Aluminum Case
- Aluminum Knob
While the speaker and case have zero waterproof performance, I purchased a waterproof toggle switch (IP67[3]). It can be turned ON/OFF with wet hands without any issues.
I splurged on the aluminum knob. It harmonizes well with the case.
The ON/OFF label and rubber hood serve as nice accents.
Other Parts
#- XH connectors and DC-DC boost converters were purchased in bulk from AliExpress (can't beat the price).
- The MP3 module was purchased on Amazon as a DFPlayer mini compatible device.
- The sound source was purchased from Yamaha's music distribution site, known for the "Yobikomi-kun" sound source ポポーポポポポ♪.
- A microSD card (4GByte) was used from what I had lying around.
- The ring bolt was purchased from Yodobashi.com.
In the nearby supermarket's seafood section, "Yobikomi-kun" was playing ポポーポポポポ♪, and I couldn't help but hum along to the catchy tune that stuck in my head. I had already decided that the music would be ポポーポポポポ♪ from the start.
I searched extensively in Akihabara's parts shops for bolts with a ring-shaped hole but struggled to find what I imagined and eventually found a round ring bolt. I will attach it to the case with two M6 hex nuts.
Design of Internal Electronic Circuits
#The circuit diagram was easily completed by using the music playback module and delay circuit from the <Christmas Illumination Circuit Diagram>.
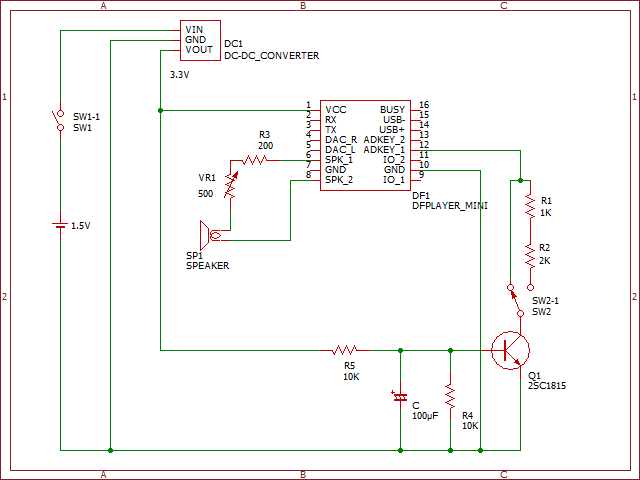
Next, I just need to consider the following installations:
- AA battery holder
- DC-DC boost converter (DC1)
- ON/OFF toggle switch (SW1-1)
- Connect resistor (R3) and variable resistor (VR1) in series to adjust the range to a minimum of N (N: about 100-300) Ω and a maximum of 700Ω.
- A switch (SW2-1) to switch between playing the first song (shorting at 0Ω) or the second song (shorting R1+R2 at 3KΩ).
The speaker (SP1) and ON/OFF toggle switch (SW1-1) will be mounted on the top of the case, while the variable resistor (VR1) and knob will be mounted on the side of the case.
The music that will be played can be switched, with the first song being "ポポーポポポポ♪" and the second song being "ポポーポポポポ♪ 8bit Pico Pico Sound Version." When I asked which one was better, she preferred the first song. Therefore, the switch (SW2-1) is set to the 0Ω side. This switch cannot be changed without opening the case.
Fun Crafting Time
#Finally, it’s time to create the circuit and process the case.
Wiring and Soldering
#I used a breadboard pattern printed with silk[4].
Since the wiring is the same as the breadboard from the start, I can arrange the components on the board just like on a breadboard. However, unlike a breadboard, I want the surface to look neat with only the modules, so I solder the wiring on the back side.
Back of the circuit board
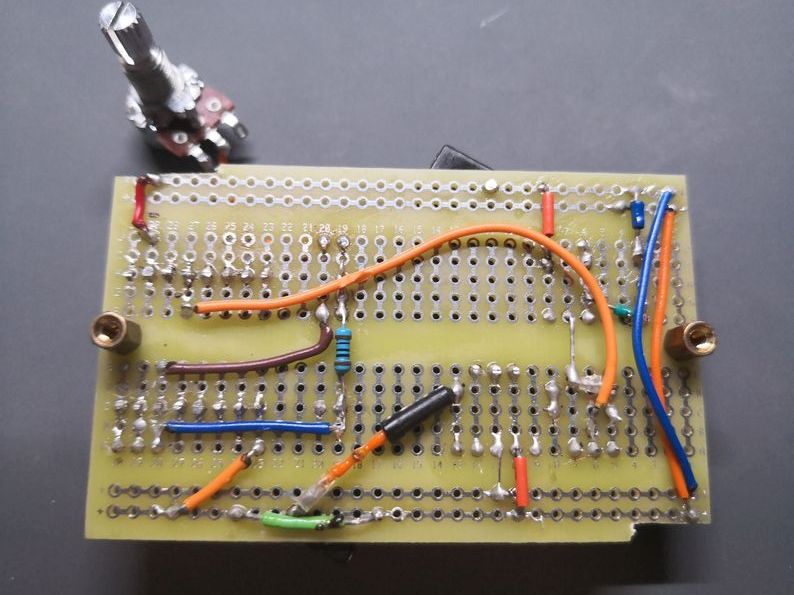
To minimize the number of wires, I cut the patterns in multiple places. Therefore, I arranged the resistors and other components in a layout that cannot be assembled on a breadboard.
Speaker Installation
#The speaker needs to be fixed by making a hole in the aluminum case. Since it has a diameter of about 50mm, I cannot make such a large hole in one go. Therefore, I followed the steps below to make the hole.
- Draw two concentric circles with a compass.
- Make an indentation on the inner circle with a punch.
- Use a power drill to make a small hole at the punch position.
- Use a slightly larger drill to make a hole (without hitting the outer circle).
- Use a file to connect the holes and create a larger hole.
- Smooth the edges around the circle with a file.
- Apply instant adhesive to the speaker and fix it in this hole.
Making the hole
Filing
Storing in the Case
#I made a hole in the back of the aluminum case and secured the circuit board with spacers and screws. It is slightly elevated due to the rubber feet.
The round ring bolt has long legs that hit the MP3 module, so I needed to cut them. I patiently filed them down while applying oil with a jigsaw. This was the most challenging task.
I have significantly abbreviated the component installation process, but what is housed in the case is as follows.
Operation Verification and Adjustments for Each Circuit
#The delay circuit worked without any issues since it was something I had made previously.
The LED light from the MP3 module shines inside the case but is not visible, making it a waste of power.
Since circuits using LEDs are often wired in parallel, I thought that removing the LED would not affect music playback, so I cut it off with a soldering iron. (It was able to play music without the LED.)
For volume adjustment with the knob, I initially set R3 to 100Ω and the variable resistance value from 100Ω to 600Ω. However, at 100Ω, too much current flowed (increasing the volume), which caused power shortages and the music would stop midway, so I changed it to 200Ω.
The song-switching switch (SW2-1) was initially planned to be installed on the side of the case, but it was deemed unnecessary, so it remains housed inside.
The battery is the heaviest component and needs to be centrally located for balance. However, the battery holder was too large to fit, so I laid it out diagonally. This allowed it to fit nicely in the center.
The volume adjustment knob did not fit because it hit the circuit board, so I had to shave a bit off the board.
The ON/OFF switch was right on the edge of hitting the circuit board.
Overall Operation Verification and Adjustments
#I checked the length adjustment of the hemp string, the center of gravity balance when placed vertically and horizontally, cut the front and back blank spaces during music playback, tested vibrations during music playback, and checked how well the ON/OFF switch worked.
Once the circuit board was housed in the case, I could feel a significant increase in durability compared to the wiring on the breadboard. Even if handled somewhat roughly, there was no sign of breaking at all.
Getting Feedback by Having It Actually Used
#Until this article is published, it is still in development, so it has not been delivered yet. It seems she liked the music and appearance, so I have passed the first hurdle.
I am curious whether she will actually hang it around her neck when going out, but I hope she will use it for a long time.
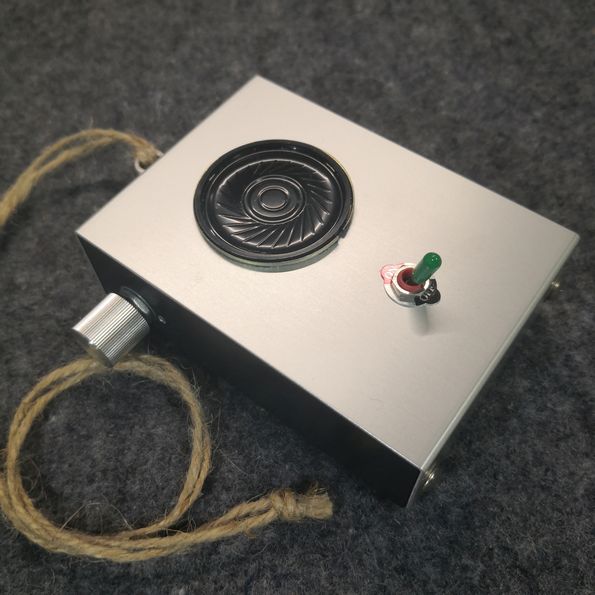
Now, please take a look at the completed product. Please be careful as it makes sound!!
Since she wanted to adjust the volume with her left hand, I set it so that turning it counterclockwise increases the volume.
It seemed that the speaker sounded louder when it was embedded in the case and in a sealed state than when it was bare. Upon investigation, it turns out that sound travels not only from the front of the speaker but also from the back, so when sealed, the air spring effect occurs inside the box, controlling the diaphragm's movement and resulting in sharper sound response.
Finally
#I tried making a media player using the V-Model development method, but in actual work, the process from "requirement definition" to "development" was repeated many times. There are things you can only understand by doing, so it felt like gradually improving. Rather than a typical team effort, it felt more like I was repeating a solo Scrum Sprint. I truly felt that the risk of failure was mitigated.
When it comes to purchasing hobby electronic circuit parts, Akizuki Electronics is the go-to. ↩︎
The ESP32 series is an IoT product that has a built-in WIFI module and web server functionality, making it perfect for smart home devices. ↩︎
IP67 6: No ingress of dust, 7: No effect on the device even if temporarily submerged in water. ↩︎
Guides and part numbers printed on the surface. ↩︎