Debugging Raspberry Pi Pico with Raspberry Pi Debug Probe and Platform IO
Back to TopTo reach a broader audience, this article has been translated from Japanese.
You can find the original version here.
In the previous article, we introduced how to debug an ESP32 development board using ESP-PROG and Platform IO.
This time, I would like to introduce how to debug the Raspberry Pi Pico using a Raspberry Pi Debug Probe and Platform IO.
What is Raspberry Pi Pico?
#The Raspberry Pi series are single-board computers equipped with ARM processors.
The most recently released model is probably the Model 5.
Models 5 and 4 come with HDMI and USB ports, microSD card slots, etc., and can be used as a high-performance single-board computer by installing an OS on a microSD card.
In contrast, the "Raspberry Pi Pico" looks like the following and is closer to embedded development boards like the ESP32 or Arduino Nano.
Appearance of Raspberry Pi Pico
(The photo shows the H type, which is equipped with a JST 3-pin SH connector on the debug terminal and has pin headers pre-soldered)

It may not be suitable for high-performance applications like the Model 5 or Model 4, but the Raspberry Pi Pico (hereafter referred to as "Pico") is cheaper and more suitable for electronic projects. (Reference: Switch Science)
What is a Raspberry Pi Debug Probe?
#Appearance of Raspberry Pi Debug Probe
(The board surrounded by the plastic case in the middle is the debug probe itself)

You can purchase it from Amazon or Switch Science. (I bought it from a cheaper place though)
The Raspberry Pi Debug Probe (hereafter referred to as "Debug Probe") is the "official Raspberry Pi Debug Probe" similar to the ESP-PROG I introduced last time, with two USB serial conversion ports.
It is equipped with a "CMSIS-DAP" debug interface.
CMSIS-DAP seems to be a standard specification for JTAG emulators (debuggers).
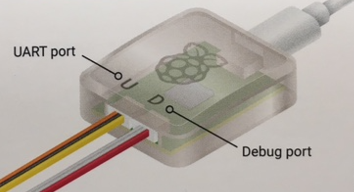
Also, the Debug Probe has a UART serial communication port, so UART communication is also possible.
(Left side is the UART port, the right side is the CMSIS-DAP debug port)
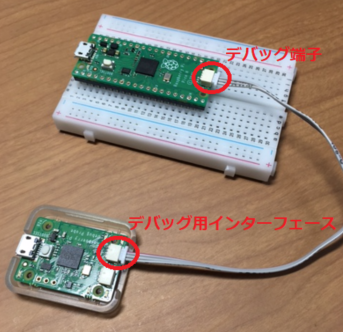
Upon further research, the Debug Probe is based on an application called "picoprobe," and the Debug Probe itself is composed of a Pico.
In fact, this article shows two Picos side by side, using one as a Debug Probe.
Connecting the Raspberry Pi Debug Probe to PC and Raspberry Pi Pico
#This time we will only use the CMSIS-DAP debug port.
Actually, this port alone allows both program upload and debugging.
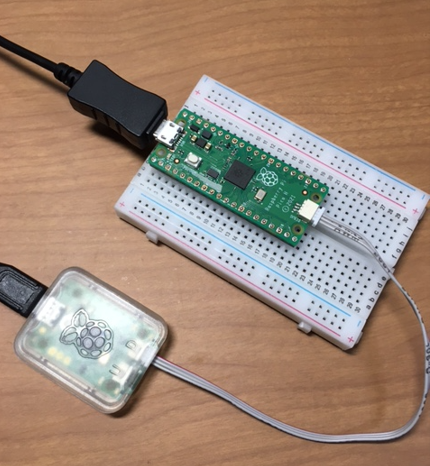
Connect the Debug Probe and Pico with a JST 3-pin SH connector as shown below, and do not connect anything to the UART port side.
Then, connect both microUSB terminals to the PC side.
(The microUSB on the Pico side is used only for power supply. A cable without communication function is OK.)
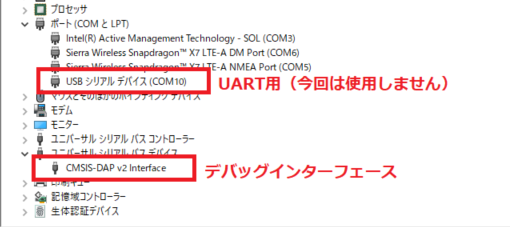
Check the COM port and Serial Bus Device in Device Manager.
You can see that the "CMSIS-DAP v2 interface" is recognized correctly.
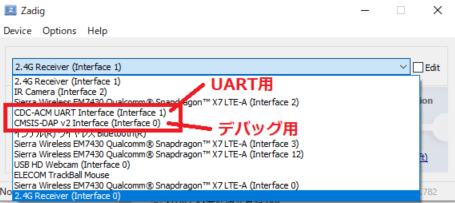
Just in case, let's check the interface with "Zadig" used last time.
Launch Zadig and display the List.
Each interface was confirmed.
(Although the same name interface was displayed in ESP-PROG, the Debug Probe showed different interfaces)
Creating a Sample Project with Platform IO
#As a development environment, we will use "Platform IO (hereafter referred to as PIO)" introduced in the article "Trying IoT (Part 14: OLED Display SSD1306 Edition)".
Let's create a project for Pico.
The project created is as follows.
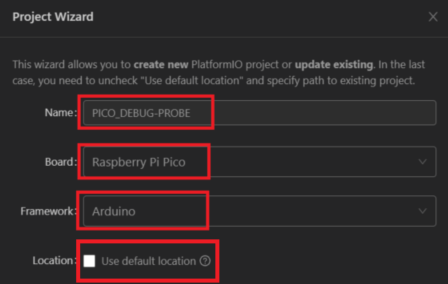
- Project Name: PICO_DEBUG-PROBE
- Board: Raspberry Pi Pico
- Framework: Arduino
- Location: <Do not use the default!>
(※ As last time, the project location was set to "c:/opt/ESP32_ESP-PROG/" instead of the default)
The sample program is a simple one that just blinks an LED.
(Pico has an LED on board that can be controlled by a program)
The sample program is as follows.
#include <Arduino.h>

const int T_DELAY = 1000;

// the setup function runs once when you press reset or power the board
void setup() {
  // initialize digital pin LED_BUILTIN as an output.
  pinMode(LED_BUILTIN, OUTPUT);
}

// the loop function runs over and over again forever
void loop() {
  digitalWrite(LED_BUILTIN, HIGH);   // turn the LED on (HIGH is the voltage level)
  delay(T_DELAY);                    // wait for a second
  digitalWrite(LED_BUILTIN, LOW);    // turn the LED off by making the voltage LOW
  delay(T_DELAY);                    // wait for a second
}
Debugging Settings (platformio.ini)
#This time, we will add some options to platformio.ini to debug with the Debug Probe.
The content of the platformio.ini file was as follows.
[env:pico]
platform = raspberrypi
board = pico
framework = arduino
upload_protocol = cmsis-dap
debug_tool = cmsis-dap
debug_init_break = tbreak setup
build_type = debug
Let's explain the details of platformio.ini.
The following three settings are basic, so there are no particular changes this time.
- platform: When creating a project in PIO and selecting "Raspberry Pi Pico" as the board, "raspberrypi" is set.
- board: The same operation as above sets "pico".
- framework: Since "Arduino" was selected as the development framework, "arduino" is set.
The options added to debug with the Debug Probe are as follows.
- upload_protocol: Specifies "CMSIS-DAP" for program upload from PIO. (※ As mentioned later, for some reason, PIO's upload did not function well)
This is probably the most crucial part of this article.
- debug_tool: Specifies "cmsis-dap".
- debug_init_break: Specifies the function where you want to stop (break) first when executing debug. This time, it is specified to stop at the "setup" function.
- build_type: Specifies "debug" as the build option. Besides debug, it seems that release and test can be specified.
Debugging Settings (Visual Studio Code)
#The debugging settings "launch.json" for Visual Studio Code (hereafter referred to as VSC) will use the default values output by PIO.
(Replace <username> with your own account)
{
    "version": "0.2.0",
    "configurations": [
        {
            "type": "platformio-debug",
            "request": "launch",
            "name": "PIO Debug",
            "executable": "c:/opt/PICO_DEBUG-PROBE/.pio/build/pico/firmware.elf",
            "projectEnvName": "pico",
            "toolchainBinDir": "C:/Users/<username>/.platformio/packages/toolchain-gccarmnoneeabi/bin",
            "internalConsoleOptions": "openOnSessionStart",
            "svdPath": "C:/Users/<username>/.platformio/platforms/raspberrypi/misc/svd/rp2040.svd",
            "preLaunchTask": {
                "type": "PlatformIO",
                "task": "Pre-Debug"
            }
        },
        {
            "type": "platformio-debug",
            "request": "launch",
            "name": "PIO Debug (skip Pre-Debug)",
            "executable": "c:/opt/PICO_DEBUG-PROBE/.pio/build/pico/firmware.elf",
            "projectEnvName": "pico",
            "toolchainBinDir": "C:/Users/<username>/.platformio/packages/toolchain-gccarmnoneeabi/bin",
            "internalConsoleOptions": "openOnSessionStart",
            "svdPath": "C:/Users/<username>/.platformio/platforms/raspberrypi/misc/svd/rp2040.svd"
        },
        {
            "type": "platformio-debug",
            "request": "launch",
            "name": "PIO Debug (without uploading)",
            "executable": "c:/opt/PICO_DEBUG-PROBE/.pio/build/pico/firmware.elf",
            "projectEnvName": "pico",
            "toolchainBinDir": "C:/Users/<username>/.platformio/packages/toolchain-gccarmnoneeabi/bin",
            "internalConsoleOptions": "openOnSessionStart",
            "svdPath": "C:/Users/<username>/.platformio/platforms/raspberrypi/misc/svd/rp2040.svd",
            "loadMode": "manual"
        }
    ]
}
Build, Upload, and Debug
#Build the program with PIO and upload it to Pico.
Here, a problem occurred.
The build finishes normally, but the program upload fails.
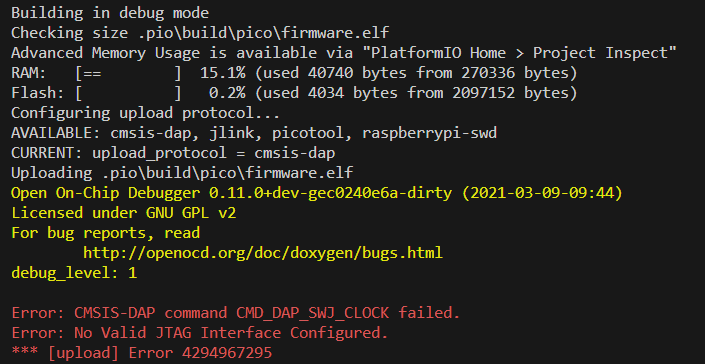
After further research, I couldn't find a solution.
I suspected a version mismatch with OpenOCD and changed the version, but it didn't improve.
PIO's "PIO Debug" seems to automatically execute both "build" and "upload" when starting debugging, so for now, let's run "PIO Debug" from "Run and Debug".
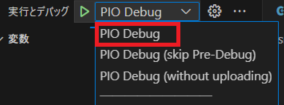
The program is built, uploaded, and the debugger starts, stopping at the "Setup function".
(It feels like the stopping position is slightly different from when using ESP-PROG)
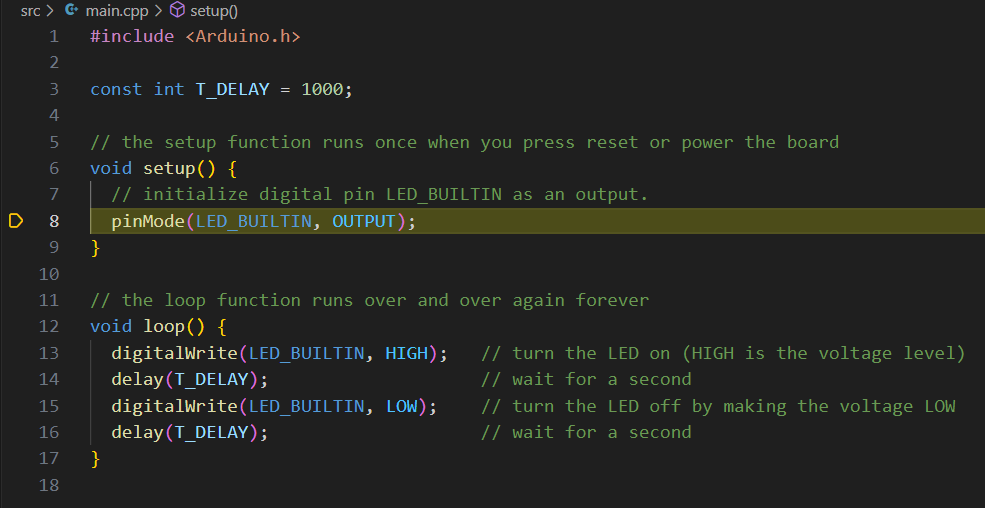
On the "Debug Console" at the bottom right of the screen, you can also see that it stopped inside the 8th line "void setup()" function.

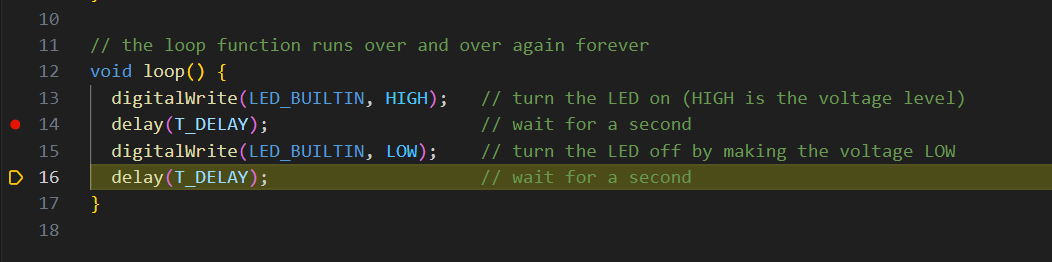
If you continue running, it stops at the set breakpoint.
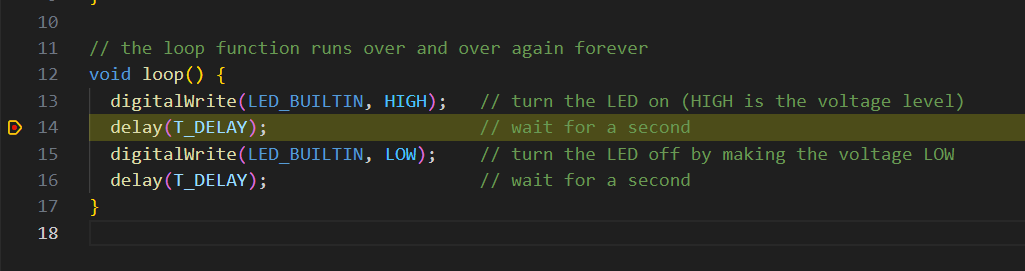
Step execution is also possible.
Uploading Programs from Arduino IDE 2.0
#Although PIO failed to upload the program correctly, it was unclear whether the problem was with the Debug Probe or PIO's settings.
Just in case, let's try uploading the program only from another development environment, "Arduino IDE 2.0".
(The installation method for Arduino IDE is omitted)
The program code is exactly the same.
Set the Arduino IDE as follows.
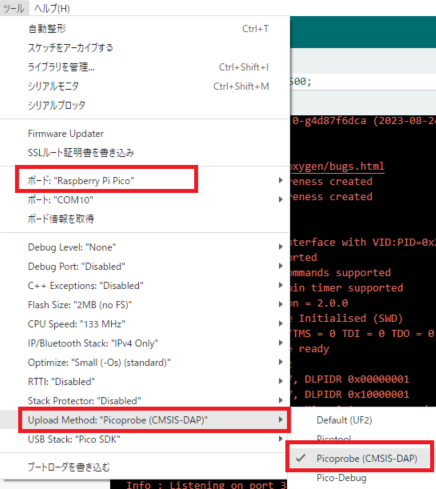
- Board: "Raspberry Pi Pico"
- Port: <Not necessary to select since it's not used>
- Upload Method: Picoprobe(CMSIS-DAP)
By specifying "Picoprobe(CMSIS-DAP)" as the Upload Method, you can upload the program via the Debug Probe.
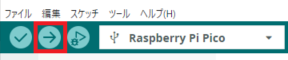
Press the "Upload" button to write the program to Pico.
The program was successfully written to Pico.
(The text appears red, which seems like an error, but the message indicates that the writing was completed successfully)
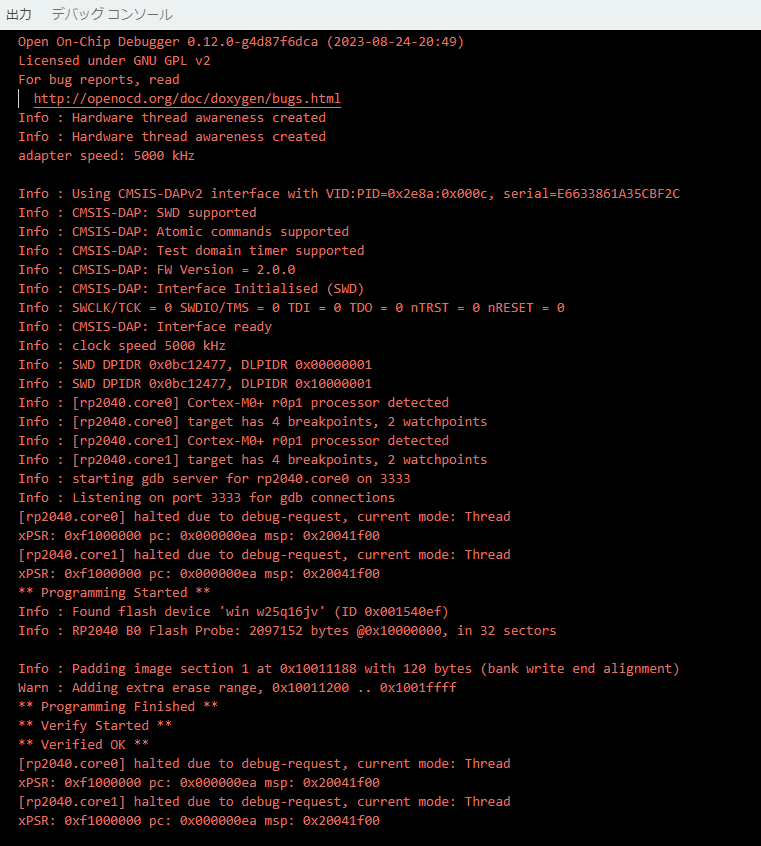
It seems that the Debug Probe is working correctly.
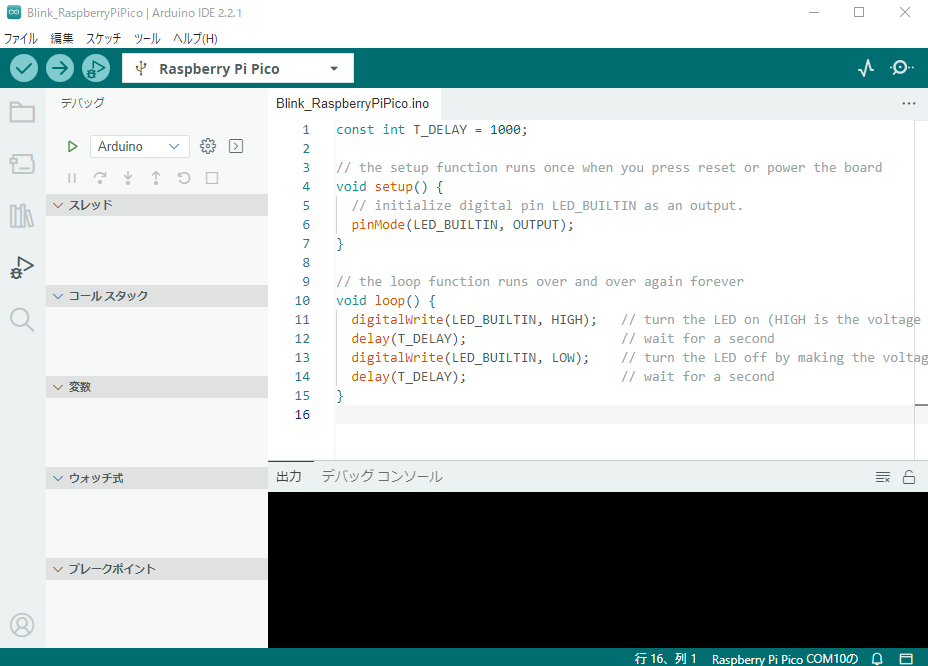
Actually, Arduino IDE version 2.0 and later can also perform debugging.
However, I feel that the code completion and other features are "not quite there," so I still prefer to use PIO. (It's more about VSC than PIO)
For now, since I can debug and write programs with PIO, I will continue to use PIO as my main tool, and if the problem with program uploads is resolved, I will report back.
Summary
#This time, we were able to debug the Raspberry Pi Pico program from VSC (Platform IO) using the Raspberry Pi Debug Probe.
Although there was a problem with the program not being uploaded correctly, I think there was some success.