How to Configure Agents and Instructions in GitHub Copilot
Back to TopTo reach a broader audience, this article has been translated from Japanese.
You can find the original version here.
Introduction
#In this article, we explain how to configure Agents and Instructions for GitHub Copilot.
Agents are a feature that allows you to customize Copilot as a specialist for specific tasks or domains. For example, you can define multiple agents with different expertise—such as for backend development or frontend development—and switch between them as needed. You can assign them to Issues or select them within VS Code.
Instructions are a feature that defines common rules and constraints for Copilot. You can specify coding conventions, naming rules, and project-specific best practices so that all developers receive consistent code-generation guidance. Instructions are used alongside Agents and apply in all scenarios, including coding in VS Code and reviewing Pull Requests.
Order of Application
#Rules are applied in the following order. If there are conflicting rules, the rule with the smaller number takes precedence.
- Selected Agent (e.g.,
agents/backend.agent.md) - Matching Instructions (e.g.,
instructions/typescript.instructions.md← matching the applyTo pattern) - Overall Instructions (
copilot-instructions.md)
File Placement
#Arrange your files like this so that GitHub Copilot can recognize them:
.github/agents/xxx.agent.md: Agent files defined for specific domains (roles, etc.), e.g., backend, frontend, test
copilot-instructions.md: File defining rules and constraints that apply globallyinstructions/xxx.instructions.md: Files defined for specific technologies (e.g., typescript, python, react). Note: You might want to organize them into subfolders, but if you do, they will not be loaded.
About AGENTS.md
The .github/AGENTS.md file (directly under the directory) is for GitHub CLI. Please note that it is not loaded in VS Code. In VS Code, only *.agent.md files within the agents/ directory are effective.
Placement in a Workspace
When using VS Code with multiple repositories open (working on multiple repos simultaneously), you need to place the configuration files in the .github/ directory at the workspace root. If you want to use separate settings for each repository, open each repository in a separate VS Code window.
.github/agents/sample.agent.md: Displays as selectable when placed at the workspace rootrepo-A/.github/agents/sample.agent.md: Agents under individual repositories are not loadedrepo-B/.github/agents/sample.agent.md
Purpose of the Header Section
#Here are some of the properties you can set in the header of your definition files.
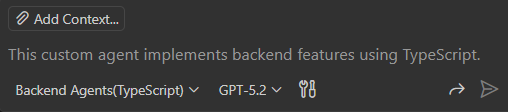
Agents
---
name: Backend Agents(TypeScript)
description: This custom agent implements backend features using TypeScript.
model: GPT-5.2
---
※ Agent selection screen (VS Code)
| Property | When Set | When Unset |
|---|---|---|
| name | Used as the agent name | Uses the filename (without extension) as the agent name |
| description | Used as the agent description | Blank |
| model | Specifies the AI model to use | Default model |
Instructions
---
applyTo: "src/**/*.ts" # e.g. targeting ts files under src
---
| Property | When Set | When Unset |
|---|---|---|
| applyTo | Specifies the file patterns to apply the instruction (glob pattern) | Applies to all files |
Examples of applyTo specifications
**/*.ts- All TypeScript filessrc/**- All files under the src directory**/*.{js,ts}- JavaScript and TypeScript files
Definition Examples
#Below are examples of agent and instruction definitions. By combining these, you can tailor Copilot’s behavior to your project or tasks.
Agent: Backend Developer
#---
name: Backend Developer Agent
description: Expert in backend development using NestJS
---
# Role
You are an expert in backend development using NestJS and TypeScript.
# Tech Stack
- **Framework**: NestJS 11.x
- **Language**: TypeScript 5.x
- **Database**: PostgreSQL
- **ORM**: TypeORM
- **Testing**: Jest
# Coding Conventions
- Adhere to the hexagonal architecture.
- Always add validation decorators to DTOs.
- Use custom exceptions that return appropriate HTTP status codes for exception handling.
# Testing Policy
- Write unit tests for all Service classes.
- Aim for a test coverage of over 80%.
``` ````
### Overall Instructions: Project-wide Conventions
```md: .github/copilot-instructions.md
# Coding Conventions
## Common Rules
- **Language**: Write comments and documentation in Japanese
- **Naming Convention**:
- Class names: PascalCase
- Function and variable names: camelCase
- Constants: UPPER_SNAKE_CASE
- **Indentation**: 2 spaces
- **Strings**: Use single quotes
## Prohibited Items
- Use of `any` type is generally prohibited (define types appropriately)
- Committing `console.log` statements is prohibited (use a logger)
- Hardcoding sensitive information is strictly forbidden
## Security
- Always validate external input
- Implement measures against SQL injection
- Apply guards to endpoints that require authentication and authorization
```
### Domain-specific Instructions: TypeScript-specific Rules
````md: .github/instructions/typescript.instructions.md
---
applyTo: "**/*.ts"
---
# TypeScript-specific Rules
## Naming Convention
- File names: kebab-case
## Type Definitions
- Prefer explicit type annotations
- Utilize Utility Types (`Partial`, `Pick`, `Omit`, etc.)
- Define complex types using `type` aliases
```typescript
// Good
type UserProfile = {
id: string;
name: string;
email: string;
};
type UserProfileUpdate = Partial<Pick<UserProfile, 'name' | 'email'>>;
// Bad
const updateUser = (data: any) => { ... };
```
## Asynchronous Processing
- Use `async/await` (avoid Promise chains)
- Handle errors using `try-catch`
## Import Order
1. External libraries
2. Internal modules (absolute paths)
3. Relative paths
```typescript
// External libraries
import { Injectable } from '@nestjs/common';
import { Repository } from 'typeorm';
// Internal modules
import { UserEntity } from '@/entities/user.entity';
import { CreateUserDto } from '@/dto/create-user.dto';
// Relative paths
import { UserService } from './user.service';
```
Operational Notes
#Cache Management in VS Code
#When you modify agent or instruction files, the initially loaded content is cached. To apply the changes, you need to do one of the following:
- Specify the modified file in the chat and prompt for reload (e.g.,
sample.agent.md has been modified, please reload) - Start a new chat
- Restart VS Code
File Size Limit on GitHub
#If an agent file exceeds 30,000 characters (not bytes, excluding the header section), it cannot be selected. Please split the file into appropriate granularity.
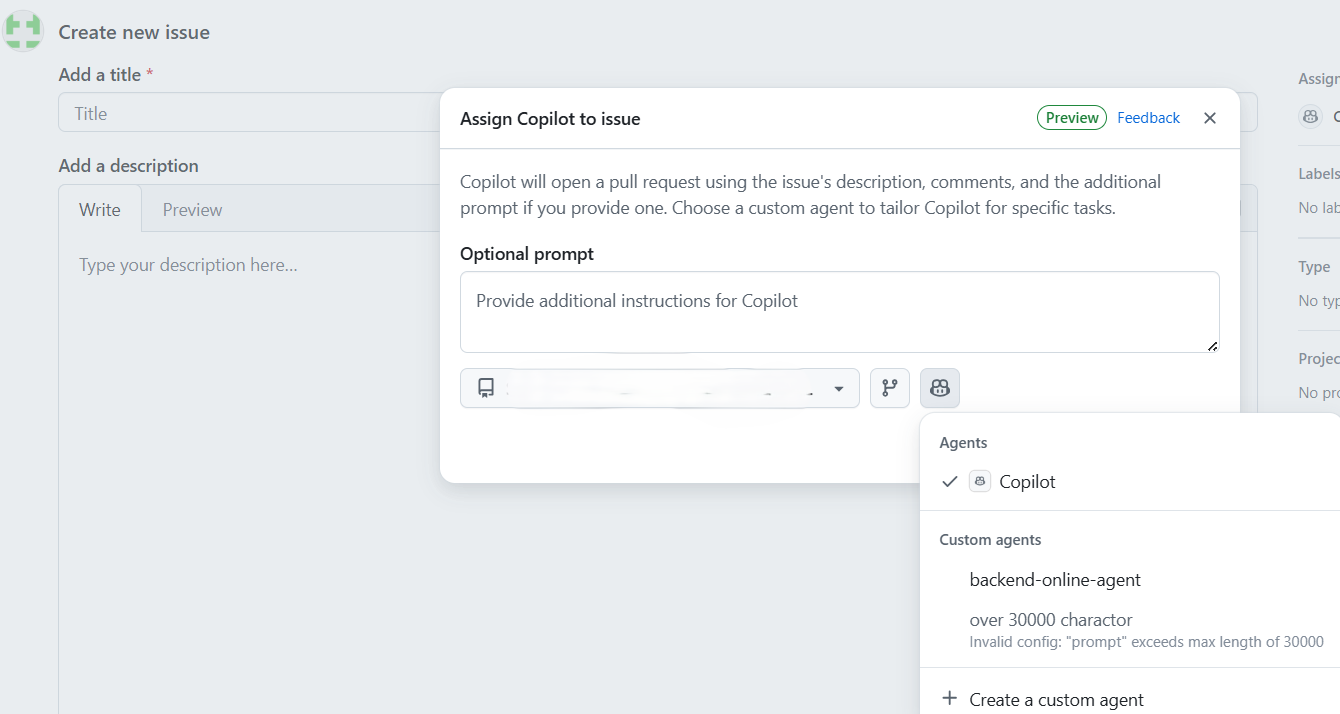
Dialog displayed after assigning Copilot in a GitHub Issue