Even Newcomers Don't Need to Be Afraid! Command Operations Explanation to Avoid Panic with Git: Stash, Conflict Resolution, and Undoing Merges
Back to TopTo reach a broader audience, this article has been translated from Japanese.
You can find the original version here.
I joined the company last year as a new employee, and my name is Tsukano.
This time, as an article for newcomers, I would like to explain the solutions and mechanisms for each situation where you might think, "What should I do in this case?" regarding Git, which I stumbled upon last year.
Git is a very convenient version control tool and is probably introduced in many workplaces, but for me as a newcomer, it was full of mysterious spells, and I was worried about "accidentally overwriting data" and "Git is angry, but I don't understand what it's saying."
However, Git is not a scary tool if you understand how to use it. Git is a friend, not scary.
Introduction
#Since I didn't even know what Git was when I joined as a newcomer, I learned the basics from Monkey Sensei's Git Tutorial.
It's the famous Git tutorial known as Monkey Git. By reading the introductory part first, you can learn about what Git is and the basic operations used in Git, such as pull and push.
To read this article, understanding the introductory part and branches of Monkey Git should be sufficient.
The basic concepts and command-line operations of Git are detailed in the book Practical Git published by O'Reilly. I referred to this Practical Git a lot while writing this article. Also, although it's a bit old, this article is also summarized for new employees and might be helpful (Git for New Employees by New Employees).
In this article, we will cover three scenarios where newcomers might panic:
- I forgot to create a branch and edited the main (master) branch...
- I can't merge because of a conflict, what should I do...
- I merged from the working branch to main but want to undo it!
We will explain the solutions for these scenarios. There are various ways to operate Git, such as command-line, GUI tools like TortoiseGit, and IDE operations, but this article will focus on the basic command-line operations. This is because GUI and IDE operations for Git ultimately make command-line operations more convenient, and understanding "what is happening" is best achieved by understanding command-line operations.
"I Forgot to Create/Switch Branches..."
#This is the first panic situation.
First, if you were supposed to create a new working branch from the main branch and work on that branch, but you edited files on the original branch instead. If you haven't committed the changes to the main branch, you can simply create a new branch now.
$ git switch -c <new-branch-name>
…
Create a new branch and switch the current branch to the newly created branch. The point where the branch splits will be from the latest commit of the current branch. By using git switch -c <new-branch-name> <source-branch-name>, you can create a new branch from a branch other than the current one.
On the other hand, if you were supposed to work on an existing working branch but edited files on a different branch... and you want to switch branches while keeping the edited files. Simply switching branches won't work. If you try to switch branches without committing the edited files, the changes will be overwritten by the files in the target branch, resulting in an error and the branch switch will be aborted.
error: Your local changes to the following files would be overwritten by checkout:
        filename causing the issue
Please commit your changes or stash them before you switch branches.
Aborting
If you don't mind overwriting, you can forcibly switch branches with git switch -f <branch-name>, but if not, you can use stash to temporarily save the changes.
$ git stash push -m "Temporarily interrupting the edit of index.html"
…
$ git stash pop
git stash push saves the current changes (both staged and local changes) to the stash stack and rewinds to the latest commit of the current branch. You can add a comment with the -m option when pushing to the stash, which is convenient when you want to use a specific stash from the list. The default option for git stash is push, so push can be omitted.
To restore changes from the stash, use the git stash pop command[1]. This command restores from the last pushed stash in the stash stack.
Additionally, you can specify the index in the stash stack to use a stash other than the top of the stack.
$ git stash list
stash@{0}: On main: Temporarily interrupting the edit of Main.java
stash@{1}: On main: Temporarily interrupting the edit of index.html

$ git stash pop stash@{1}
By the way, the stash is actually a commit (a commit object managed in .git/ref/stash). When restoring to the working directory with the pop command, a merge is performed from this commit. Therefore, if there is a discrepancy between the stashed file and the file in the restore destination, a conflict will occur, and the merge will be interrupted just like a branch merge. Conflict resolution will be explained in the next section.
"There's a Conflict..."
#This is the second panic situation. I think this is the most panicking situation for newcomers.
A conflict occurs when there is a discrepancy in the changes between the branch being merged and the branch being merged into. In this case, Git does not automatically adopt one or the other but leaves the resolution to the developer. This is conflict resolution, and once you understand the procedure, it's not scary.
First, let's explain what happens when a conflict occurs.
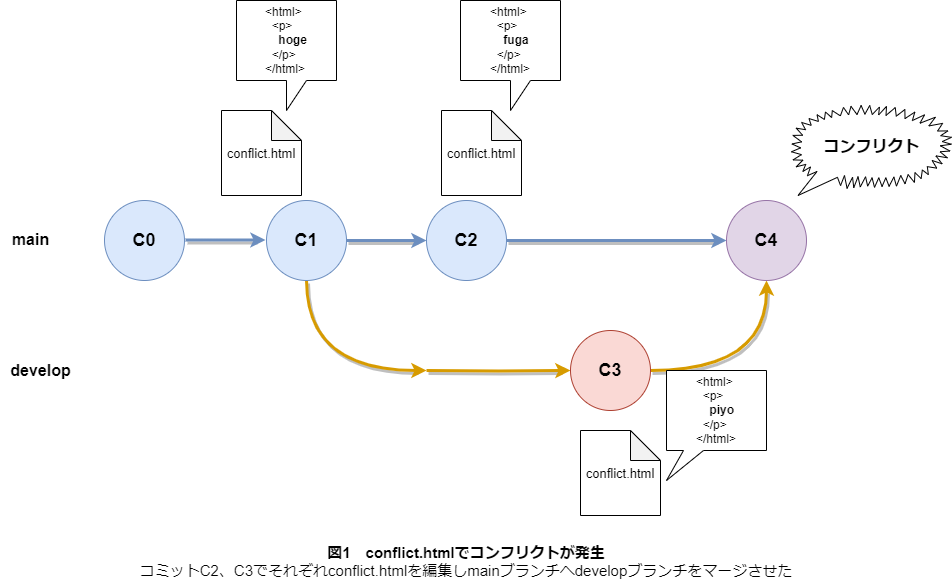
As an example, let's consider a conflict occurring in conflict.html when merging the develop branch into the main branch.
If conflict.html is edited separately in the main and develop branches as shown in Figure 1, and the develop branch is merged into the main branch, a conflict occurs in conflict.html (Figure 1).
When you run the git merge command, if a conflict occurs, the merge is interrupted, and you are told to resolve the conflict and commit the result.
$ git switch main
…
$ git merge develop
Auto-merging conflict.html
CONFLICT (content): Merge conflict in conflict.html
Automatic merge failed; fix conflicts and then commit the result.
When a conflict occurs, Git inserts conflict markers into the conflicted file to indicate where the conflict is.
$ cat conflict.html
<html>
    <p>
<<<<<<< HEAD
        fuga
=======
        piyo
>>>>>>> develop
    </p>
</html>
The symbols like <<<<<<< and ======= in conflict.html are conflict markers.
HEAD is a ref (reference) in Git, which allows you to refer to a commit using an alias instead of a hash value.
HEAD refers to the latest commit of the current branch[2].
Therefore, the conflict marker indicates, "In the current branch (the one being merged into), it's 'fuga', and in the develop branch (the one being merged), it's 'piyo', so please fix this."
After resolving the conflicting parts and removing the conflict markers, commit the result to complete the conflict resolution.
When you run the git status command to display the state of the working directory and index while a conflict is occurring,
$ git status
On branch main
Your branch is up to date with 'origin/main'.

You have unmerged paths.
  (fix conflicts and run "git commit")
  (use "git merge --abort" to abort the merge)

Unmerged paths:
  (use "git add <file>..." to mark resolution)
        both modified:   conflict.html

no changes added to commit (use "git add" and/or "git commit -a")
it shows the conflicted files under Unmerged paths, indicating that there are unmerged files.
Git determines whether a file is unmerged by comparing three versions when the git merge command is executed to create a single commit that integrates them[3].
- The version in the common ancestor commit where the main and develop branches diverged. The merge base. (Commit c1 in Figure 1)
- The version in the HEAD commit of the current branch, which is the target of the merge. The ours version. (Commit c2 in Figure 1)
- The version in the commit being merged into the current branch (managed by .git/MERGE_HEAD and referred to by the git ref
MERGE_HEAD). The theirs version. (Commit c3 in Figure 1)
When a conflict occurs in conflict.html, the integration of the above three versions fails, and conflict.html in the index is split into three versions.
$ git ls-files -u
100644 102d11e6ef0dcd75574db478be9c8e7d9c736ded 1       conflict.html
100644 d264e8299b49c5d3700adc1eaaeb37728b78edce 2       conflict.html
100644 5787296473b24fc630c26de42f14d9647dbc5982 3       conflict.html
The git ls-files command displays the files in the index, and the -u option displays the unmerged files in the index.
Three versions of conflict.html with different SHA-1 hash values are displayed, numbered 1, 2, and 3, corresponding to the merge base, HEAD, and MERGE_HEAD versions, respectively.
Git determines this state as unmerged, and after resolving the conflicts in conflict.html and staging it with git add,
$ git ls-files -s
100644 5787296473b24fc630c26de42f14d9647dbc5982 0       conflict.html
…
$ git status
On branch main
Your branch is up to date with 'origin/main'.

All conflicts fixed but you are still merging.
  (use "git commit" to conclude merge)

Changes to be committed:
        modified:   conflict.html
the index's conflict.html becomes a single version with a 0 number, and git status indicates that the conflicts are resolved but the merge is still in progress, so you need to commit.
As the output of the status command before git add indicates, use "git add <file>..." to mark resolution, Git considers the conflict resolved when the file is added with git add, so be careful not to add a file with conflict markers left.
You can use the git diff --check command to check if there are any conflict markers left.
Finally, by running git commit, the merge interruption state is cleared, and by pushing with git push, the conflict resolution and merge work are completed.
(Reference: git merge explanation_Simpline Blog)
"I Merged to the Main Branch but Want to Undo It..."
#This is the third panic situation.
After merging the development branch into the main branch, you might find a bug and want to revert to the state before the merge! There are times when you might think that.
When you want to revert the state of a branch after a merge is completed to the state before the merge, you can use the reset command and the revert command.
reset Command
#$ git reset --hard ORIG_HEAD
…
The reset command overwrites the state of the specified commit to the HEAD and the working directory. ORIG_HEAD is a commit managed by .git/ORIG_HEAD and refers to the commit that was the previous HEAD when a command that moves the HEAD is used. Therefore, by specifying the commit as ORIG_HEAD, you can revert the HEAD and the working directory to the state before the merge. The --hard option forcibly overwrites the working directory even if there are files currently being edited[4].
revert Command
#On the other hand, the revert command cancels a commit by adding a new commit that negates the changes of the specified commit.
$ git revert <commit-ID>
…
The revert command can also cancel merge commits, so you can undo a merge just like with the reset command.
$ git revert -m 1 <commit-ID>
…
When reverting a merge commit, use the -m option (short for --mainline). The number after -m is the parent-number, and since a merge commit has two parent commits, you specify whether to revert to the state of parent 1 or parent 2.
1 refers to the commit on the side that performed the merge, and 2 refers to the commit on the side that was merged.
If you want to check which parent commit to revert to,
$ git show <commit-ID>
commit commit-ID
Merge: parent-commit1 parent-commit2
you can check the parent commits with the git show command as shown above, and if you want to choose parent commit 1, specify 1 for parent-number.
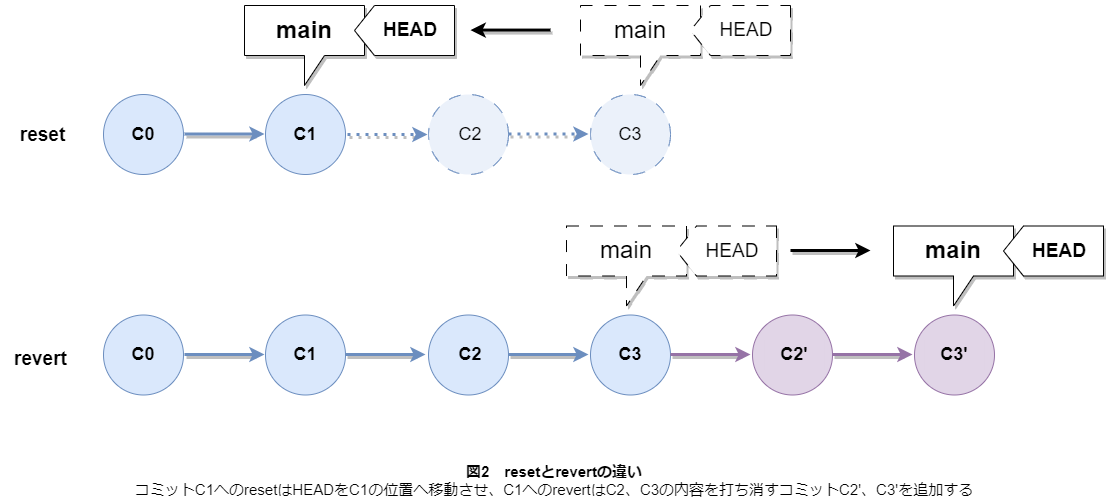
Difference Between reset and revert
#The difference between the reset and revert commands is whether the history of "reverting" remains. The revert command leaves the correction as a commit log, while the reset command resets the HEAD to the specified commit state, and the correction does not remain in the log.
Therefore, when developing with multiple people, using the reset command might cause conflicts with other developers, or the state of the remote repository might not match, requiring a forced push with git push -f[5].
When developing with multiple people, it is safer to use the revert command rather than the reset command.
If the merge work is not completely finished, and you want to abort the merge during conflict resolution, you can use the --abort option of the merge command to interrupt the merge process.
$ git merge --abort
…
This command can be used in the merge interruption state, which specifically refers to the state where .git/MERGE_HEAD exists.
When you resolve the conflict and finally run git commit, the merge is considered complete, and .git/MERGE_HEAD is deleted, so you can use this command before committing.
This command can revert the state of the working directory and index to the state before running git merge.
Conclusion
#The commands introduced this time can be tried on the site " Learn Git Branching", where you can learn the basic command-line operations of Git. This site allows you to visually learn the state of branches through tasks, making it recommended for beginners learning Git.
Also, to prevent careless mistakes with Git, it might be effective to use Git hooks (Git Hooks). This allows you to set scripts to run during push or commit, such as prohibiting direct pushes to the main branch or preventing commits with conflict markers.
I hope this article helps reduce the panic when operating Git.
The
popcommand reflects the stash in the working directory and removes it from the stash stack. If you don't want to remove it from the stash stack, you can usegit stash applyto only reflect the stash in the working directory and then usegit stash dropto remove it from the stash stack. ↩︎In the root directory of the project, a
.gitdirectory is created to store Git metadata when initializing a local repository. Generally, git refs are managed under.git/refs, but some refs are specially managed directly under.git.HEADis one of those special refs and is managed under.git/HEAD. ↩︎This is the common case where a recursive three-way merge is performed. ↩︎
The reset command has other options such as
--softand--mixed. They are used depending on how much of the local state you want to keep while overwriting. ↩︎The saying "A man silently uses
git push -f" is a lie. When using the-foption, use the safer--force-with-leaseor--force-if-includesoptions instead (Making git push -f safer --force-if-includes_id:onk's Hatena Blog). ↩︎