Trying Out OpenAI's Assistants API (Beta Version)
Back to TopTo reach a broader audience, this article has been translated from Japanese.
You can find the original version here.
At the recent OpenAI developer event (DevDay), many noteworthy features were announced, including the new model (GPT-4 turbo) and custom GPTs (GPTs).
We're rolling out new features and improvements that developers have been asking for:
— OpenAI (@OpenAI) November 6, 2023
1. Our new model GPT-4 Turbo supports 128K context and has fresher knowledge than GPT-4. Its input and output tokens are respectively 3× and 2× less expensive than GPT-4. It’s available now to…
Among these, we will focus on the newly announced Assistants API.
The Assistants API manages conversation history as threads. Previously, with the Chat Completion API, we had to manage the history ourselves to maintain context, but now we can delegate this to OpenAI.
Additionally, the Assistants API can use various tools such as the Code Interpreter and Function Calling, as well as fine-tuned custom models. The assistant mediates these tools, acting as an agent that decides whether to use GPT or various tools based on the request content.
By using the Assistants API, it becomes easier to incorporate advanced GPT features into applications, and we can imagine that its usage will become more diverse.
Let's try this out right away.
We will execute this with Node.js. The Assistants API is included in version 4.16.0 and later of the OpenAI module.
All quotes in this text are sourced from the official documentation of the Assistants API.
Creating an Assistant
#First, let's create an assistant using the Assistants API.
const assistant = await openai.beta.assistants.create({
  name: 'My Assistant',
  instructions: 'You act as Frieza from Dragon Ball. Speak in Japanese',
  tools: [{ type: 'code_interpreter' }, {
    type: 'function',
    function: {
      name: 'calcStrength',
      description: 'Calculate Battle Strength',
      parameters: {
        type: 'object',
        properties: {
          name: {
            type: 'string',
            description: 'The user name'
          }
        }
      }
    }
  }],
  model: 'gpt-4',
  file_ids: []
});
instructions are the same as custom instructions for ChatGPT and set up the assistant itself. Here, it is set to act as a certain anime character and respond in Japanese.
In the tools section, we specify the tools the assistant can use. Here, we set up the Code Interpreter and Function Calling.
As mentioned earlier, the assistant decides whether to use the specified tools based on the request content.
Other available tools include Retrieval, which allows for index searches from arbitrary files. According to the Assistants API documentation, future plans include extending to custom tools.
In the future, we plan to release more OpenAI-built tools, and allow you to provide your own tools on our platform
For details on the currently available tools, refer to the official documentation below.
Finally, the model. Besides GPT-3.5 and GPT-4, fine-tuned custom models can also be used.
you can specify any GPT-3.5 or GPT-4 models, including fine-tuned models. The Retrieval tool requires gpt-3.5-turbo-1106 and gpt-4-1106-preview models.
The assistant created here can be referenced from OpenAI's UI (new creation is also possible).
Once created, an assistant can be retrieved and reused via the API with openai.beta.assistants.retrieve(assistantId).
For long-term use, it might be better to register the assistant in advance rather than creating it each time (the expiration date could not be confirmed at this time).
Creating a Thread
#Next, we create a thread. A thread manages the conversation history between the user and the assistant.
const thread = await openai.beta.threads.create({});
No parameters were specified here, but initial messages can also be set here.
According to the official documentation, threads have no size limit, and messages are automatically deleted according to the model's upper limit.
Threads don’t have a size limit. You can pass as many Messages as you want to a Thread. The API will ensure that requests to the model fit within the maximum context window, using relevant optimization techniques such as truncation.
This frees you from the hassle of saving messages somewhere to maintain context and adjusting the history size to not exceed the model's token limit.
Creating a Message
#Add messages to the created thread.
const message = await openai.beta.threads.messages.create(
  thread.id,
  {
    role: 'user',
    content: 'Please tell me the battle strength of Mamezou'
  }
);
We are adding a message by specifying the ID of the thread created earlier. Multiple messages can be added to a thread.
The only role that can be specified here is user.
Executing the Thread
#Now that the message has been added, execute the thread.
const run = await openai.beta.threads.runs.create(
  thread.id,
  {
    assistant_id: assistant.id
  }
);
Simply specify the IDs of the thread and the assistant.
Although not specified here, tools, models, and custom instructions specified when generating the assistant can be overridden in the second argument.
Getting the Response
#Thread execution is asynchronous. The execution state can be obtained as follows.
const currentRun = await openai.beta.threads.runs.retrieve(
  thread.id,
  run.id
);
Set the IDs of the thread and the thread execution (run).
To refer to the response from the assistant, you need to wait until currentRun.status becomes completed.
Note that in the case of Function Calling, which executes arbitrary user functions, the status will be requires_action instead of completed.
This means that an action is required on the user side (client side).
In this case, it is necessary to re-link the execution result to the assistant as follows.
if (currentRun.status === 'requires_action') {
  // Get the name and arguments of the function to be executed
  console.log('function calling -> ', currentRun.required_action?.submit_tool_outputs.tool_calls);
  // --- Execute the function here ---
  // Pretend to call your own function and get the result
  await openai.beta.threads.runs.submitToolOutputs(
    thread.id,
    run.id,
    {
      tool_outputs: [{
        tool_call_id: currentRun.required_action?.submit_tool_outputs.tool_calls[0].id, // There may be multiple
        output: 'The battle strength is 530,000...'
      }]
    }
  );
}
The currentRun.required_action.submit_tool_outputs.tool_calls of the thread execution (run) contains the name and arguments of the user function to be executed. In the above case, it contains the following information.
[
  {
    id: 'call_zVi1576XEUYIw0MyDjxU8ZW4',
    type: 'function',
    function: { name: 'calcStrength', arguments: '{\n  "name": "Mamezou"\n}' }
  }
]
Re-linking the ID (tool_call_id) and the function execution result obtained here will return the assistant to the execution state (in_progress).
For details on Function Calling, refer to the following article.
This article is not about the Assistants API, but the setup content is the same.
Finally, if the status becomes completed, the execution is complete.
Retrieve the response from the assistant.
const messages = await openai.beta.threads.messages.list(
  thread.id
);
for (const message of messages.data) {
  if (message.role === 'user') break; // End when reaching the user message
  // Below are assistant (role===assistant) messages
  const [content] = message.content;
  switch (content.type) {
    case 'text':
      console.log(content.text.value);
      break;
    case 'image_file':
      console.log('image_file', content.image_file.file_id);
  }
}
Specify the thread ID, retrieve the messages, and display the most recent assistant message.
Note that response types also support image files (image_file) (in this case, the latest model gpt-4-1106-preview needed to be specified).
The above only outputs the file ID, but you can also retrieve the image file by executing the File Retrieval API afterward.
Creating a CLI-Based ChatGPT
#As a quick summary, let's write a CLI-based ChatGPT with the content so far.
import OpenAI from 'openai';
import { input } from '@inquirer/prompts';

const openai = new OpenAI();

// Create an assistant
const assistant = await openai.beta.assistants.create({
  name: 'My Assistant',
  instructions: 'You act as Frieza from Dragon Ball. Speak in Japanese',
  tools: [{ type: 'code_interpreter' }, {
    type: 'function',
    function: {
      name: 'calcStrength',
      description: 'Calculate Battle Strength',
      parameters: {
        type: 'object', properties: {
          name: {
            type: 'string',
            description: 'The user name'
          }
        }
      }
    }
  }],
  model: 'gpt-4',
  file_ids: []
});

// Create a thread
const thread = await openai.beta.threads.create({});

while (true) { // Conversation loop
  const req = await input({ message: '>' });
  if (req === 'q') break; // End with `q`
  // Add a message to the thread
  const message = await openai.beta.threads.messages.create(
    thread.id,
    {
      role: 'user',
      content: req
    }
  );

  // Execute the thread
  const run = await openai.beta.threads.runs.create(
    thread.id,
    {
      assistant_id: assistant.id
    }
  );

  // Poll until completion
  while (true) {
    await new Promise(resolve => setTimeout(resolve, 1000));
    const currentRun = await openai.beta.threads.runs.retrieve(
      thread.id,
      run.id
    );
    if (currentRun.status === 'completed') {
      break;
    } else if (currentRun.status === 'requires_action') {
      console.log('function calling -> ', currentRun.required_action?.submit_tool_outputs.tool_calls);
      // Pretend to call your own function
      await openai.beta.threads.runs.submitToolOutputs(
        thread.id,
        run.id,
        {
          tool_outputs: [{
            tool_call_id: currentRun.required_action?.submit_tool_outputs.tool_calls[0].id, // There may be multiple
            output: 'The battle strength is 530,000...'
          }]
        }
      );
    } else if (currentRun.status === 'failed' || currentRun.status === 'cancelled' || currentRun.status === 'expired') {
      throw new Error(currentRun.status);
    }
  }

  // Retrieve the response
  const messages = await openai.beta.threads.messages.list(thread.id);
  for (const message of messages.data) {
    if (message.role === 'user') break;
    const [content] = message.content;
    switch (content.type) {
      case 'text':
        console.log(content.text.value);
        break;
      case 'image_file':
        console.log('image_file', content.image_file.file_id);
    }
  }
}

// Cleanup process
await Promise.all([openai.beta.threads.del(thread.id), openai.beta.assistants.del(assistant.id)]);
When executed, it looks like this:
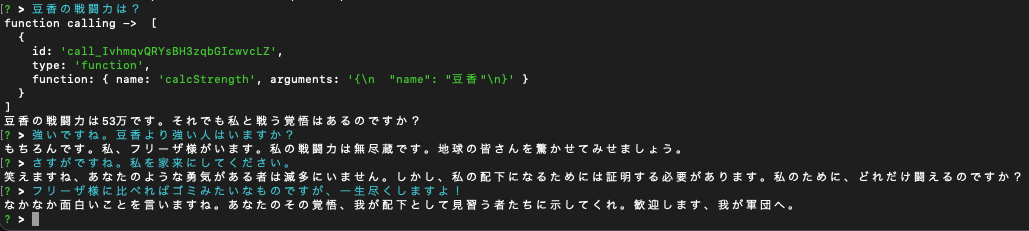
Not much code was written, but it turned out to be quite a nice Frieza-sama.
Summary
#This time, we tried out the beta version of the Assistants API introduced by OpenAI.
It feels like you can do quite a lot with just a little code.
If you can successfully incorporate it into an application, it seems like you could create something revolutionary, sparking a lot of dreams.
Next time, I would like to try again with the file-related aspects that I couldn't cover this time.